Turkey Sweet Potato Chili
Turkey Sweet Potato Chili is a cozy, savory bowl that balances lean, browned turkey with tender, slightly sweet sweet potato, warm spices, and a tomato based broth. It’s perfect as an easy weeknight dinner or make ahead meal, offering hearty texture and approachable heat. Make a pot to enjoy now and for several days of flavorful leftovers.
Equipment
- Heavy frying pan
- Medium soup pot
Ingredients
- 2 T olive oil, divided Heat and flavor the pan while providing a cooking fat for browning and sautéing other ingredients; split use allows initial browning and finishing to prevent sticking. Adds a mild fruity note that complements the chili spices and keeps lean turkey moist. Choose extra-virgin for more flavor or regular olive oil for a neutral profile and higher smoke point.
- 1 1/2 lb s. lean ground turkey Brown and add lean protein while absorbing spices and aromatics; breaks into crumbles to form the chili's hearty base. Provides savory depth and a lower-fat option compared with beef, helping the dish feel substantial without heaviness. Cook until just browned to maintain tenderness and integrate with vegetables and liquids.
- 2 green peppers, seeds and stem removed and chopped Contribute crunch, color, and a bright vegetal sweetness while balancing the chili's warmth; chopped for even distribution throughout the pot. Soften during sauté to release moisture and meld with onions and garlic, enhancing overall texture. Adjust chop size to control bite and visual appeal in the finished chili.
- 1 small onion, chopped Add aromatic sweetness and savory depth when chopped and sautéed to form the flavor foundation; caramelization enhances natural sugars. Combine with peppers and garlic to create a balanced aromatic base that supports spices and tomato components. Monitor heat to avoid burning and to develop a rich, mellow flavor.
- 1 T minced garlic Introduce pungent, savory fragrance and umami-like complexity when minced and added early in cooking; releases volatile oils that boost overall flavor. Incorporate into the sauté with onions and peppers to ensure even distribution and avoid raw sharpness. Use fresh minced garlic for best aromatic impact.
- 1 T Spike Seasoning (optional, but recommended; see notes) Provide a balanced all-purpose seasoning blend that layers savory, salty, and herbal notes; recommended to enhance overall flavor profile though optional. Sprinkle during cooking to build complexity alongside chili powder and cumin, adjusting to taste. Consider starting with less and tasting before adding more to avoid over-salting.
- 1 T chili powder Impart classic chili warmth and depth with a blend of earthy, smoky, and mildly spicy flavors; measured to define the dish's chili character. Integrate into the sautéed aromatics and meat to toast the spice and unlock oils for maximum flavor. Adjust amount for desired heat level and regional style.
- 1 tsp . ground Ancho Chiles (or use more regular chili powder if you don’t have Ancho) Add smoky, mild heat and a fruity chile flavor that complements regular chili powder; ground Ancho provides complexity and richness. Use as an alternative or addition to standard chili powder to layer nuanced chile notes without overwhelming heat. Toast lightly with other spices to deepen aroma before adding liquids.
- 1 T ground cumin Contribute warm, earthy, and slightly citrusy notes that anchor the chili's spice profile; ground cumin enhances savory depth. Sprinkle into the cooking mixture early to bloom in oil, releasing essential oils and rounding other spices. Balance with acidity from tomatoes to prevent overpowering bitterness.
- two 4 oz. cans diced green chiles (Anaheim chiles, not jalapenos) Bring mild, roasted chile flavor and a touch of vegetal sweetness while adding a subtle heat without jalapeño intensity; diced green chiles add texture and brightness. Stir into the chili to distribute soft, tender pieces that complement tomatoes and sweet potato. Drain or include juices based on desired moisture and flavor concentration.
- one 14.5 oz. can petite diced tomatoes Provide bright acidity, tomato-sweetness, and chunky texture to form the sauce base; petite diced tomatoes break down while still adding body. Combine with tomato sauce and spices to create a balanced, savory-tangy backbone for the chili. Choose canned tomatoes with no added sugar for a cleaner flavor.
- one 8 oz. can tomato sauce Offer smooth tomato richness and concentrated umami to thicken and unify the chili base; tomato sauce helps bind ingredients. Add along with diced tomatoes and broth to achieve a cohesive sauce consistency and deeper tomato flavor. Adjust quantity to control thickness and sauciness of the finished chili.
- two 14 ounce cans beef broth (see notes) Supply a savory, beefy liquid base and extra depth when added to the chili; using canned broth provides consistent seasoning and richness. Combine with tomatoes and spices to simmer the chili, infusing the sweet potato and turkey with layered flavors. Substitute or dilute cautiously to maintain intended flavor balance.
- 1 large sweet potato, diced into cubes (see notes) Introduce natural sweetness, body, and a creamy texture when diced into cubes and cooked until tender; sweet potato balances spicy and acidic elements. Add to the pot to absorb flavors and release starches that help thicken the chili, contributing hearty mouthfeel. Cut into uniform cubes to ensure even cooking throughout the simmer.
- 1 T Green Tabasco Sauce (or more, to taste) Provide bright vinegar-based heat and tang that lifts flavors and adds a spicy finish; Green Tabasco contributes a vinegary, peppery kick. Stir in toward the end of cooking to adjust acidity and heat to taste, enhancing overall balance without overwhelming other spices. Add gradually and taste to reach desired warmth.
- salt and fresh ground pepper to taste Enhance and balance flavors by controlling seasoning levels and adjusting taste; use to highlight spices and savory notes without masking other ingredients. Add salt and freshly ground pepper progressively while simmering, tasting often to reach a well-rounded final profile. Keep conservative initially, as broths and seasonings may already contribute sodium.
Instructions
- Heat 1 T olive oil in a heavy frying pan, add ground turkey, and cook over medium-high heat until the turkey is well-browned and all liquid has evaporated.: You will smell a rich, meaty aroma as the surface of the ground turkey caramelizes, and you should see small browned bits forming that signal proper maillard development, which gives the chili its deep savory backbone. Listen for a gentle sizzle rather than a roar; that controlled sound means the pan is hot enough to brown without burning. Visually, the turkey will change from pink to golden brown and any released moisture will steam away, leaving the meat dry around the edges. Achieving dryness is important because excess liquid will dilute the flavors in the pot later. One common mistake is crowding the pan, which causes steaming rather than browning; if that happens, brown the meat in batches so it can properly caramelize. Keep an eye on color, and if tiny black specks appear, lower the heat since that means burning has begun.
- Put the browned turkey into a medium-sized soup pot.: When you transfer the browned meat to the soup pot you’ll start layering flavors in one vessel where the chili will finish. The transfer preserves those fond bits from the frying pan, which you can later deglaze to capture more flavor. The pot should be large enough that when liquids and vegetables are added there’s room for simmering without spilling. A mistake to avoid is adding the meat to a pot that is too small, which makes stirring difficult and can lead to uneven cooking. As you move the meat, notice that the pot already smells richer, a cue that the base flavor is set.
- Add the other T of olive oil to the frying pan, add the chopped green pepper and chopped onion, and saute about 3-4 minutes over medium heat.: You will hear a light sizzle as the diced green pepper and chopped onion hit the oil, and within minutes the mixture will soften and become translucent, releasing sweet, fragrant notes. Stir occasionally so the pieces cook evenly and avoid browning them too darkly at this stage; you want softened aromatics that still have texture. This step extracts natural sugars and mellows pungency, which balances the spice blend later. A common slip is rushing this step on too high heat, which can char the vegetables and add a bitter aftertaste, so maintain moderate heat and watch for translucence.
- Add the minced garlic, Spike Seasoning if using, chili powder, Ancho chile powder, and ground cumin and cook 1-2 minutes.: Once the aromatics are softened, the spices go in briefly to bloom in the warm oil, releasing essential oils that intensify flavor. The scent will shift from sweet onion to warm, toasty spice notes; this brief toasting is crucial because raw spices can taste flat if not heated. Stir constantly so the garlic does not brown too much and become bitter. If you smell a deep acrid note, you’ve gone too far, so lower the heat and remove from direct heat briefly. This technique unlocks the spice profile and ensures the chili tastes integrated rather than one dimensional.
- Add the pepper-onion-spices mixture to the soup pot.: Adding this fragrant mixture back into the pot with the browned ground turkey layers the aromatics directly into the simmering base, creating immediate depth. As the mixture falls into the pot you will notice an immediate lift in aroma, showing how these elements work together. Stir thoroughly so the spices coat the meat and vegetables, which helps the flavors distribute evenly as the chili simmers. Avoid adding everything on top without stirring, because that can create pockets of uneven seasoning.
- Then add the diced green chiles with juice, petite diced tomatoes, tomato sauce, and beef broth to the soup pot and start to simmer the chili on low.: When the canned goods and beef broth hit the pot you will see a deepening of color and hear a gentle rolling of bubbles as it begins to simmer. The juices from the diced green chiles introduce acid and mild heat, while the diced tomatoes and tomato sauce thicken and bind the spices. Simmering on low allows collagen and flavors to meld slowly, producing a cohesive broth. Avoid boiling vigorously as that can break down delicate sweetness and make the sweet potato disintegrate later. Stir occasionally and skim any excess fat or foam to keep the broth clear.
- While the chili simmers, peel the sweet potatoes and dice into pieces about 3/4 – 1 inches square.: The sound of the peeler and the tactile feel of the firm sweet potato remind you to aim for uniformity, which is key for even cooking. Cubes that are roughly 3 quarters to 1 inch will soften through the long simmer without turning to mush, giving you pleasant, toothsome bites throughout the chili. If the pieces are too small they will break down and make the pot starchy, while very large chunks may remain undercooked. A common oversight is uneven sizing, so take a moment to cut carefully for uniform doneness.
- Add sweet potatoes to the chili and simmer about an hour, adding a little water if it gets too thick.: As the sweet potato cooks, the aroma shifts to a cozy sweetness mingled with savory broth, and you’ll see the cubes transition from firm to tender. Simmering for about an hour allows the flavors to marry and the sweet potato to reach a creamy interior while keeping its shape. If the pot reduces too far and becomes gluey, add a splash of water or broth to restore a pleasant consistency. A pitfall is simmering uncovered at too high a heat, which accelerates reduction and can dry the chili; keep it at a gentle simmer and check texture periodically.
- Taste for seasoning and add Green Tabasco Sauce, salt, and fresh ground pepper to taste.: This final tasting moment is where the dish finds its voice; your palate will guide the amount of Green Tabasco Sauce , salt , and fresh ground pepper needed. Start modestly with the Tabasco and build until the heat and tang sit comfortably with the other flavors. Salt brightens and tightens everything, so add in small increments and taste between additions. Over salting is a common error, so proceed slowly and remember that the chili may concentrate further if reheated.
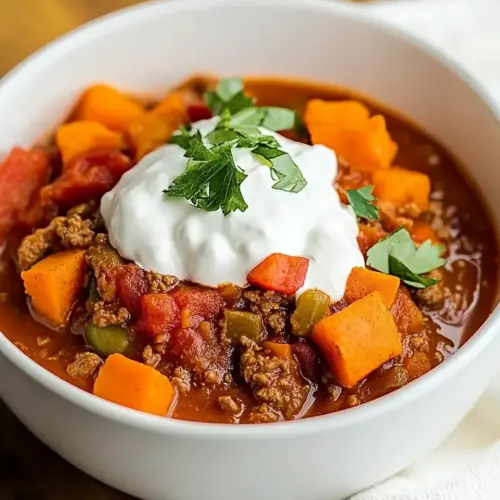
- Serve hot, with optional sour cream and cheese to add at the table if desired.: Serve straight from the pot while it is steaming, and let guests customize with optional toppings if they like. The steam will carry the aroma to the table and the textures will be at their peak. If you choose to include toppings at the table, keep them separate so people can personalize heat and creaminess. A mistake is adding creamy toppings directly into the pot too early, which can alter the texture and mask the base flavors.
- This will keep in the fridge for at least 4-5 days or can be frozen.: Once cooled, store in airtight containers and you’ll find leftovers that reheat well, with flavors that often deepen overnight. Freeze portions for longer storage, thawing slowly in the fridge before reheating gently on the stove. Reheating too aggressively can break down the sweet potato , so warm gently and stir to restore texture. The usual error is leaving hot food uncovered in the fridge, which can dry it or invite condensation, so cool it slightly before refrigerating.
Notes
- Adjust the heat: Add Green Tabasco Sauce at the end to control spice at the table, so everyone can tailor their bowl without altering the whole pot.
- Boost richness: Stir in a small spoonful of reserved pan juices or a splash of broth when reheating to restore depth if the leftovers seem slightly dry.
- Texture control: Keep sweet potato cubes toward the larger end of the recommended size if you prefer distinct bites, or dice smaller if you want them to mellow into the broth more.
- Make ahead strategy: Cook the chili fully, cool, and refrigerate overnight to let flavors marry, then reheat slowly for an effortless meal the next day.
- Serving flexibility: Offer optional toppings at the table so guests can personalize heat and creaminess without changing the base pot.