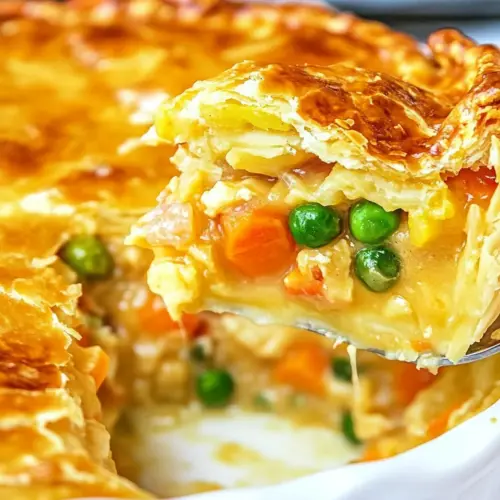
Turkey Pot Pie
Turkey Pot Pie is a creamy, savory classic that pairs flaky double crust with a rich gravy studded with turkey, potatoes, peas, and corn. This easy weeknight dinner is comforting and crowd friendly, perfect for using leftover holiday turkey. Make it for cozy family meals or a Thanksgiving remix that everyone will request again.
Equipment
- 9-inch pie plate
- Large Skillet
- Microwave-safe Bowl
- Rolling Pin
- Baking Sheet
Ingredients
- 3/4 cup potatoes, peeled and diced in 1/2-inch cubes* (See Notes) Provide diced potatoes that add body and a hearty, rustic texture to the filling; simmer briefly so they become tender but still hold shape in the pie. Enhance overall substance and soak up savory sauce, contributing a comforting bite to each serving.
- 1 tablespoon water Add a small amount of water to help steam and cook the potatoes gently during initial simmering; use sparingly to avoid thinning the sauce. Assist in deglazing the pan and preventing sticking while preserving concentrated flavors.
- 1/3 cup butter, salted or unsalted Contribute rich fat for sautéing vegetables and building a silky roux when combined with flour; use salted or unsalted based on desired seasoning control. Impart a buttery depth to the sauce and help achieve a smooth, glossy texture.
- 1/2 cup carrots, peeled and diced small Bring natural sweetness and slight firmness when diced small, providing color contrast and bite throughout the filling; cook until tender but not mushy. Complement savory components and balance the richness of the sauce.
- 1/3 cup white or yellow onion, diced Provide aromatic sharpness and subtle sweetness when diced, forming part of the flavor base with onions caramelizing to deepen taste. Release savory compounds during sautéing that underpin the pie's overall savory profile.
- 1/3 cup celery, diced small Offer mild, peppery flavor and pleasant crunch when diced small, contributing to the classic mirepoix trio that builds foundational flavor. Soften during cooking to meld with other vegetables while maintaining textural interest.
- 2 to 4 cloves garlic, finely minced Deliver pungent, aromatic intensity when finely minced, boosting savory complexity without overwhelming other flavors; adjust quantity to taste. Brighten and enliven the filling through fragrant heat released during sautéing.
- 1/3 cup all-purpose flour Thicken the sauce by creating a roux when combined with butter, producing body and stability for the filling; cook briefly to remove raw flour taste. Ensure a smooth, velvety gravy that coats vegetables and turkey evenly.
- 1 cup turkey or chicken broth, I use low-salt or no-salt added versions, may need to increase the salt quantity Provide savory liquid and depth, forming the base of the gravy and infusing meaty flavor; choose low-salt or no-salt versions to control seasoning. Combine with milk and roux to create a balanced, flavorful sauce for the filling.
- 1/2 teaspoon thyme**, See Notes Impart earthy, aromatic notes that complement poultry and vegetables; use dried thyme to add herbal nuance to the filling. Stir into the gravy early so its flavor infuses evenly throughout the sauce.
- 1/2 teaspoon salt, or to taste Season the filling to enhance and balance flavors; add gradually and taste to avoid over-salting, especially with low-sodium broth. Help bring out natural sweetness of vegetables and richness of the sauce.
- 1/2 teaspoon freshly ground black pepper, or to taste Provide sharpness and a warm, pungent counterpoint to the creamy sauce; freshly ground pepper brightens flavors and adds subtle heat. Grind to taste and adjust as needed after combining all components.
- 1 cup milk, 2% or whole recommended*** (See Notes) Contribute creaminess and slight sweetness, enriching the gravy and helping achieve a smooth, cohesive sauce; choose 2% or whole for best texture. Temper into the roux and broth mixture to prevent curdling and maintain silkiness.
- 1/2 cup peas, frozen or canned**** (See Notes) Add bursts of sweetness and a pop of color, contributing texture contrast with tender peas; use frozen or canned based on availability. Stir in near the end of cooking to retain vibrant color and pleasant bite.
- 1/2 cup corn, frozen or canned**** (See Notes) Bring additional natural sweetness and color with kernels that provide chew and visual appeal; frozen or canned options work well. Incorporate late in cooking so corn stays tender and retains a pleasant texture.
- 1 refrigerated double crust pie crust, (or homemade pie crust) Provide a convenient pre-made top and bottom crust for baking, sealing in steam and creating a flaky outer shell; press and crimp edges to seal the filling. Brown to golden for visual appeal and a crisp contrast to the creamy interior.
- 2 cups cooked turkey, shredded (chicken may be substituted) Supply the main protein and rich savory flavor when shredded, ensuring hearty, satisfying bites throughout the pie; chicken can be substituted if desired. Distribute evenly in the filling so each slice contains ample meat.
Instructions
- Preheat oven to 425 F and spray a 9-inch pie plate with cooking spray; set aside.: The oven should be fully hot so the pie crust begins to set the moment it enters, producing a crisper bottom and a golden top. You will notice the kitchen warming and the anticipation building. If you skip preheating the crust can turn soggy because the filling will release steam before the pastry begins to bake, so always wait for a full preheat.
- Peel and cube the potatoes, place them in a microwave-safe bowl, cover with 1 tablespoon water, cover the bowl with plastic wrap, and microwave on high for 5 minutes. Tip– This allows the potatoes to head start on cooking before placing them in the pie with the other ingredients which are faster cooking.: The potatoes should emerge steaming and slightly tender at the edges, with a faint starch scent that hints they are nearly done. This jump start shortens skillet simmer time and prevents uneven cooking in the pie. If they are still very firm, give them another minute in the microwave; avoid overcooking or they will dissolve in the filling.
- While the potatoes are microwaving, to a large skillet, add the butter, carrots, onion, celery, and sauté over medium-high heat for about 4 to 5 minutes, or until vegetables begin to soften; stir frequently.: You will hear a steady sizzle and see the onion turn translucent while the carrots and celery soften. This step builds a sweet, savory base that flavors the entire filling, and stirring prevents sticking and uneven browning. If your pan smokes, reduce the heat slightly, because burned butter will impart a bitter note.
- Add the garlic, stir to combine, and sauté for 1 minute or until fragrant; stir constantly.: The scent of garlic will bloom quickly into the air, brightening the sauté. Keep it moving so it turns fragrant without browning, which can bring a sharp, bitter edge. If you smell bitterness, you've likely overcooked the garlic ; remove the pan from heat briefly to cool and carry on.
- Evenly sprinkle the flour and cook for about 3 minutes, or until the flour is well toasted since it will combine with the butter to give a foundational level of flavor to the pot pie, meaning you want it browned a bit.: As the flour cooks, it will stop smelling raw and take on a warm, toasty aroma, forming the roux that thickens your gravy. Stir constantly to avoid lumps and to develop that slightly nutty flavor. If you still detect raw flour taste later, it means the roux needed more toasting time.
- Add the broth, microwaved potatoes (drain any excess water before adding them), thyme, salt, pepper, stir to combine, and allow the mixture to simmer over medium heat for about 10 minutes, or until the potatoes and carrots are tender.: When the broth hits the roux the mixture will bubble and thicken, releasing savory steam and deep aromas. The simmer softens the vegetables and integrates flavors. Keep an eye on bubbles, and stir occasionally to prevent the base from sticking. If the sauce is too thin after simmering, continue to reduce gently until the vegetables are tender and the liquid coats a spoon.
- Add the milk, peas, corn, and simmer over medium-low heat until the gravy thickens while you prepare the crust.: The addition of milk will soften the color and lend creaminess, while the peas and corn add sweetness and color. As it simmers you should see the gravy thicken to a glossy coat on a spoon, and hear a quieter simmer as the heat lowers. If the filling becomes too thick, loosen with a splash of extra broth or milk .
- Roll out the store bought or homemade pie crust to fit your 9-inch pie pan.: The dough should feel cool and slightly tacky, and rolling will produce a uniform thickness that bakes evenly. Use a light dusting of flour to prevent sticking, and turn the dough periodically to maintain an even circle. If the dough cracks, press it gently and chill briefly before finishing to avoid a broken crust.
- To place the crust in the pie pan use a lightly floured rolling pin and roll the pie crust onto the rolling pin, place over the 9 inch pie pan and unroll the rolling pin so that the crust is centered over the pie pan; set aside.: This method keeps the crust intact and centered, and you will feel the dough settle into the pan as you unroll. Make sure the edges are even for a tidy finish. If the crust slips, press it gently and refit, chilling briefly if it becomes too soft.
- Remove the skillet that’s been simmering from the heat and add the shredded leftover turkey, chicken, rotisserie chicken, etc. Stir to combine.: The residual heat will warm the turkey without overcooking it, and you will see the meat glisten as it absorbs the gravy. Stir gently to distribute the protein evenly so each slice has balance. If the turkey is dry, a touch more gravy or a splash of warm broth will revive it.
- Taste the mixture and if you think it needs more salt, pepper, thyme, etc. add it now, to taste.: This is the moment to balance flavors, and you should sample a spoonful warm to judge seasoning. Adjusting now ensures the finished pie is seasoned correctly after baking. If you oversalt, a squeeze of lemon or a few spoonfuls of unsalted milk can help mellow the saltiness.
- Gently spoon the mixture into the pie plate on top of the pie crust.: As you spoon the filling in, you will feel its weight settle into the shell and hear a quiet plop. Leave a bit of room under the rim so the top crust can seal without overflowing. If the filling is too full, it may bubble over during baking, so remove a couple of spoonfuls to avoid mess.
- Now you will prepare to place the top pie crust over the top but first cut out 4 to 5 small slits into the top of the pie dough with a sharp knife so the steam can be released as the pie cooks. A star-shape is what I did for this pot pie.: The slits should be neat and intentional, and when cut you will see steam vents that ensure even baking. Decorative vents also let steam escape so the filling does not push the crust off. If you skip vents, the pie may bubble and crack unpredictably.
- Place the top pie crust over the top and crimp the edges of the pie dough by pinching the top and bottom of the dough together between your fingers, and repeat all along the edges of the pie to seal. Tip– For good measure as a steam valve, prick the very center 5 or 8 times with the very tip of a sharp paring or small knife.: Proper sealing keeps the filling contained and creates a neat edge that browns evenly. You will see the edges come together and form a pleasing ridge. Poorly sealed edges can open while baking, so press firmly and chill if the dough becomes too soft.
- Place the pie dish on a baking sheet, and put the whole thing in the oven. Tip– The baking sheet will catch any bubble-overs that occur as the pie bakes so it doesn’t burn on the bottom of your oven (less potential cleanup for you).: The baking sheet is a small protective step that saves cleanup and prevents smoky oven aromas. Slide the sheet onto the middle rack and listen for the first, gentle crackle as the crust starts to bake. If you omit the sheet, a bubbling spill can caramelize on the oven floor and cause smoke.
- Bake for 35 to 40 minutes, or until the crust is golden brown, and the filling is bubbling (you will be able to see it because of the slits you made in the top crust). Check pie at 25 minutes and if it seems that the crust is browning too quickly, either drape a sheet of foil loosely over the top (tenting the pan) or carefully apply strips of foil around the edges of the crust only to shield it from browning.: Toward the end of baking you will hear the faint bubble and see the top turn a warm amber hue. This caramelization adds flavor and texture. If the edges brown too fast, shielding them prevents burning while the rest finishes. If the filling is not bubbling near the vents, bake a little longer, as that bubbling is a sign the center has come fully to temperature.
- Serve immediately. Pie will keep airtight in the fridge for up to 5 days and in the freezer for up to 3 months, noting that the crust of the leftovers will not be as flaky and light.: When you cut into the pie you should see glossy, steaming filling and a crisp crust. Letting it rest for five to ten minutes will make slicing cleaner, but warm serving delivers the best texture. If freezing, wrap tightly and reheat at moderate oven heat to revive the crust; microwaving will soften it.
Notes
- Swap the protein: If you are short on turkey, use shredded cooked chicken for a similarly savory result that keeps the texture and flavor profile intact.
- Use different vegetables: Swap or add diced turnip or parsnip if you want earthier notes, keeping sizes similar so everything cooks evenly.
- Make it richer: Stir in a splash of heavy cream or half and half at the end for an extra luxurious gravy, but beware this increases richness and may require less salt.
- Choose your crust: Use a store bought refrigerated crust for convenience, or make a butter based homemade crust for superior flakiness, chilling it well before baking.
- Adjust herb intensity: Increase the amount of thyme for a stronger herbaceous presence, or add a pinch of dried rosemary for a different woodsy note; fresh herbs always provide brighter flavor.
- Freeze for later: Assemble and freeze the unbaked pie for up to three months, then bake from frozen adding a bit of extra baking time until the center bubbles through the vents.