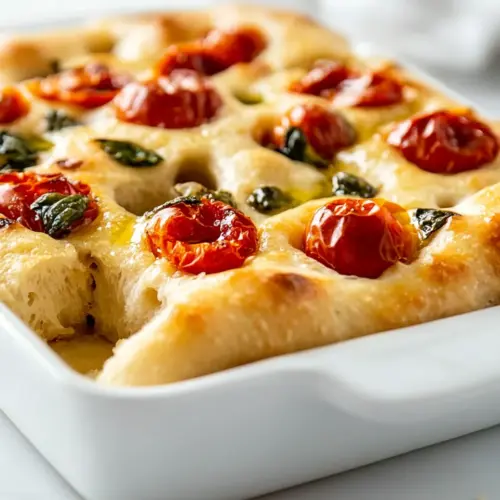
Tomato Basil Focaccia Bread
Tomato Basil Focaccia Bread is an airy, olive oil rich loaf topped with roasted cherry tomatoes, fresh basil, and creamy goat cheese. This easy, rustic bread delivers a crispy golden crust and tender interior, perfect for an easy weeknight dinner or a relaxed picnic. Make it for gatherings when you want simple, crowd pleasing flavor.
Equipment
- Stand mixer
- Bread hook
- Baking Sheet
- Parchment Paper
- Plastic Wrap
Ingredients
- 1/4 cup hot water Hydrate yeast by combining with other warm liquids so fermentation activates; provides moisture and temperature control to bloom the yeast for dough rise and helps dissolve sugar for consistent activation.
- 1 packet dry active yeast Activate fermentation and leavening by supplying yeast cells that convert sugars into carbon dioxide; ensures dough gains structure and rise during proofing and contributes subtle yeasty flavor complexity.
- 2 teaspoons granulated sugar or honey Feed yeast and balance dough fermentation rate by adding fermentable sugar or natural sweetness from honey; also aids browning of the crust and supports yeast activity for a reliable rise.
- 1 1/2 cup cold water Provide bulk hydration for the dough and help control dough temperature; chilling the water slows fermentation slightly and contributes to a more manageable dough handling and crumb development.
- 1/4 cup olive oil + extra for the bowl and pan Tenderize dough and add rich flavor and sheen by incorporating extra-virgin olive oil into the mix and using additional oil to coat the bowl and pan; oil improves crumb softness and prevents sticking while contributing characteristic olive notes.
- 2 teaspoons sea salt Enhance dough flavor and strengthen gluten structure by seasoning the dough; sea salt regulates yeast activity, improves taste, and helps develop the dough’s overall texture and crumb.
- 4 cups all-purpose flour Build the dough’s structure and provide the bulk of carbohydrates and proteins needed for gluten formation; all-purpose flour creates the framework that traps gas for rise and determines crumb texture when mixed and kneaded properly.
- 16 ounces grape or cherry tomatoes Add concentrated sweet-tart bursts and oven-roasted juiciness as a topping; grape or cherry tomatoes provide bright flavor, moisture, and attractive color that complements the herbs and cheese.
- 1 cup fresh basil leaves Introduce fresh aromatic herbal brightness when torn or chiffonaded over the dough; basil contributes a fragrant, peppery-sweet note that balances the tomatoes and oil.
- 2 ounces chevre goat cheese Contribute creamy tang and luxurious mouthfeel when dolloped or crumbled over the focaccia before or after baking; chevre adds a mellow, slightly acidic cheese flavor that pairs well with tomatoes and basil.
- Salt and pepper Season the finished focaccia to taste with salt and freshly ground pepper to enhance and balance all flavors; finishing with pinches adjusts final seasoning and elevates the overall profile.
Instructions
- Set out an electric stand mixer with a bread hook attachment. To the bowl, add the hot water and sugar. Swirl the bowl around to dissolve the sugar and lower the temperature of the water until it is just lukewarm. Now add one package of dry active yeast and swirl around. Allow the yeast to foam for at least 10 minutes.: You will notice the surface begin to bubble and form a foamy crown, a sign the yeast is active and ready. The aroma is slightly sweet and yeasty, and the texture should be frothy, not flat. This foam stage matters because it confirms the yeast is alive, which ensures a good rise later. If you see no foam after ten minutes, the yeast may be inactive, and it is better to start over with fresh yeast. Avoid using water that feels hot on your wrist, as excessive heat can kill the yeast and prevent any rise.
- Stir in the cold water, olive oil, and sea salt. Turn the mixer on low and add in the flour. Allow the bread hook to 'knead' the bread for at least 10 minutes.: As the mixer runs, listen for a consistent low hum and watch the dough change from shaggy to a loose, sticky cohesion. The dough will sound slightly sloshy and should cling lightly to the hook. The mix's temperature should feel lukewarm, which helps controlled fermentation. Proper kneading develops gluten, yielding structure that traps air, so this time is crucial. A common error is under kneading, which produces a dense loaf, or over kneading, which can make the crumb tight; aim for a tender, extensible dough rather than stiff.
- The dough should be very loose and sticky. Drizzle extra olive oil over the top of the bowl, cover tightly with plastic, and allow the dough to rise until double in size, 1 to 2 hours in a warm kitchen.: During this bulk rise you will see the dough swell and dome, the surface becoming puffy and airy. The scent will deepen to a slightly yeasty, olive oil rich bouquet. This stage gives the loaf its lift and flavor depth, and patience here improves crumb openness. A warm but not hot spot is ideal for rising; too cold and it will lag, too warm and the dough may overproof. If it collapses, it was likely left too long, so watch the volume rather than the clock.
- Meanwhile set out a large baking sheet and line with parchment paper. Once the dough has doubled in size, flour a clean work surface. Dump the dough out on the surface and knead/fold into a rectangle. Use a rolling pin (or stretch the dough by hand) into a large 14 x 10' oval or rectangle.: As you shape, you will feel the dough resist, then relax as gluten is gently stretched; this signals elasticity. The surface should be tacky but not sticking to your hands if you dust a little flour. How you shape affects crumb distribution and final height, so handle the dough with light touches to keep as much air as possible. Overhandling will degas the dough and lead to a tighter crumb, so lift and fold rather than pounding it.
- Move the dough to the prepared pan. Use your fingers to press deep dimples in the surface of the dough. Then poke basil leaves, goat cheese clumps, and cherry tomatoes down into the dimples.: Pressing dimples creates the classic focaccia texture, and you should feel the dough give under your fingertips, creating little wells. Nestle the toppings into those wells so they bake in place rather than sliding off. As the tomatoes roast, their sugars concentrate and mingle with the olive oil, making small juicy pockets. A typical misstep is pressing too hard, which can flatten the loaf, or not pressing enough, which leads to a smooth top without the characteristic texture.
- Gently brush the top of the dough with extra olive oil then cover with plastic wrap. Allow the dough to rise again for 1 hour. Either leave the surface of the focaccia alone and the tomatoes will bake near the top of the loaf, or right before baking, press the tomatoes back down into the dough to create little caverns for each tomato. This is completely a personal preference. It will bake well either way!: During the second rise you will notice the dough fill the pan more fully and the dimples soften but remain defined. Brushing with oil keeps the surface glossy and helps the crust brown evenly. If you prefer tomatoes peeking out, leave them higher, or press them deeper for more integrated pockets. Watch for overproofing here; a collapse indicates it rose too long and will bake with less oven spring.
- Preheat the oven to 400°F. Once the dough has risen a second time, uncover and sprinkle with salt and pepper. Bake for 25 to 30 minutes until the crust on top is golden and firm.: As the loaf bakes you will hear a gentle crackling as moisture exits and the crust forms a golden shell. The aroma becomes rich, olive oil forward, with roasted tomato sweetness and herb perfume. A golden top that gives a little when pressed signals doneness, while a pale top means it needs more time. Avoid opening the oven early and often, which can reduce oven spring. If the center seems underdone when the edges are browned, tent loosely with foil and give it a few more minutes.
Notes
- Respect the oil Use the recommended amount of olive oil and do not skimp, because it softens the crumb and enhances crust color, which is central to authentic focaccia texture.
- Freshness matters Check the date on your dry active yeast and confirm it foams in the warm water; inactive yeast is the most common cause of a failed rise.
- Tomato moisture Pat excess moisture from very juicy cherry tomatoes if needed to limit sogginess in the crumb, and position them in dimples so juices stay localized.
- Storage tip Cool the loaf fully, then wrap in plastic and store at room temperature for up to three days, or freeze for up to a month wrapped in foil and plastic.
- Serving prep Warm slices briefly in a hot oven or skillet before serving to revive crispness and enhance aroma.
- Adjusting salt If you use a particularly briny goat cheese, reduce the sprinkled salt on top to keep flavors balanced and avoid over salting.