Tomahawk Steaks
Tomahawk Steaks offer a dramatic, beef forward experience with a crisp seared crust and a tender, juicy interior. This easy weeknight dinner or special occasion recipe highlights robust seasoning and a silky herb lemon compound butter, creating a restaurant worthy steak at home. Perfect for warm evenings or celebrations, it encourages sharing and savoring each rich, flavorful bite.
Equipment
- Grill
- Meat probe thermometer
- Tongs
- Baking Sheet
Ingredients
- 2 Tomahawk steaks (2-3 pounds each/at least 2 1/2-inches thick) Season generously and help form a flavorful crust; salt draws out surface moisture to concentrate beef flavor and aids in creating a savory sear when grilling.
- 1 1/2 -2 1/2 tablespoons kosher salt (in directions) Enhance internal seasoning when applied before cooking; kosher salt's coarse grains dissolve during resting to evenly season the thick steak and improve texture.
- 1 1/2 teaspoons freshly cracked pepper Provide aromatic heat and a sharp, savory note; freshly cracked pepper adds bright spice to the crust and complements rich beef flavors when applied before or after cooking.
- 1 teaspoon garlic powder Add a subtle savory garlic undertone; garlic powder disperses easily to season the meat evenly without burning when used in rubs or finishing blends.
- vegetable oil for the grill Prevent sticking and promote even searing; a light coating of vegetable oil on grill grates and steak conducts heat and encourages uniform browning.
- 8 tablespoons unsalted butter, room temperature Enrich with silky richness and help baste during finishing; softened unsalted butter melts over hot steak to add moisture, mouthfeel, and a glossy finish.
- 1 teaspoon lemon zest (1 lemon) Brighten and lift heavy flavors with citrus oils; lemon zest contributes fragrant acidity that balances the steak's richness when mixed into compound butter or finishing.
- 1 TBS EACH fresh parsley, oregano, thyme (or 1 tsp EACH dried) Add fresh herbaceous complexity and aromatic depth; combining parsley, oregano, and thyme (or dried equivalents) creates a balanced herb profile for compound butter or finishing sauce.
- 1 tsp EACH paprika, garlic powder Impart smoky sweetness and additional garlic intensity; paprika and garlic powder boost color and layered savory flavor in rubs and finishing mixtures.
- 1/2 teaspoon onion powder, salt, pepper Provide background sweetness and balance seasoning intensity; onion powder with a bit of salt and pepper rounds out savory flavors and enhances overall taste harmony.
- 1/4 teaspoon cayenne pepper, or more to taste Introduce controlled heat and accentuate flavor; cayenne pepper adds spicy warmth that can be adjusted to taste to elevate the steak's finish or rub.
Instructions
- Take Note of Weight: Diamond Crystal Kosher Salt: Use approximately 1 teaspoon per pound of meat. Morton Kosher Salt: Use about 3/4 teaspoon per pound, because it's denser than Diamond Crystal.: Diamond Crystal Kosher Salt: Use approximately 1 teaspoon per pound of meat. Morton Kosher Salt: Use about 3/4 teaspoon per pound, because it's denser than Diamond Crystal. : Begin by feeling the heft of each steak and noting its weight, because salt quantity should be adjusted precisely. You'll notice a faint metallic, salty aroma as you measure, and that careful measure prevents over salting while ensuring deep seasoning. The why is simple, salt draws moisture to the surface and then reabsorbs to season the meat through and tenderize; misuse can leave the exterior overly salty or under seasoned. A common mistake is eyeballing salt instead of measuring relative to weight, which leads to uneven seasoning and a flat tasting steak.
- Season: Transfer the steaks to a baking rack or cutting board and pat dry with paper towels. Season the steaks on both sides with kosher salt (note amount per weight in Step 1), cracked pepper, and garlic powder. Press, don’t rub, the spices into the steaks.: Transfer the steaks to a baking rack or cutting board and pat dry with paper towels. Season the steaks on both sides with kosher salt (note amount per weight in Step 1), cracked pepper, and garlic powder. Press, don’t rub, the spices into the steaks. : After patting dry, you will feel the meat surface become tacky as the salt sits, which helps the pepper and garlic adhere and form a crust. Pressing rather than rubbing preserves the meat grain and avoids tearing, which keeps juices intact. This technique matters because a well formed crust seals flavor and provides textural contrast. The mistake to avoid is over handling, which can compress the meat and ruin the searing surface.
- Dry Brine: Time permitting, refrigerate, uncovered, for 4 to 48 hours. If you don’t have time, let the steaks rest at room temperature for 1-2 hours with the seasoning before cooking.: Time permitting, refrigerate, uncovered, for 4 to 48 hours. If you don’t have time, let the steaks rest at room temperature for 1-2 hours with the seasoning before cooking. : During a dry brine in the fridge you will notice the surface becoming firmer and slightly drier, which is perfect for a deep sear later. This step enhances tenderness and concentrates flavor by allowing salt to work slowly. If rushed, a shorter room temperature rest still helps but will not produce the exact same texture. Avoid leaving the steak out longer than recommended, which risks bacterial growth and uneven cooking.
- Make Cajun Butter: Meanwhile, mash the ingredients in a bowl until blended. Add the softened butter to a piece of plastic wrap and form into a log as you roll up the plastic wrap. Place in the refrigerator until firm until ready to use.: Meanwhile, mash the ingredients in a bowl until blended. Add the softened butter to a piece of plastic wrap and form into a log as you roll up the plastic wrap. Place in the refrigerator until firm until ready to use. : As you blend herbs and spices into the butter, you'll smell bright citrus, fresh herbs, and a warm paprika note. Chilling the butter into a log is practical because it lets you slice perfect rounds to melt over the steak. This matters because the cold butter melts slowly and creates glossy pools that finish each slice. One mistake is leaving the butter too soft when forming, which makes it messy and hard to portion later.
- Bring Steaks to Room Temperature: If the steaks have been dry-brined in the fridge, bring them to room temperature for 1-2 hours (2 hours is recommended).: If the steaks have been dry-brined in the fridge, bring them to room temperature for 1-2 hours (2 hours is recommended). : As the meat warms you will notice it relax and lose chill, which improves even cooking and better internal color. This step is important because cold meat into hot grill causes the exterior to overcook before the center reaches temperature. Avoid letting the steak sit at room temperature beyond 2 hours, which could risk food safety and a loss of texture.
- Prepare the Grill for Indirect Heat: Turn half the burners to approximately medium-high heat (you may need to reduce the heat later); don’t light the other burners. If your grill has three sections, turn on two of the three. The grill's internal temperature should be 375°F with the lid closed.: Turn half the burners to approximately medium high heat (you may need to reduce the heat later); don’t light the other burners. If your grill has three sections, turn on two of the three. The grill's internal temperature should be 375°F with the lid closed. : You will feel a burst of warmed air and smell the faint metallic scent of heated grates, and creating an indirect zone allows the interior to cook gently while the sear zone is reserved for finishing. This technique prevents the exterior from charring too fast, preserving a tender interior. A common error is not testing the grill temperature, which leads to inconsistent cooking and blown timelines.
- Reverse Sear the Steaks: Clean and then grease the entire grill with vegetable or canola oil (use tongs to avoid burning yourself). Place the steaks on the grill over the indirect heat/unlit side, with the bone side facing the heat. Insert your meat probe, cover, and cook to an internal temperature of 115°F at the thickest part, flipping once around 90°F. For 2 1/2-inch thick steaks, this takes about 10-15 minutes per side; for thicker steaks, it will take closer to 20-30 minutes per side; for thinner steaks, it can take half the time. However, every grill and steak is different, so monitor closely!!! (Note: 115°F is if you’re cooking a medium-rare steak. For rare, cook only to 110°F and sear to 115°F.: Clean and then grease the entire grill with vegetable or canola oil (use tongs to avoid burning yourself). Place the steaks on the grill over the indirect heat/unlit side, with the bone side facing the heat. Insert your meat probe, cover, and cook to an internal temperature of 115°F at the thickest part, flipping once around 90°F. For 2 1/2-inch thick steaks, this takes about 10 to 15 minutes per side; for thicker steaks, it will take closer to 20 to 30 minutes per side; for thinner steaks, it can take half the time. However, every grill and steak is different, so monitor closely!!! (Note: 115°F is if you’re cooking a medium rare steak. For rare, cook only to 110°F and sear to 115°F. : While the steaks are on indirect heat you'll hear a gentle hiss rather than an aggressive sizzle; the meat slowly changes from purple to a warm brown rim as the interior gently rises in temperature. This slow approach produces even doneness and a tender texture because the muscle fibers relax gradually. Avoid continuously opening the lid to check temperature, which lengthens cooking time and leads to loss of heated air. Also, a frequent mistake is relying on time alone instead of internal temperature, which risks missing the desired doneness.
- High Heat Sear the Steaks: Using tongs, transfer the steaks to the direct heat. Sear, uncovered, flipping every 1-2 minutes until they reach the desired temperature, approximately 4 minutes. Remove the steaks at 125°F for medium-rare (recommended), 130°F for medium, or 140°F for medium-well.: Using tongs, transfer the steaks to the direct heat. Sear, uncovered, flipping every 1 to 2 minutes until they reach the desired temperature, approximately 4 minutes. Remove the steaks at 125°F for medium rare (recommended), 130°F for medium, or 140°F for medium well. : On direct heat you'll hear loud sizzling and smell a rich, nutty aroma as the crust forms; the exterior develops a deeply caramelized color that contrasts with the rosy interior. Rapid searing locks in juices and creates flavor via the Maillard reaction, which is essential for steak complexity. Avoid overcrowding the grill or leaving the steak in one place too long, which causes charring rather than a controlled crust.
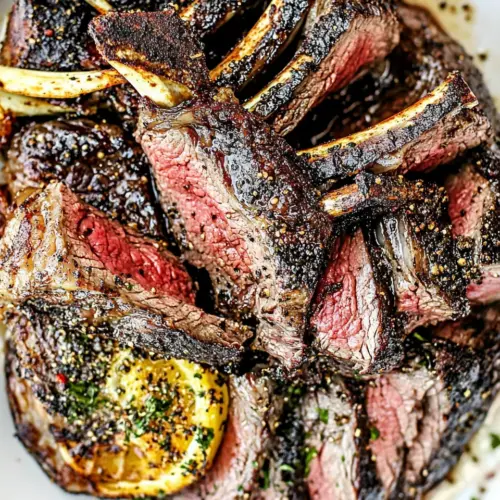
- Rest and Serve: Transfer the steaks to a large cutting board. Place several rounds of compound butter over the top to cover and melt. Let the steaks rest for 10 minutes before slicing.: Transfer the steaks to a large cutting board. Place several rounds of compound butter over the top to cover and melt. Let the steaks rest for 10 minutes before slicing. : As the steaks rest you will notice butter melting into the meat and juices redistributing, creating glossy, juicy slices. Resting is critical because it prevents those juices from running out when you carve, preserving succulence. A common mistake is slicing too soon, which leads to dry slices and lost flavor.
- Carve: Slice the bone away by running a sharp knife along the curve of the bone. Slice the steak into 1/2-3/4-inch slices. Serve with additional butter on the side.: Slice the bone away by running a sharp knife along the curve of the bone. Slice the steak into 1/2 to 3/4-inch slices. Serve with additional butter on the side. : When carving you should see clean, juicy slices with a tender pink center, and the knife should glide smoothly without tearing. Proper carving accentuates texture and makes for elegant plating. Avoid sawing aggressively, which bruises the meat and creates ragged pieces rather than neat, succulent slices.
- Prep: Heat the grill to high heat, clean, and grease with vegetable oil. Meanwhile, preheat the oven to 375°F. Line a baking sheet with foil for easy cleanup.: Heat the grill to high heat, clean, and grease with vegetable oil. Meanwhile, preheat the oven to 375°F. Line a baking sheet with foil for easy cleanup. : If you choose the sear then oven finish method, the hot grill provides a deep initial crust while the oven ensures even finishing. The oven adds gentle ambient heat so the center reaches the target temperature without additional charring. One mistake is skipping foil or a rack which can make cleanup much harder and allow hot drippings to smoke excessively.
- Sear: Sear the steaks on the grill for 3-4 minutes per side, until deeply golden and they easily release from the grill. Transfer to the prepared baking sheet.: Sear the steaks on the grill for 3 to 4 minutes per side, until deeply golden and they easily release from the grill. Transfer to the prepared baking sheet. : During the sear you will hear a satisfying release and smell that rich caramelized note; the steak develops a crisp, deeply colored crust that enhances texture. This stage matters as the sear builds the flavor base that the oven finish will preserve. A frequent error is moving the steak too soon before it forms a proper crust, which causes sticking and uneven sear marks.
- Bake: Bake at 375°F until the steaks reach an internal temperature of 125°F for medium-rare (recommended), 130°F for medium, or 140°F for medium-well. This should take around 30 minutes for a 2 1/2-inch thick steak. The cooking time will vary depending on the steak's thickness. If your steak is less than 2 1/2-inches, check early!: Bake at 375°F until the steaks reach an internal temperature of 125°F for medium rare (recommended), 130°F for medium, or 140°F for medium well. This should take around 30 minutes for a 2 1/2-inch thick steak. The cooking time will vary depending on the steak's thickness. If your steak is less than 2 1/2-inches, check early! : In the oven the steak will slowly climb to target temperature while the exterior holds its seared color, and the aromatic butter will begin to melt into the meat. This controlled finish ensures even doneness and a moist interior. The common pitfall is relying solely on time rather than probe temperature, which can result in over or undercooked meat.
Notes
- Swap herbs: Use the suggested parsley, oregano, and thyme combination, or choose a single dominant herb to create a simpler profile.
- Adjust heat: Increase or decrease the amount of cayenne in the compound butter to dial the spice level to your preference.
- Butter texture: Chill the composed butter until firm so you can slice even medallions that melt slowly over the steak.
- Salt timing: Dry brine up to 48 hours for deeper flavor, or salt just before cooking if you are short on time.
- Searing approach: Choose reverse sear for more control over internal doneness, or sear then oven finish for a faster method that still yields a great crust.