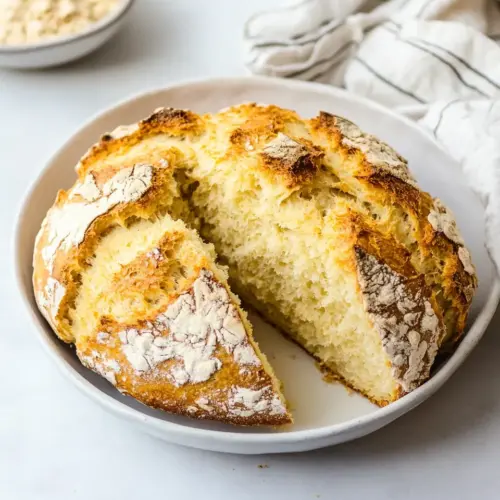
The Best Irish Soda Bread
The Best Irish Soda Bread is a quick, rustic loaf with a crunchy crust and tender, tangy crumb. This easy no yeast bread uses simple pantry staples like flour, baking soda, and buttermilk to create an approachable, flavorful loaf that works for breakfast or as a dinner side. Make it when you want warm, satisfying bread without long rises, perfect for an easy weeknight baking win.
Equipment
- Cast-Iron Skillet
- Mixing Bowls
- Rubber spatula
- Knife
Ingredients
- 4 cups all-purpose flour Provide structure and bulk to the loaf, creating the framework that traps gases during baking for a tender crumb; sift or whisk to remove lumps and ensure even mixing with dry ingredients.
- 2 teaspoons kosher salt Enhance flavor balance and control yeast-like reactions in quick breads, helping to strengthen gluten slightly and season the dough evenly; measure accurately for consistent results.
- 1 teaspoon baking soda React with acidic buttermilk to produce carbon dioxide, giving the bread its lift and open crumb; distribute evenly by sifting or mixing thoroughly with the flour.
- 1 tablespoon granulated sugar Add a touch of sweetness to round out savory flavors and promote a slight browning of the crust; dissolve into the dry mix for even flavor distribution.
- 1 and 3/4 cups buttermilk Provide acidity that activates the baking soda, contributing moisture and a tender, slightly tangy crumb; gently fold in to avoid overworking the dough while ensuring even hydration.
- 2 tablespoons melted butter Contribute richness, tenderizing the crumb and adding a subtle buttery flavor to the crust; incorporate melted form into wet ingredients to ensure uniform texture and moisture.
- 1 egg Bind ingredients together and add richness, improving structure and giving the loaf a softer, more cohesive crumb; beat lightly before adding to wet ingredients for even incorporation.
Instructions
- Preheat oven to 400 degrees F and butter a 10 inch cast iron skillet (or similar baking dish).: As the oven warms to 400 degrees F , you will notice the kitchen begin to heat and carry a dry warmth that readies the crust formation. Preparing a 10 inch cast iron skillet by rubbing it with butter ensures the loaf will release easily and develop a nicely crisp bottom. The hot skillet helps start crust development immediately on contact, creating contrast with the tender interior. A common mistake is skipping the butter or using too little, which can lead to the loaf sticking; be generous but not excessive. If you do not have cast iron, any ovenproof baking dish will work but the skillet helps conduct heat evenly and offers a deeper, rustic crust. Listen for a faint metallic hum as the oven elements cycle, and when the oven reaches temperature, the air will feel more stifling and ready to transform the dough.
- In one bowl, whisk together the flour, salt, baking soda and sugar.: The dry mix should look homogenous, a pale landscape of all purpose flour flecked with granules of granulated sugar and the fine dust of baking soda . Whisking aerates the flour slightly and distributes the kosher salt and leavening, which is crucial for even rise. You will notice a faint, dry scent of flour and a slight sparkle from the sugar. Avoid over measuring the all purpose flour by scooping directly with the cup; instead spoon into the cup and level for accurate texture. Clumping of baking soda is a sign to re whisk, as clumps can create uneven pockets of lift.
- In another bowl, whisk together the buttermilk, egg and melted butter.: Combine buttermilk , a beaten egg , and warmed but not hot melted butter into a glossy mixture. The aroma will be tangy and milky, and the liquid will shine from the fat. The egg helps emulsify the liquid, while the melted butter contributes richness. If the melted butter is too hot, it can scramble the egg , so let it cool slightly before whisking. A common error is adding very hot fat to the mixture, so if you notice any congealing, whisk vigorously to re combine.
- Pour liquid mixture into flour mixture. Use a rubber spatula to mix into a shaggy dough.: When you pour the wet into the dry, the bowl will release a faint hiss as the buttermilk meets the baking soda , and small bubbles may form. Use a flexible rubber spatula to fold and scrape, bringing the ingredients together into a rough, shaggy dough that looks uneven and a bit rustic. This stage is about gentle combining, not perfect smoothness; over mixing will tighten the crumb. A common mistake is to switch to vigorous kneading here; instead, limit your action to a few folds until the dough holds together with no large dry patches.
- If dough is sticky, sprinkle with a little flour, shape into a ball with your hands.: Touch the dough; it should be tacky but manageable. If it clings to your fingers, dust your hands and the surface with a little all purpose flour to shape it into a cohesive ball. The tactile feel is important—the dough should hold its shape without feeling dry. Press lightly with your fingertips to form a round loaf, avoiding heavy kneading. Over flouring here can dry the crumb, so add sparingly. A frequent slip is adding too much flour thinking it will make the dough neater; instead, aim for slightly tacky and shapable.
- Transfer dough ball to prepared skillet. Use a knife to score an X in the top of the bread loaf (this will help the center bake).: Place the shaped dough into the buttered cast iron skillet , patting gently to form an even round. With a sharp knife, make a confident X across the top; you will feel the blade glide through the surface, and the scored lines will open as the loaf expands in the oven. This classic mark does more than decorate, it gives the steam a place to escape so the center cooks through. If the cut is too shallow, the loaf may split unpredictably; if too deep, it can collapse slightly. Aim for a quarter inch to three eighths inch depth for even expansion.
- Bake for 35-40 minutes, until loaf is golden. To test for doneness, tap the bottom of the loaf – it should sound hollow. Allow to cool slightly before slicing.: As the loaf bakes, the kitchen fills with a nutty, toasty aroma and the crust will deepen to a warm golden brown. The sound of the oven cycles blends with a low popping from steam escaping the scored top. After about thirty five minutes start checking; a hollow thud when tapping the base signals a fully baked interior. The crust should be firm and crackly to the touch. Letting the bread rest for a short time makes slicing cleaner and preserves crumb texture. A common pitfall is slicing too quickly, which can cause a gummy center; patience yields cleaner slices and better texture.
Notes
- Adjust hydration carefully — If the dough feels stiff, add a tablespoon of buttermilk at a time until it becomes tacky; avoid adding too much which can make the loaf heavy.
- Enhance richness — For a slightly richer loaf, brush the top with a little additional melted butter just after baking to create a glossy, flavored crust.
- Control browning — If the crust is browning too quickly, tent the loaf loosely with foil during the last ten minutes of baking to prevent overcoloring while the center finishes.
- Fix a dry crumb — If your slices seem dry, slice and toast them lightly, then spread with softened butter to restore moisture and flavor.
- Make it portable — Cool completely before wrapping in parchment and a loose towel, this keeps crust texture intact while making the loaf easy to transport.