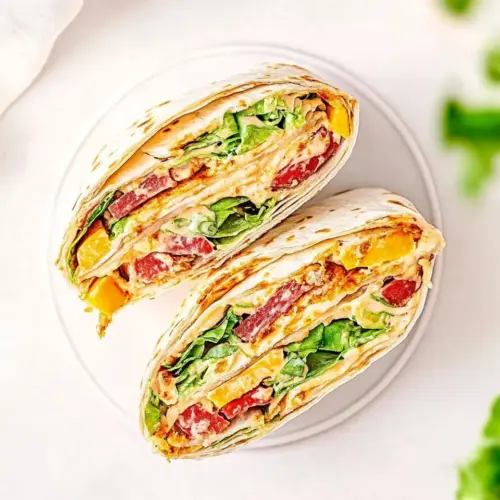
Thanksgiving Crunchwrap
Thanksgiving Crunchwrap turns leftover turkey, mashed potatoes, and stuffing into a crispy, melty handheld. This easy weeknight dinner style recipe is creamy, crunchy, and perfect for using up holiday extras. Serve warm with gravy for dipping and enjoy a crowd pleasing, comforting meal that makes leftover night feel festive and intentional.
Equipment
- nonstick skillet
- Cutting Board
- Spatula
Ingredients
- 5 large, burrito-size, flour tortillas Provide a large, flexible wrap to hold all fillings and fold into a handheld Crunchwrap; choose burrito-size flour tortillas for easy folding and even toasting. Support structural integrity while crisping edges to create a stable outer shell that keeps fillings contained. Allow soft interior ingredients to meld without tearing when folded and heated.
- 1 cup leftover mashed potatoes or mashed sweet potatoes Act as a creamy, comforting binder that provides moisture and a smooth texture between fillings; mashed potatoes or sweet potatoes add richness and body. Offer a neutral base that balances savory turkey and salty cheese while helping layers adhere. Contribute warm, cohesive mouthfeel when reheated, enhancing overall bite.
- 3/4 cup leftover cooked cut green beans or green bean casserole; divided Add tender vegetable texture and a bright, slightly savory contrast when using leftover cooked green beans or green bean casserole; divide and distribute for balanced bites. Provide vegetal color and fiber to lighten the richness of other components while maintaining recognizable holiday flavors. Help create pleasant textural variation between soft and crisp elements.
- 4 corn tostadas Provide a crisp, crunchy layer inside the wrap to mimic a tostada shell and add satisfying contrast to softer fillings. Maintain a distinct crunch that holds up against moist components when tucked in the center. Offer a textural anchor that prevents the wrap from becoming uniformly soft.
- 1 1/2 cups leftover roasted turkey, shredded; divided Supply savory, protein-rich meatiness and traditional holiday flavor when using shredded roasted turkey; divide among wraps to ensure even distribution. Contribute chew and depth that pairs well with potatoes, stuffing, and gravy. Provide familiar roast notes that carry the sandwich-like profile.
- 1/2 cup leftover cranberry sauce; divided Introduce bright, sweet-tart flavor contrast that cuts through savory richness; divide to achieve balanced pockets of cranberry throughout the wrap. Contribute moisture and a sticky element that helps layers adhere while providing bursts of acidity. Enhance overall flavor complexity with its fruity presence.
- 1 cup leftover stuffing; divided Bring seasoned, herby, and textural stuffing elements that add savory crumbly pockets throughout the Crunchwrap; divide for even layering. Contribute aromatic herbs and breadcrumbs that absorb some moisture while retaining slight chew. Balance softness with a subtly toasted grain texture when reheated.
- 4 sliced provolone cheese, Swiss, Munster, Monterey Jack, or Gouda may be substituted Provide melty, creamy, and slightly salty richness that binds hot ingredients and adds a smooth, cohesive layer; use provolone or selected substitutes for mild flavor. Contribute stretch and mouthfeel when heated, helping the wrap hold together and taste indulgent. Offer a mild dairy counterpoint to savory and sweet components.
- 1 cup leftover gravy, warmed for dipping; divided Serve as a warm, savory dipping sauce and moistening agent for reheated sandwiches; warm gravy enhances richness and ties flavors together. Provide additional moisture to prevent dryness and boost umami and comfort-food appeal. Allow controlled dipping or spooning for personalized sauciness.
Instructions
- Place 1 large tortilla on a cutting board and cut into four equal pieces; and set aside. You will use these as filler pieces later because without placing them on top of the mound of filling ingredients, your crunchwrap won't close all the way. Optionally, you can trim off the edges of each of the 4 filler pieces, so that they're pentagon-shaped, if you're so inclined. Refer to the blog post photos. This isn't necessary, but if you don't want excess tortilla, you can do it.: You will immediately notice the tactile difference between the whole tortilla and the trimmed filler pieces, which should feel flexible and not brittle. This step ensures you have the small filler pieces that will later cap the center and help the wrap close. A common mistake is cutting irregular pieces, which can make gaps when folding; try to keep each quadrant roughly equal so the top lays flat.
- Assembly– With the remaining 4 tortillas, you will build the crunchwraps. Assembling one at a time, start by laying a single tortilla on a flat surface.: As you lay a single tortilla flat, you should hear a slight rustle as it settles, and the surface will be ready to receive fillings without sliding. Doing one at a time helps you focus on balance, because overstuffing leads to tears when folding. Avoid piling too much in the center, which will make sealing difficult.
- In the center, place 1/4 cup mashed potatoes.: The spooned mashed potatoes should mound slightly in the middle and feel smooth and creamy. This component anchors moisture and gives a soft cushion for other layers. If it feels too runny, the wrap may be soggy; if it is too stiff, warm it briefly so it becomes spreadable.
- Next add 1/4 cup green beans over the top.: The green beans should be placed so they rest on the potato, adding a firmer texture and a fresh green color. You want bits visible when the crunchwrap is cut. If the beans are overly wet, blot them slightly, because excess liquid can cause the tortilla to become damp and fail to crisp.
- Add 1 tostada over the top.: When you place the tostada , you will hear a light crack as it seats into the mound, which is a good sign. The tostada must sit fairly flat to give a continuous crisp layer; cracked or overly broken tostadas will create weak spots. If a tostada breaks, tuck a small piece beneath to maintain structure.
- The over the top of the tostada, add 1/4 cup shredded turkey, 1/4 cup cranberry sauce, 1/4 cup stuffing.: The assembly now becomes a harmony of sweet, savory, and herbed notes. Spread the turkey evenly so each section has protein, dollop the cranberry sauce in a small layer to avoid runaway sweetness, and sprinkle the stuffing so it sits between wet and dry elements. A common error is piling the cranberry sauce in one spot, which leads to soggy pockets; distribute small spoonfuls instead.
- And top it with a slice of provolone cheese.: The cheese should cover the filling center and will begin to soften from the warmth of the fillings. Its melt is crucial because it acts like adhesive, holding components together when you fold. If the slice is too small, use two smaller slices overlapping to cover the exposed filling areas.
- Place one of the reserved flour tortilla filler pieces over the top.: This little disk sits above the cheese and helps the folds tuck underneath to create a sealed top. It will press slightly into the cheese and fillings, becoming an internal patch. Skipping this makes closure difficult and increases leakage when frying.
- Folding– Start with one side of the bottom tortilla and gently fold it inwards. Repeat as you continue to fold around each side, tucking each side over the other until a star-like shape is formed on top.: As you fold each side, you will feel the tension change; the dough will give and then settle into place. Work methodically around the circle so the layers overlap evenly and form a star shape. Rushing here often causes tears or uneven seals, so take a breath and fold each segment the same amount.
- Place fold side down on a flat surface or plate until ready to fry.: Resting the folded crunchwrap fold side down keeps the seams from opening. You should notice the top looks like a neat star and the bottom is mostly sealed. If you skip this rest, the wrap might unravel when moved to the skillet, especially if your fillings are warm and the cheese has not yet set.
- Repeat– Repeat steps 2 through 10 to create three more crunchwraps.: As you remake the next ones, you will get a rhythm and the fillings will portion more consistently. This repetition helps you see where you tend to over or underfill, refining the process. Avoid mixing up filler pieces, or you may end up with one wrap missing its top disk and unable to seal properly.
- Frying– In a nonstick skillet over medium heat, heat a thin layer of oil such as vegetable or canola oil.: The oil should shimmer slightly but not smoke; that gentle sizzle is your cue. The pan should be hot enough to crisp quickly, which locks the tortilla's texture and heats fillings. If the oil is too cool, the wrap will absorb oil and become greasy; too hot, and the exterior will char before the inside warms, so adjust heat as needed.
- Cook one crunchwrap at a time, placing the fold side down onto the hot oiled skillet. Cook for 3 to 5 minutes on each side, or until the tortilla is as golden brown and crunchy as desired; repeat with the remaining 3 folded up crunchwraps until they've all been fried. Tip– Depending on the size of your skillet, you may be able to fry two at a time, but better to not overcrowd them if it's questionable.: When the fold side contacts the pan, you should hear a steady sizzle and start smelling toasted flour. Cook for 3 to 5 minutes on each side, flipping when the exposed side reaches a golden brown. Use a spatula to press gently for even browning. A typical mistake is flipping too early, which can cause the fold to pop open, so wait until the color is right before turning.
- Serving– Slice in half if desired, and serve with warmed gravy for dipping. Crunchwraps are meant to be enjoyed warm, fresh, and hot. I do not recommend refrigerating or freezing leftovers. After all the point is to actually consume your Thanksgiving leftovers and not create more!: The finished crunchwrap should present a thin, crisp edge, and when cut, layers of filling should be visible, steaming slightly. Serve warm so the cheese is still melty and the crispness is at its peak. Avoid refrigerating leftovers as they tend to lose their crisp texture; if you must store them, reheat briefly in a skillet to revive crunch.
Notes
- Portion control matters: Measure fillings by quarter cups to ensure equal distribution and to help each crunchwrap fold neatly without bursting at the seams.
- Heat fillings moderately: Warm the mashed potatoes and turkey just enough so they spread and the cheese will melt, but avoid boiling or making them runny, which would cause sogginess.
- Choose a melting cheese: Use provolone or a similar melting cheese so it binds the filling layers, if you pick a non melting option the layers may not stick together when fried.
- Use a thin oil layer: A thin sheen of neutral oil crisps the tortilla without making it greasy, and it helps the fold seal while frying.
- Allow a short rest before frying: Let assembled wraps sit fold side down briefly so the cheese can tack down; this reduces the risk of opening during cooking.