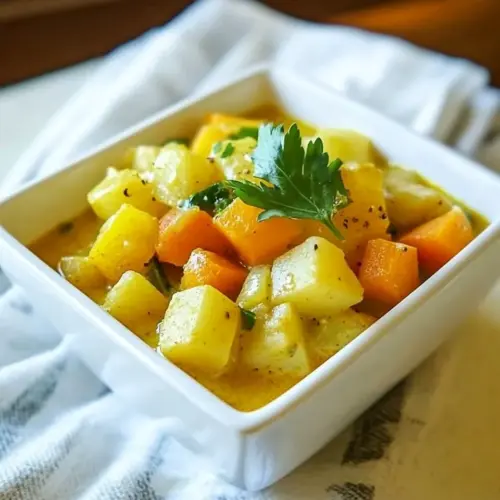
Thai Root Vegetable Curry
Thai Root Vegetable Curry is a creamy, fragrant bowl that combines tender sweet potato, parsnip, and turnip with warming spices and rich coconut milk. Perfect as an easy weeknight dinner, it delivers comforting texture, aromatic depth, and bright herbal finish. Make it for cozy fall meals, and enjoy leftovers that taste even better the next day.
Equipment
- Wok or large skillet
- Spatula
Ingredients
- 2 tablespoons coconut oil or oil of choice Sauté slowly in the pan to provide a neutral, rich cooking fat that helps carry and meld the curry flavors; can be substituted with another oil if preferred and brings a silky mouthfeel to the finished dish.
- 1 yellow onion chopped Chop finely and sweat until translucent to add a sweet, aromatic base and build savory depth; releases natural sugars that balance the spices and complements root vegetables.
- 1 -1/2 tablespoons grated fresh ginger Grate freshly and add early in cooking to contribute bright, pungent warmth and a slightly citrusy bite; helps lift the curry’s flavors and aids digestion.
- 1 medium-sized sweet potato chopped into 1-inch pieces Cube evenly and simmer until tender to introduce natural sweetness and creamy texture; absorbs curry sauce and provides hearty substance to the stew.
- 1 turnip chopped into 1-inch pieces Chop into uniform pieces and cook until soft to add an earthy, slightly peppery note and firm texture; helps balance the sweeter root elements in the curry.
- 1 parsnip chopped into 1-inch pieces Cut into 1-inch pieces and braise until tender to contribute a sweet, nutty flavor and dense texture that complements the other roots; helps thicken the sauce as it breaks down.
- 1 teaspoon cumin seeds Toast briefly in oil to bloom aromatic oils and add warm, slightly smoky fragrance; provides a subtle background complexity and an earthy spice base.
- 1 teaspoon turmeric Stir in to impart warm, slightly bitter warmth and golden color; acts as an anti-inflammatory spice and pairs well with coconut and other curry spices.
- 1 teaspoon coriander Add ground to layer citrusy, floral notes and gentle spice complexity; helps round out the curry’s flavor profile and complements cumin and turmeric.
- 2 teaspoons garlic powder Sprinkle during cooking to add savory garlic punch without needing fresh cloves; distributes evenly and offers long-lasting, mellowed garlic flavor after simmering.
- 1/4 teaspoon red pepper flakes optional Toss in sparingly to introduce heat and a touch of smoky spice; adjusts the curry’s piquancy without overwhelming the aromatic and creamy elements.
- 1 teaspoon salt or to taste Season gradually to enhance and balance all flavors while cooking; allows control over saltiness so the coconut milk and basil can shine without being muted.
- 1 full-fat canned coconut milk Pour creamy coconut milk in to provide rich, velvety body and slightly sweet tropical flavor; tempers spices, creates saucy consistency, and melds the curry ingredients together.
- 1 bunch fresh basil leaves chopped Chop and stir in at the end to introduce fresh, anise-like brightness and herbal lift; adds color, aroma, and a fragrant finish that balances the richness of the coconut milk.
Instructions
- In a wok or large skillet, sauté onion, ginger and cumin seeds in the coconut oil over medium heat until the onion is softened and beginning to turn translucent, about 3 minutes.: The kitchen should smell warm and toasty as the cumin seeds pop in the shimmering coconut oil , releasing a nutty perfume, while the diced onion softens and begins to glisten. Listen for a gentle sizzle, not a furious fry, and watch for the onion edges to go from opaque to translucent, which signals the sugars are starting to bloom and the aromatic base is ready. The grated ginger will release a sharp, peppery steam when it hits the pan, adding an immediate lift. This stage matters because properly softened aromatics create a rounded backbone that infuses every subsequent layer, so do not rush by turning the heat too high. A common mistake is crowding the pan or increasing heat to hurry things, which can scorch the spices and leave a bitter taste. If you see dark specks forming on the cumin seeds , lower the heat and stir to prevent burning. Stir often to ensure even contact with the oil, and keep the motion gentle so you do not tear the softened onion .
- Add all spices and root veggies and sauté about 8 minutes before adding 1/4 cup of the coconut milk. Continue cooking a couple of minutes, allowing the coconut milk to evaporate, then add an additional 1/4 cup of the coconut milk. Continue to cook about 5 minutes.: At this point add the measured turmeric , coriander , garlic powder , red pepper flakes if using, and salt , then toss in the chopped sweet potato , turnip , and parsnip . The dry spices will bloom on contact with the hot oil, deepening in aroma and color, while the roots begin to pick up a light golden sheen. Stir continuously so each piece is kissed by the spice oil, and you should hear a steady sizzle as moisture leaves the vegetables. After about eight minutes the edges of the roots will start to soften and show slight browning, which adds complexity. Now add a quarter cup of the coconut milk to deglaze, scraping up any fond from the pan, which incorporates caramelized bits into the sauce for extra flavor. This technique matters because it prevents sticking and builds a richer mouthfeel. Avoid dumping all the coconut milk now, or the pan will cool and steaming will replace the desired light browning.
- Add another 1/4 cup of the coconut milk – by now the root veggies should be softening up. Test the sweet potato by biting into it. If it’s still not cooked all the way, continue sautéing. Cook until the sweet potato is soft, but slightly al dente in the middle (avoid cooking the vegetables to the point that they turn mushy).: After the first splash, you will see the liquid bubble and then reduce quickly, concentrating aromatics on the vegetables. The sound should change from an aggressive boil to gentle bubbling, and you will notice the aroma becoming creamier as the coconut melds with the spices. Adding a second quarter cup keeps the sauce building in stages, reducing the risk of ending up with a thin, watery curry. During this phase check the texture, pressing a fork into a piece of sweet potato to feel for resistance. A common pitfall is moving too fast and not letting the moisture reduce enough, which prevents the sauce from thickening. Stir often to prevent scorching, and adjust the heat to maintain a steady but not violent simmer.
- Once the vegetables are finished cooking, add the remaining coconut milk.: As you add the next portion of coconut milk , the mixture should become silkier and the surface will develop a lightly glossy sheen. Use sensory cues to judge doneness, such as the way a fork slides through the sweet potato with slight resistance rather than collapsing. The goal is tender but with structure, which keeps the curry texturally satisfying. If a piece resists too much, reduce heat and continue to cook while stirring, checking every couple of minutes. Overcooking makes roots fall apart and the dish lose its pleasant contrast, so avoid leaving the pan unattended during this step. If you notice the sauce becoming too thin, increase the heat briefly to reduce and concentrate flavors, then return to gentle simmering.
- Stir to incorporate the coconut milk. Allow it to come to a gentle boil and cook a few more minutes, allowing it to thicken slightly.: Adding the final portion of coconut milk should turn the pan into a unified, creamy pool that bathes every piece of vegetable. You will see a uniform color and a velvety texture, and the aroma should be rich, floral, and warming. This final addition adjusts the sauce to the desired richness, so if you prefer a thicker finish, let it simmer a touch longer to reduce, or for a looser curry, serve sooner. This step matters because it allows you to calibrate the mouthfeel and ensure the spices have fully integrated. A typical mistake is to skip tasting here; always sample and adjust salt or heat as needed. Stir gently to avoid breaking the vegetables while allowing the sauce to coat them thoroughly.
- Stir to incorporate the coconut milk. Allow it to come to a gentle boil and cook a few more minutes, allowing it to thicken slightly.: As you stir, watch for small bubbles rising and the sauce clinging to the back of the spoon, a visual cue the curry is reaching the right thickness. The smell will become more rounded, the sharpness of individual spices mellowing into a cohesive profile. Keep the boil gentle to prevent separation of the coconut milk , and keep stirring intermittently to maintain an even texture. This brief finishing simmer melds flavors and slightly reduces the liquid so the sauce coats the roots beautifully. Avoid a vigorous boil which can break emulsions and make the sauce grainy. Once you see the glossy sheen and the sauce no longer runs off a spoon, remove from heat and let the pot rest a couple minutes before serving to let flavors settle.
Notes
- Protein boost: The notes mention adding a chopped chicken breast or shrimp for protein, and if you choose that option, cook the protein separately and fold it in at the end to keep the vegetables perfectly textured.
- Adjusting heat: Increase or decrease the red pepper flakes to control spice, and remember that heat intensifies slightly as the curry sits, so err on the milder side if you plan leftovers.
- Thickening tricks: If you want a thicker sauce, simmer a little longer after the final coconut milk addition to reduce, or remove a small portion of vegetables to mash and stir back for natural thickening.
- Brightening flavor: Always finish with chopped basil for a fresh lift, and consider a tiny squeeze of citrus only if it fits your taste, added sparingly at the end.
- Make ahead: This curry holds well in the refrigerator for up to three days; gently reheat on low, adding a splash of water if the sauce tightens.