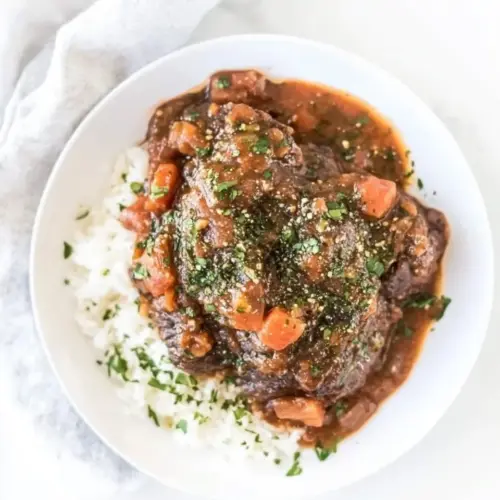
Swiss Steak Recipe
Swiss Steak Recipe is a tender, savory braise featuring browned beef, caramelized onions, and a rosy tomato based sauce that is comforting and perfect for an easy weeknight dinner. The slow simmer yields fork tender meat and a rich sauce that soaks into mashed potatoes or rice, making leftovers even better. Try it when you want hearty, satisfying comfort food that feeds a family.
Equipment
- 6-quart rondeau or sauce pot
- Sheet tray
- Parchment Paper
- Plastic zip bag
- Meat Mallet
- Wide shallow bowl or 9 inch cake tin
Ingredients
- 2 pound top round steak Coat the steak evenly with flour to promote a flavorful browned crust and to help thicken the cooking liquid later. Use enough to dredge both sides, shaking off excess, so the meat sears without steaming. Flour also provides a bit of protection during braising, keeping juices inside the steak.
- 1 cup all-purpose flour Provide a light dusting of flour to assist in dredging the meat before searing and to slightly thicken sauces. Measure accurately to avoid a gummy texture in the braising liquid. Keep the flour dry and free of lumps for an even coating.
- 3 tablespoons olive oil Sear the steak in olive oil to develop deep caramelized flavor and to prevent sticking in the pan. Use the oil at medium-high heat until shimmering but not smoking for best browning. Olive oil also contributes a subtle fruity note to the overall dish.
- 2 peeled thickly sliced yellow onions Caramelize the sliced onions slowly to build sweetness and rich depth in the sauce, softening until translucent and slightly browned. Add them after initial searing to absorb browned bits and enhance the braising liquid. Thick slices hold texture and release natural sugars during the slow cook.
- 5 thickly sliced ribs of celery Sweat the sliced celery to add aromatic, savory backbone and subtle vegetal crunch to the stew base. Cook with the onions to release natural moisture and complement other aromatics. Thick slices maintain body and integrate into the finished sauce.
- 1 large peeled cut in half thickly sliced carrot Add the halved, thickly sliced carrot to introduce natural sweetness and earthy flavor while contributing body to the braise. Cook until tender so it enriches the sauce and pairs well with the beef. Larger pieces withstand long cooking without disintegrating.
- 4 finely minced garlic cloves Infuse the dish with robust aroma by finely mincing garlic and adding it toward the end of sautéing aromatics to prevent burning. Allow garlic to soften and meld into the sauce, delivering savory complexity. Finely minced pieces distribute flavor evenly throughout.
- 1 1/2 cups beef stock Deglaze and braise using beef stock to provide a hearty liquid base that complements the roasted meat and vegetables. Use the specified amount to ensure sufficient braising liquid while concentrating flavors as it simmers. Stock adds savory depth and helps form a cohesive gravy.
- 28 ounce can whole peeled tomatoes, no juice Introduce the whole peeled tomatoes (drained of excess juice) to contribute bright tomato flavor, acidity, and body to the sauce while keeping a rustic texture. Break them up during cooking so they integrate with the braising liquid and vegetables. Tomatoes balance the richness of the beef and create a classic sauce.
- 1 tablespoon Worcestershire sauce Enhance savory depth and umami by stirring in Worcestershire sauce to round out acidity and add complexity to the braising liquid. Use sparingly to avoid overpowering other flavors while lifting the overall profile. Worcestershire complements both meat and tomato components.
- coarse salt and fresh cracked pepper to taste Season generously with coarse salt and freshly cracked pepper to taste, adjusting during cooking to build layers of seasoning. Apply salt early to help extract and concentrate flavors, and add pepper later for a bright, peppery finish. Taste before serving to ensure balanced seasoning.
Instructions
- Start by cutting the steak into 4 individual pieces that are roughly 8 ounces each. If you want smaller pieces of steak, cut each 8-ounce piece in half again so there are 8 4-ounce pieces.: The air smells faintly metallic when you first slice the beef , and the exposed surfaces will take seasoning and pounding more effectively than a whole roast, which helps even cooking. Doing this lets each portion brown evenly and fit your pan without crowding, and it also helps portion control when serving. One common mistake is cutting pieces unevenly, which leads to different cooking rates; aim for uniform thickness and weight so everything finishes together.
- Place the swissed steaks into a plastic zip bag and pound using a mallet until it is about a 1/4” to 1/2” thick.: You will feel the meat give under the mallet and hear soft thuds as fibers break down; this physical tenderizing shortens braise time and ensures a consistent texture. Pounding increases surface area for the dredge and creates thin, tender steaks that absorb the braising liquid. Avoid punching through the meat, which can create tears that release juices and reduce final succulence.
- Set the steak on a sheet tray lined with parchment paper and generously season on both sides with salt and pepper.: The parchment keeps the meat clean and prevents sticking, while the salt draws out a whisper of moisture that helps the crust form during searing. Use a confident hand when seasoning so each piece has a good coating, and let it rest briefly so the seasoning begins to penetrate. Over-salting is the typical error here, so season judiciously and remember you will adjust later.
- In the meantime, prepare the onions, celery, carrots, and garlic.: As you slice the onion , celery , and carrot , the kitchen fills with vegetal sweetness, and the minced garlic releases a pungent aroma. Uniform cuts ensure even cooking and a pleasing mouthfeel in the finished dish. A common slip is inconsistent slicing which results in some pieces becoming mushy while others remain underdone, so take a few extra minutes to match sizes.
- In a wide shallow bowl or a 9” cake tin, mix together the flour and salt.: As you whisk the flour with salt, you will notice a faint dusty scent and the mixture becomes evenly seasoned, ready to coat the steaks. This step ensures the flour is distributed so each piece gets a balanced dredge that aids browning and sauce thickening. The usual misstep is skipping the salt here, which leaves the crust bland and misses an easy seasoning opportunity.
- Dredge the steak on both sides in the flour and place them back on the sheet tray with parchment paper.: The meat takes on a matte, floury sheen and feels slightly tacky, which is perfect for forming a golden crust. The coating seals surface juices and creates the fond that flavors the sauce later. Shake off excess flour to avoid clumping in the pan because too much coating can make the sauce pasty rather than silky.
- Next, heat the oil in a large 6-quart rondeau or sauce pot over high heat until it begins to smoke lightly.: The olive oil will shimmer and give off a faint aroma, signaling it is hot enough to sear; this is crucial for developing deep browning. A properly heated pan ensures an immediate sear that locks flavors, but if the oil smokes heavily, lower the heat slightly to prevent burnt notes. A frequent error is adding meat to a cool pan which causes sticking and poor crust formation.
- Add the steak, turn the heat down to medium, and sear for 3 to 4 minutes per side or until well browned on both sides. You may need to do this in batches.: You will hear a satisfying sizzle as the steak kisses the pan and see the edges caramelize into a rich mahogany color, that caramelization is flavor gold. Searing concentrates savory compounds and builds the fond that will enrich your sauce later. Crowd the pan and you will steam rather than sear, so do this in batches if needed and keep an eye on color rather than strict timing.
- Set the steak to the side on a plate, and then add the onions to the pot and lightly caramelize over low heat for 25 to 30 minutes while occasionally stirring.: The pot fills with sweet, nutty aromas as the onion softens and turns golden, slowly releasing sugars that deepen the final sauce flavor. This slow caramelization is worth the time because it transforms sharp raw onion into rounded sweetness. Stir occasionally to prevent burning, as charred onion can introduce bitter tones to the sauce.
- Once browned, add in the celery and carrots and sauté for medium heat for 3 to 4 minutes or until they begin to lightly brown.: The vegetables will hiss gently and develop small browned spots, adding complexity and texture to the mirepoix base. Browning these pieces builds layered flavor that supports the braise and ensures the vegetables retain some structure after long cooking. Avoid overcooking them at this stage so they do not dissolve into the sauce during the braise.
- Stir in the garlic and cook for 30 to 45 seconds or until fragrant - season with vegetables with salt.: The aroma changes instantly when the garlic hits the pan, releasing a warm, lively scent that amplifies the savory profile. Because garlic cooks quickly, timing matters; cook just until fragrant to avoid a harsh, burnt flavor. A typical mistake is letting garlic brown too much, which introduces bitterness rather than depth.
- Deglaze with beef stock and add in the hand-crushed whole peeled tomatoes.: As you pour in the beef stock , you will see the fond release from the bottom of the pot in small shimmering streaks, and the crushed tomatoes add bright color and a gentle acidic lift. Deglazing captures all those browned bits and folds them into the sauce, which is why this step is essential for maximum flavor. Skipping deglazing leaves flavorful fond stuck to the pan, wasting an important taste element.
- Season with Worcestershire sauce, salt, and pepper.: The sauce will deepen into a cohesive savory blend once you add the Worcestershire sauce , and a measured amount of salt and pepper balances the acidity from the tomatoes. Taste as you go because reduction will intensify the seasoning, and it is easier to add more later than to fix an over salted sauce. Over seasoning at this stage is the most common seasoning error.
- Add back in the steak, cover the pot, and cook over low heat for 2 to 2 hours and 15 minutes or until steak is fork tender.: During the long, gentle simmer the kitchen fills with deep, meaty perfume and the liquid transforms into a glossy, concentrated sauce as collagen melts into the liquid. This low slow cooking is why the meat becomes meltingly tender, and maintaining a low simmer prevents toughening. A frequent mistake is boiling vigorously, which tightens muscle fibers and yields a tougher result.
- Garnish with optional finely minced parsley and serve.: A bright sprinkle of minced parsley adds a green fresh note and a visual contrast against the rich sauce, completing the dish. The first bite should reveal tender meat, a velvety sauce, and softened vegetables, a satisfying triplet of textures and flavors. Avoid adding garnish too early, or it will lose color and freshness.
Notes
- Make ahead: You can keep the finished Swiss Steak Recipe warm over very low heat for up to 1 hour before serving, which helps when timing a family meal.
- Storage: Cover and refrigerate the steak in its sauce for 3 to 4 days, the flavors actually deepen overnight, making leftovers particularly good.
- Freezing: Freeze portions in an airtight container for up to 3 months, thaw in the refrigerator for a day before reheating to preserve texture.
- Reheating: Reheat gently in a pot over low heat with a splash of water or stock if the sauce has thickened, stirring occasionally until warmed through.
- Oven option: You can braise in the oven at 325 degrees for 2 1/2 to 3 hours if you prefer hands off heat, just use a covered ovenproof pot.
- Ingredient swaps: If you do not want to tenderize by pounding, buy cubed steak from your butcher which is already prepared for braising.