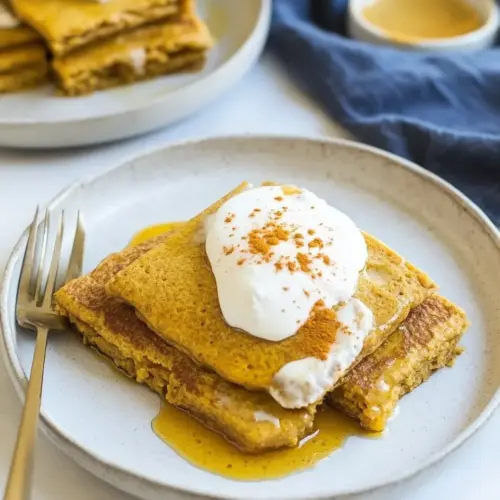
Sweet Potato Sheet Pan Protein Pancakes
Sweet Potato Sheet Pan Protein Pancakes are a warm, slightly sweet, and protein packed breakfast that bakes on a sheet for easy slicing and meal prep. The combo of mashed sweet potato, blended gluten free rolled oats, and eggs yields a tender, sliceable pancake that reheats beautifully for busy mornings. Perfect for an easy weeknight breakfast or make ahead brunch, this recipe is worth trying for its convenience and hearty flavor.
Equipment
- Blender
- Large sheet pan
- Parchment Paper
- Offset Spatula
Ingredients
- 2 cups gluten-free rolled oats Provide a hearty, gluten-free base and add texture when blended or processed into flour for pancakes; contributes fiber and structure while keeping pancakes tender.
- 3 tbsp protein powder Boost protein content and enhance browning while slightly thickening batter; choose a neutral-flavored protein powder to avoid overpowering cinnamon notes.
- 1 tbsp ground cinnamon Add warm, aromatic flavor and natural sweetness while complementing sweet potato; also contributes a small amount of antioxidants and balances savory notes.
- 1/2 tsp baking powder Leaven batter slightly to create lift and lighter pancakes; use sparingly to avoid a chemical taste and ensure even distribution throughout dry ingredients.
- 1/2 tsp sea salt Enhance overall flavor by balancing sweetness and bringing out other ingredients; also supports proper chemical reaction with leavening for taste depth.
- 2 cups cooked sweet potato mashed (about 2 medium sweet potatoes) Provide moisture, natural sweetness, and bulk while contributing creamy texture and nutrients; mash thoroughly to incorporate smoothly into batter for even consistency.
- 4 eggs Contribute rich structure, emulsification, and binding to hold pancakes together; whole eggs add fat and help provide a tender crumb and golden color.
- 6 egg whites 1 cup + 1 Tbsp Increase protein and reduce fat while improving lift and lightness; add egg whites gradually for a fluffy, stable batter and lighter texture.
- 2 tbsp pure maple syrup optional Add gentle sweetness, moisture, and caramelized flavor when cooked; use sparingly or omit based on desired sweetness level and dietary preferences.
Instructions
- Cook your sweet potatoes using a method of your preference. I chop them into chunks and boil them for about 15 to 20 minutes, until they’re tender. While the potato is cooking, you can prepare the rest of the recipe (or cook the potato up to 4 days in advance): The kitchen will fill with an earthy, caramel like scent as the sweet potato softens, a sign it is breaking down and ready to mash. If boiling, you will hear a gentle rolling bubble and feel the heat on the pot as the chunks become fork tender in 15 to 20 minutes; if roasting, the aroma is more concentrated and slightly sweet with caramelized edges. Mash the pieces while warm so they blend smoothly into the batter, eliminating cold lumps that make the texture uneven. A common mistake is undercooking, which leaves fibrous pieces that resist pureeing; avoid this by testing with a fork so the flesh yields easily. The why here is moisture control, warm mashed sweet potato incorporates more readily, producing a cohesive batter rather than a crumbly one. If you cook in advance, store covered in the fridge, and loosen the mash with a splash of water or milk before blending if it has thickened.
- Preheat the oven to 375 degrees F and line a large sheet pan with parchment paper.: When the oven air becomes steadily warm and the element cycles quietly, the pan will reach an even heat that encourages uniform browning. Proper preheating ensures the top sets quickly and the center cooks through, preventing a rubbery interior from overbaking the edges. The sound cue is subtle, a steady hum rather than bursts of HVAC like sounds that signal temperature swings. A frequent error is skipping parchment which can cause sticking and tearing during removal; parchment ensures the slab releases cleanly and keeps edges intact. The reason this matters is consistent heat and a nonstick surface make slicing and presentation much easier.
- Add the oats to a blender and blend until a flour forms - it’s fine if there are small chunks... you just want it to have a similar consistency as flour.: As the blades whirl you will notice the oats transforming from flakes to a powdery, slightly sandy texture, and the blender will take on a quieter, more uniform tone when the large pieces are gone. Small flecks are okay, they add a subtle chew. Overblending will produce too fine a flour that can feel gummy with moisture, so pulse until you reach a flour like consistency with a few small bits remaining. If your blender struggles, work in batches. The purpose is to create a base that absorbs moisture while still lending oat character to the crumb.
- Add the remaining ingredients to the blender and blend until smooth.: When you incorporate the mashed sweet potato , eggs , egg whites , protein powder , cinnamon , baking powder , sea salt , and optional pure maple syrup , the batter should become silky and pourable. You will see the color deepen to a warm amber and smell a blend of toasted oats and spice. Stop blending when the mixture looks uniform; overblending can incorporate excess air that affects bake consistency. A typical problem is adding too much liquid if your sweet potato was very loose; if the batter seems too thin, add a tablespoon of blended oats and pulse briefly. The why here is texture balance, ensuring the pancake sets without becoming dense or spongy.
- Pour the pancake batter onto the parchment-lined baking sheet and smooth it into an even layer.: As the batter spreads it should form a glossy, even surface that reflects light subtly, with no deep valleys or high ridges. Use an offset spatula to coax it into a uniform thickness so slices bake consistently. You may notice small bubbles forming on the surface, which is normal and will subside as it bakes. Uneven spreading leads to thin edges that brown too rapidly while the center lags, so take a moment to visually level the batter. The reason this matters is even thickness equals predictable doneness across the entire sheet.
- Bake for 20 to 24 minutes, or until the pancakes have set up and are cooked through - I do 22 minutes.: While baking you will notice a toasty, sweet aroma and the edges turning slightly darker than the center. The surface should look matte and spring back gently when pressed, indicating it has set. I typically aim for about 22 minutes; ovens vary, so check visually and with a toothpick in the center which should come out mostly clean with a few moist crumbs. A common misstep is underbaking, which leaves a gummy center that collapses when sliced; if that happens, return to the oven for a few additional minutes. The why is simple, proper bake time ensures a sliceable pancake that keeps its shape and texture when reheated.
- Remove the pancakes from the oven and allow them to cool for 5 minutes before slicing and serving.: Letting the slab rest lets residual steam redistribute, firming the interior so slices hold together cleanly. You will feel it cool from warm to pleasantly warm at the edges, and the aroma will mellow slightly. Cutting too soon often causes tearing or a mushy center, so patience here improves presentation. Use a sharp knife and press straight down for neat rounds or bars. The reason is structure; the brief rest helps proteins set and the crumb stabilize for perfect slices.
- Serve with your favorite toppings. I go with nut butter and honey and sometimes fresh fruit.: When you plate a slice you will find a tender, moist interior with a slightly toasted oat note, ready to accept spreads or fresh fruit. I often pair with nut butter and a drizzle of honey, or keep it simple with plain fruit to let the sweet potato shine. A mistake is piling on too many wet toppings right away which can make slices soggy; instead add them just before eating or serve toppings on the side. Serving in this way highlights the balanced sweetness and makes each bite texturally interesting.
Notes
- Prep cooked sweet potatoes ahead — Cook and mash the sweet potato up to four days in advance and refrigerate. This shortens active morning time and the chilled mash can be loosened with a tablespoon of water or warmed briefly before blending if it firms up in the fridge.
- Blend oats to the right texture — Aim for a flour like consistency with a few small flecks left for tooth. If your blender heats up, stop and scrape down to maintain even grinding and avoid gummy batter from overheated oats.
- Use parchment for clean release — Parchment guarantees the slab lifts off the pan without tearing. If you skip it, the bottom can stick and ruin presentation, so I do not recommend skipping this step.
- Check doneness visually and by touch — Look for a matte surface and a gentle spring back when pressed. If the center feels too soft, give it an extra three to five minutes; underbaking leads to a gummy interior that is hard to salvage.
- Slice after a short rest — Resting the slab for five minutes lets steam redistribute and the crumb set, giving you clean, neat slices instead of ragged pieces that fall apart.