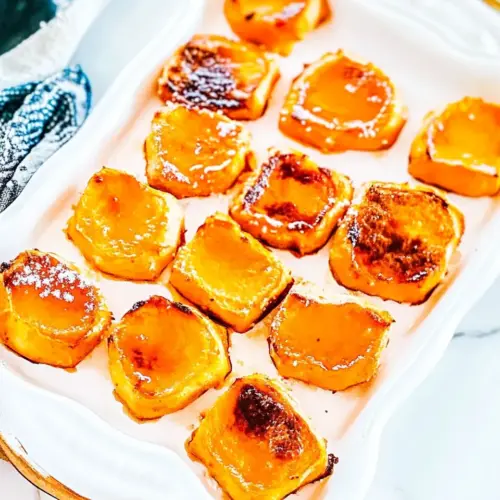
Sweet Potato Bites
Sweet Potato Bites are a crispy edged, tender centered autumn snack, glazed with maple and brown sugar, then crowned with toasted marshmallow and crunchy pecans. This easy, crowd friendly appetizer blends warm spice and sticky sweetness into one bite, perfect for holiday gatherings or an easy weeknight treat. Make them for their nostalgic flavor and irresistible texture contrast.
Equipment
- Baking Sheet
- Heavy duty aluminum foil
- Microwave-safe Bowl
- Pastry Brush
- Small spatula
Ingredients
- 4 medium sweet potatoes, peeled and sliced into 1/4-inch rounds Provide a tender, sweet base layer that becomes soft when roasted and holds up as a bite-sized vehicle for toppings; peeling and slicing into 1/4-inch rounds ensures even cooking and neat presentation.
- 2 tablespoons unsalted butter Add a rich, creamy fat that helps the sweet potato rounds caramelize and develop a glossy finish when melted and brushed or tossed with the slices.
- 2 tablespoons maple syrup Contribute natural sweetness and a subtle maple aroma that caramelizes during roasting to enhance the sweet potatoes without overpowering the other flavors.
- 2 tablespoons brown sugar, packed, light or dark Deliver deep molasses-like sweetness and help create a sticky, caramelized coating on the potatoes when combined with butter and maple syrup.
- 1/2 teaspoon ground cinnamon Provide warm, aromatic spice that complements the sweetness and adds a subtle depth and balance to the caramelized coating on the rounds.
- 24 -30 large marshmallows, halved Create a gooey, toasted topping that melts and browns under heat, adding a familiar marshmallow texture and sweet contrast to the roasted potatoes.
- 24 -30 pecan or candied pecan halves Offer a crunchy, nutty element—either toasted pecans or sweet candied halves—that provides textural contrast and a rich flavor counterpoint to the marshmallows.
- Kosher or flaky sea salt, optional for serving Enhance and balance the sweetness with a light sprinkle of coarse salt that brings out the flavors and adds a finishing touch when serving (optional).
Instructions
- Preheat the oven to 350 F, line a baking sheet with heavy-duty aluminum foil (see Notes), spray generously with cooking spray; set aside.: The room will fill with a faint metallic scent as the oven warms, and the foil reflects heat to encourage even browning. Lining and spraying prevents the sugary glaze from sticking and burning onto the pan, which makes clean up easier. I like using heavy duty foil because it resists tearing when removing slices, and spraying generously minimizes caramelized sugar from permanently adhering. A common mistake is skipping the spray, which leads to stubborn burnt sugar that is difficult to remove and can smoke, altering flavor. Keep the sheet level so the glaze does not pool on one side, that would cause uneven caramelization.
- Add the sweet potato rounds to the baking sheet in an even single flat layer. It’s okay if they’re touching on the sides, but don’t let them overlap; set aside.: When you arrange the rounds, listen for the faint clink as the pieces settle on the foil, and notice how evenly spaced pieces roast with consistent heat exposure. Overlapping causes steam pockets and uneven cooking, which results in some slices being limp while others are tender. I place them close but not stacked so each gets direct oven heat. If slices are overlapping, they will stay underdone at the center despite longer bake times.
- To a medium microwave-safe bowl or glass measuring cup, add the butter, maple syrup, brown sugar, cinnamon, and heat on high power for 1 minute. Stir to combine.: The butter will melt and combine with the maple syrup and brown sugar , creating a glossy glaze that smells of warm sugar and spice. Stirring matters to prevent hot spots in the microwave and to fully dissolve the sugar so it spreads evenly. If you skip stirring or underheat, the sugar may not melt fully, leaving a grainy texture. Use a microwave safe container to avoid weird flavors, and don’t overheat, which can cause the sugars to scorch and become bitter.
- Evenly brush the mixture over the tops of the sweet potato slices.: As you brush, the pan will start to gleam and the surface of each round will look shiny and slightly sticky, ready for caramelization. Brushing ensures the glaze hits every slice evenly, so there is a consistent sweet crust. Be gentle to avoid tearing the slices, and don’t leave puddles of glaze on the foil, which can burn. A common error is brushing too heavily on a few pieces, which causes uneven browning and sticky, burnt spots.
- Bake for 15 minutes, or until the sweet potato rounds are done and fork-tender. Start checking at about 11-12 minutes since all ovens bake differently and the exact thickness of your sweet potatoes will affect baking time. If you sliced them a bit thicker, they may take longer than 15 minutes to cook through.: During baking you’ll notice steam rising and the edges taking on a faint golden hue, signaling tenderness. Use a fork to test: it should slide in with little resistance but the round should hold its shape. Baking too long and the rounds can become mushy, while underbaking leaves them firm and less pleasant texturally. If you detect uneven doneness, rotate the sheet and check again in a couple of minutes.
- While the sweet potatoes bake, halve the marshmallows.: Halving the marshmallows prepares them to sit neatly atop each round and toast evenly. The act of cutting releases a faint sweet scent and makes them more manageable during placement. If you leave marshmallows whole, they may over expand or slide off during the brief finishing bake. Use clean scissors or a knife and work on wax paper to avoid sticking.
- Once the sweet potatoes are cooked through, add a marshmallow half and a pecan or candied pecan to the top of each.: Placing the toppings creates an immediate contrast of textures and flavors, with the sticky marshmallow and crunchy pecan perched on warm, tender sweet potatoes . The juxtaposition is sensory; you’ll see the marshmallow sit like a small pillow ready to puff, and the pecan will press in slightly for balance. A common problem is adding too-large toppings that overwhelm the rounds, so match sizes thoughtfully.
- Return sheet pan to the oven and bake for about 3 minutes more, or until the marshmallows are lightly golden browned. Make sure to keep a close eye on them since marshmallows are very prone to burning quickly.: This short bake creates a toasted surface that crackles slightly and smells of caramelized sugar. The visual cue is small golden spots and tiny bubbling, which signals readiness. Marshmallows brown fast, so stay nearby or they will char and taste acrid. If you notice uneven browning, briefly broil with close supervision, but beware of rapid burning.
- Remove the sheet pan from the oven and it’s likely that the marshmallows will have slid a bit, so push them back in the middle.: When you take the pan out, the marshmallows may have softened and shifted; nudging them re centers the toppings and improves presentation. The marshmallows will have a toasty aroma and slightly tacky texture, and repositioning them while hot helps maintain a neat bite. Avoid pressing too hard, which can flatten the marshmallow into the sweet potato and make the bite soggy.
- Then, immediately remove the sweet potatoes from the baking sheet using a small spatula, place on a serving platter, and allow them to cool slightly before serving. Tip– make sure you don’t allow them to cool on the baking sheet because they will be prone to sticking and will be more difficult to remove.: The final transfer preserves the glossy finish and prevents caramelized sugar from hardening onto the foil, which would make extraction tricky. On the platter the bites will steam slightly, and cooling a minute or two brings the marshmallow to a pleasant warm temperature for eating. Leaving them to cool on the pan can cause sticking and tearing, so use a thin spatula and lift gently. Watch for sticky sugar residue on your spatula; rinse quickly to avoid buildup.
Notes
- Match sizes Pick sweet potatoes that are similar in girth so slices roast uniformly, reducing the risk of some rounds being underdone while others are overcooked.
- Heavy duty foil Use heavy duty aluminum foil and a cooking spray to prevent a hard sugar mess on the sheet, making cleanup much easier.
- Watch marshmallows Keep a close eye during the final bake because marshmallows can go from lightly golden to charred in seconds, so stay nearby and check often.
- Even glazing Brush the glaze evenly to ensure consistent caramelization, and avoid puddles on the foil which can burn and smoke in the oven.
- Serve warm Transfer bites off the sheet immediately after baking and serve warm so the marshmallow is soft and the edges retain a slight crispness.