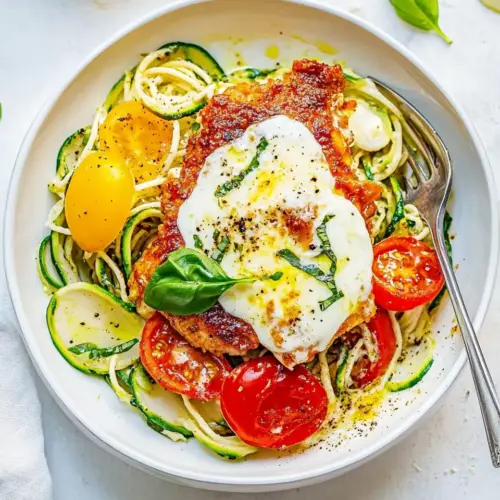
Summer Chicken Parmesan with Zoodles
Summer Chicken Parmesan with Zoodles blends crispy, golden breaded chicken with melty mozzarella and bright cherry tomatoes over tender spiralized zucchini. This easy weeknight dinner is creamy, crispy, and refreshing, perfect for warm evenings when you want comfort without heaviness. Make it for guests or a simple family meal, it�e2�€s a satisfying way to enjoy classic flavors with a summery twist.
Equipment
- 12-inch skillet
- Shallow Bowls
- Baking Sheet
- Spiralizer
- Tongs
Ingredients
- 4 thin chicken breast cutlets Pound or flatten to even thickness so chicken cooks quickly and evenly; provides the main protein and base for the breaded cutlet and layers of cheese and sauce. Serve hot to maintain crisp exterior and tender interior while punctuating the dish with savory richness.
- 1/2 cup all-purpose flour Dredge lightly to create a dry surface that helps the egg adhere and forms the foundation for a crisp breadcrumb coating. Use enough to coat without clumping, ensuring an even golden crust during pan-frying.
- 1 teaspoon kosher salt Season into the flour or sprinkle on the cutlets to enhance overall flavor and bring out savory notes in the breading and chicken. Balance with pepper to avoid overpowering fresh components like zucchini and tomatoes.
- 1 teaspoon black pepper Season into the flour or egg wash to add warm, pungent heat that complements the herbs and tomatoes; helps create a balanced savory profile. Adjust to taste to maintain pleasant seasoning without overwhelming delicate zucchini noodles.
- 2 eggs, whisked Bind breadcrumbs to the cutlets by whisking eggs until uniform; creates a tacky surface that helps crumbs adhere and promotes browning during frying. Add a pinch of salt or pepper to the eggs if desired for even seasoning.
- 2 cups panko breadcrumbs Coat the cutlets to form a crunchy, golden exterior that contrasts with melted cheese and tender chicken; panko yields a lighter, airier crispness than standard crumbs. Press firmly to ensure good adhesion and even coverage for frying.
- 6 tablespoons olive oil, divided Heat gradually for shallow frying and sautéing, using divided portions to brown chicken and then finish tomatoes or garlic; brings richness and helps develop Maillard flavors. Choose a high-quality extra-virgin olive oil for flavor, but avoid overheating to prevent bitterness.
- 1/2 pound fresh mozzarella, thinly sliced Layer thin slices over the cooked cutlets to melt into a creamy, milky topping that complements the crispy crust; contributes richness and a stretchy texture. Pat dry excess moisture to prevent sogginess and place under a lid briefly to encourage even melting.
- 3 cups halved cherry tomatoes Sauté or roast briefly with garlic and olive oil to create a bright, juicy topping that adds acidity and freshness to the dish. Halving concentrates flavor and allows them to soften quickly without losing shape, pairing well with basil and mozzarella.
- 4 cloves garlic, minced Sauté gently to release aromatic oils and flavor the tomato mixture and oil used for finishing the dish; provides a savory backbone and pairs with basil and cheese. Mince finely to distribute flavor without large bits overpowering the delicate zucchini noodles.
- 8 cups spiralized zucchini Toss or lightly sauté just until warmed to maintain a crisp-tender texture and fresh zucchini flavor; acts as a low-carb noodle substitute that lightens the dish. Drain excess moisture and salt lightly to prevent watery sauce and soggy crusts.
- Fresh basil, minced Garnish chopped to add a bright, herbaceous finish that lifts richness and ties together tomatoes, garlic, and cheese; release aromatic oils by mincing. Scatter over the finished plate to provide visual color and a fresh counterpoint to fried elements.
- Parmesan cheese, grated Sprinkle grated to add a salty, nutty umami finish that enhances depth and complexity when melted or used as a finishing dusting. Use sparingly to complement mozzarella without overpowering the fresh basil and tomatoes.
Instructions
- Look over your chicken breast cutlets and make sure they are evenly sized. Pound out any areas that are thicker.: You will notice a soft, plastic like thud when the mallet meets the meat, and the sound changes as the thickness evens out, which tells you the cutlet is ready. Even thickness ensures uniform cooking so some pieces do not dry out while others finish. A common mistake is pounding too thinly until the meat tears, which makes the cutlets fragile, so aim for even, gentle taps rather than forceful blows. If a piece is stubbornly thick, fold it and press slowly to avoid ripping the strands of muscle.
- In a shallow bowl add flour, kosher salt, and black pepper. Stir to combine.: As you stir, you will see the pale flour speckled with salt and pepper, and the aroma of pepper will lift from the bowl, hinting at the savory foundation being built. Proper seasoning here seasons the crust, not just the interior meat, which improves overall balance. Overmixing is harmless, but under seasoning is noticeable, so measure the salt carefully. Avoid using too fine a salt without adjusting the quantity, because kosher salt has a different volume than table salt.
- Next to the flour add the whisked eggs to a shallow dish and the panko breadcrumbs to a different shallow dish. At this point, you should have 3 shallow containers full of coating ingredients.: The three station setup will look tidy and efficient, and it keeps your hands moving smoothly through the coating process. This arrangement prevents clumping and ensures each layer deposits correctly. The eggs should be uniformly beaten, because streaks of white will cause uneven adhesion. A common misstep is crowding items in one dish, which makes results inconsistent.
- Coat the cutlets in flour and shake off any excess flour.: As you lightly dust each cutlet, the surface will shift from glossy to matte, indicating it is ready for the egg. Shaking off excess prevents a cakey layer that can detach during frying. If flour gathers in thick patches, tap the edge of the bowl to remove clumps. Too much residual flour leads to an uneven brownness and a pasty texture under the breadcrumb layer.
- Dip the floured cutlet into the whisked eggs and coat in panko breadcrumbs. Continue until all the cutlets have been coated.: When the cutlet hits the egg, you will see the surface glisten, and the panko will cling with a satisfying rough texture. Press the crumbs gently to help them adhere but avoid compacting them flat, which removes the airy crunch. Work quickly so the egg does not pool or run off. A frequent error is waiting too long between steps, which causes the coating to detach when it hits hot oil.
- In a large 12-inch skillet add 4 tablespoons of olive oil and set over medium heat.: You will notice the oil gradually shimmer as the pan heats, which indicates it is ready. Using most of the oil now creates a shallow frying depth that encourages even browning on the cutlets. If you add the chicken too early, the oil will be cool and the crust will absorb oil and become greasy. Keep the temperature steady rather than high, because a raging heat will char the exterior before the interior cooks through.
- When the oil is hot add the cutlets and cook until golden brown. About 5 minutes per side depending on size and thickness. You may have to cook the cutlets in two batches depending on size.: As the cutlets sizzle, you will hear a steady crisping sound and see the surface transform to a warm golden brown, which signals Maillard reaction and flavor development. The edges will firm and lift slightly from the pan, making them easier to flip. Do not overcrowd the pan or the temperature will drop, leading to pale, soggy crusts. A common misstep is frequent flipping; let each side develop color undisturbed for the best crust.
- After the cutlets have been cooked add them to a baking sheet and place the thinly sliced mozzarella on the top.: The hot cutlets will steam slightly under the cheese, and the slices will begin to soften on contact, becoming glossy and pillowy. This preps them for broiling so the mozzarella melts evenly without overcooking the crust. Arrange slices so they cover the surface but do not pile thickly, because a dense layer can insulate and prevent melting through. Avoid placing cold cheese directly from the fridge onto a very hot cutlet as this can cause uneven melting.
- Place the sheet pan under the broil to help melt the cheese, about 5 minutes. Keep an eye on the chicken as it can burn quickly.: The broiler’s intense heat will bubble and brown the mozzarella , giving golden edges and a slightly toasted aroma within minutes. Watch for rapid color change and pull the pan when the cheese is gooey and speckled with light brown. Leaving it a moment too long can char the panko, so stand nearby and check frequently. If your broiler runs hot, shorten the time and increase the distance from the element.
- While the cheese is melting, wipe out the skillet you used to cook the chicken, add the remaining 2 tablespoons of olive oil, and set over medium-high heat.: Cleaning the skillet prevents burnt crumbs from flavoring the tomato mixture and ensures a clean surface for quick saut e9ing. The fresh oil will shimmer differently than the initial batch, and the higher heat helps the tomatoes blister without becoming mush. If the pan is still crowded with crumbs, the tomatoes will pick up unpleasant bitter notes, so make sure it is well wiped.
- When the oil is hot add the tomatoes and the garlic.: You will hear a bright, lively sizzle as the tomatoes hit the pan and their skins begin to sing against the heat. The garlic will perfume the oil immediately, releasing warm, savory aromatics that mingle beautifully with the tomato sweetness. Keep the garlic moving briefly so it softens without browning, which would introduce bitterness. A typical mistake is letting garlic brown, which overshadows the tomatoes.
- Saute until the tomatoes just start to soften. Season with kosher salt and black pepper.: The tomatoes will begin to collapse slightly, releasing juice that deglazes the pan and forms a light sauce. At this point their fragrance intensifies and the mixture becomes glossy. Seasoning now helps the tomatoes release flavor and marry with the oil and garlic. Overcooking will turn them into a thick pur e9e, so stop when they yield but still retain some shape.
- Add the spiralized zucchini (zoodles) to the tomato mixture and toss to combine. Remove from heat.: The moment you add the zucchini , you will see the strands wilt slightly and take on a sheen from the tomato juices, but they should stay lively and slightly firm. Tossing quickly ensures even coating without overcooking. Removing from heat prevents them from becoming watery, which dilutes the dish. A common error is prolonged cooking, which makes the zoodles limp and releases too much liquid.
- To serve divide the zucchini/tomato mixture between 4 plates and top each plate with 1 chicken breast. Sprinkle with fresh basil and Parmesan cheese.: The assembled plate will present a contrast of warm, cheesy chicken and cool, herby zoodles , with basil adding a grassy lift and Parmesan cheese contributing salty, nutty notes. The aromas should be bright and inviting, and the visual contrast makes the dish feel celebratory. Avoid piling the cutlet too deep into the zoodles, which can trap steam and soften the crust.
- Leftovers can be easily stored in airtight containers and kept in the refrigerator for up to 4 days.: When cooled to room temperature, store components together or separately based on your preference; the zoodles keep texture better if not reheated too long. Reheat gently to preserve the crust and avoid sogginess, and refresh with a little fresh basil or a light dusting of Parmesan cheese before serving. Reheating too aggressively will dry the meat and collapse the zoodles, so use short bursts in a moderate oven or skillet.
Notes
- Make it herby: Fold minced fresh basil into the panko for an aromatic crust that complements the tomato topping without extra steps.
- Cheese swap: If you prefer a sharper finish, grate extra Parmesan cheese over the hot mozzarella just before serving to add depth.
- Zoodle prep: After spiralizing, pat the zucchini with a towel to remove excess moisture, this prevents the plate from becoming watery when the tomato juices mix in.
- Bake instead of pan fry: Arrange the breaded cutlets on a baking sheet and lightly oil the tops, bake at a moderate temperature until golden, then broil to melt the cheese for a lighter finish.
- Make ahead: You can bread the cutlets and store them separated by parchment in the fridge for several hours, then fry and finish when ready to serve for less active cooking time.