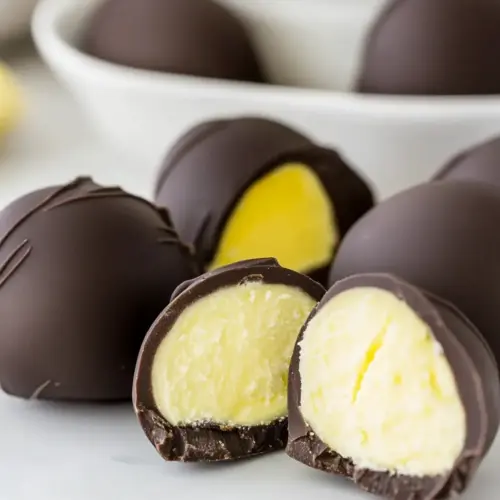
Sugar Free Easter Eggs
Sugar Free Easter Eggs are rich, creamy, and satisfyingly crisp without added sugar. These easy treats pair a glossy dark chocolate shell with a velvety mascarpone filling, perfect for holiday platters or gifting. Ideal for low carb occasions, they deliver bold chocolate flavor and a delightful texture contrast, making them a must make for those who want indulgence without the sugar.
Equipment
- Silicone Easter egg moulds
Ingredients
- 5.3 oz 150 g dark chocolate I used 90% Lindt, or use 1 cup sugar free chocolate chips Melted and glossy, provides the rich chocolate base and shell for the eggs; contributes deep cocoa flavor and firmness when cooled. Use high-cocoa varieties for less sweetness and a more intense taste, and temper gently for a smooth finish.
- 1 tablespoon butter Softens mixtures and adds silkiness while helping chocolate set with a glossy sheen; contributes a small amount of richness and helps with texture. Melt briefly over low heat or microwave in short bursts to avoid separation.
- 1 cup 250 g mascarpone take out of the fridge at least 1 hour before using Chilled then softened, supplies creamy body and a tangy, luxurious mouthfeel for the filling while balancing sweetness. Allow to warm slightly before folding to ensure smooth incorporation without graininess.
- 1/2 cup 114 g butter room temperature Creamy and aerated when whipped, creates structure and richness within the filling while lending spreadability and stability. Ensure it is at room temperature for easy blending and to avoid lumps when combined with other ingredients.
- 1/2 cup 80 g powdered sweetener Finely powdered sweetener provides bulk and sweetness without sugar, dissolves easily into the filling to prevent grittiness, and helps stabilize texture. Use a powdered form to ensure smoothness and adjust amount to taste based on the sweetener's potency.
- 1/4 teaspoon yellow food colouring Concentrated dye adds a bright yellow hue to the filling or decorations without altering flavor; a small pinch goes a long way to achieve pastel tones. Use gel or liquid sparingly and mix thoroughly for even coloration.
Instructions
- Break the chocolate into squares (or use sugar free chocolate chips) and put in a bowl together with 1 tablespoon of butter. Melt in a water bath or in a microwave (1 minute, then stir).: The aroma at this stage is pure cocoa, with a faint buttery sweetness joining the dark notes, and this combination sets the flavor foundation. I find chopping the bar into uniform pieces helps it melt evenly so you avoid hot spots. If you are using chips, they tend to be uniform and convenient, but watch for any added stabilizers that can affect gloss. A common mistake is rushing the melting which can scorch the chocolate leading to a grainy texture, so patience is key. For consistency, keep the bowl dry and free of steam, because even a little water can seize the chocolate.
- Put 1 teaspoon of the chocolate mix into each Easter egg mould. Swirl around and use the back of your spoon to coat the mould. Freeze until set. Repeat 2 more times until you have used two thirds of the chocolate.: When you heat the bowl the scent deepens into warm cocoa and the texture moves from grainy to glossy and fluid, which tells you it is ready to coat. I prefer a gentle water bath because it offers control, but a microwave in short bursts works if you stir thoroughly between intervals. Stirring cools the mixture slightly and distributes heat, preventing pockets of overcooked chocolate. If you overheat, it can become dull or clumpy, so stop as soon as it is smooth and shiny. Keep the temperature moderate, because chocolate changes texture rapidly near its melting point.
- For the filling, blend the room temperature butter and powdered sweetener until fluffy and well-incorporated. Then add the mascarpone and blend briefly until smooth. Don't over-blend here! Now put 1/4 of this mix into a separate bowl and add 1/4 teaspoon food colouring to make the egg yolk mix.: As you spoon the chocolate, it should glide and leave a glossy film on the mould walls, and the feel is slick and cool to the touch. Swirl to coat the interior evenly and use the back of your spoon to smooth out any drips or bubbles. Air bubbles will create thin spots, so tap the mould gently on the counter to release trapped air. A frequent misstep is applying too much at once which yields a very thick shell, so aim for a thin, even layer for the right crack and bite.
- Now spoon the white mascarpone cream into the chocolate shells. Make an indentation into the top and add the egg yolk mix. Flatten.: The visual cue to look for is an even sheen with no streaks, indicating full coverage, and the sound is a gentle slosh as the chocolate spreads. You want a consistent film that will set into a crisp shell, so take your time smoothing. Tempering by controlled cooling at this stage helps the shell snap instead of bending, so chill briefly if needed. A mistake to avoid is leaving uneven thickness which causes weak points that crack while unmoulding; check each mould carefully.
- Spoon over another teaspoon of melted chocolate over the top to seal your keto creme eggs, using the remainder of the chocolate. Place back into the freezer for about 20 minutes until they are fully set.: The chocolate will firm and the aroma will subside to a woody cocoa note as the shell becomes solid, giving you a tactile firmness when you press it lightly. Freezing speeds the process and helps the shells contract slightly, which makes later unmoulding easier. However, avoid leaving them in the freezer too long with strong odors nearby, as chocolate can absorb aromas. If you skip this step or rush it, the filling may melt the shell when added, so ensure a firm set.
- Repeat 2 more times until you have used two thirds of the chocolate: Layering builds shell thickness slowly so the structure is strong without being clunky, and each thin layer bonds to the last producing a smooth exterior. Between coats you will notice the sheen returns as the chocolate melts and settles, a sign the layers are integrating. A common error is applying subsequent coats while the previous one is still warm, which can cause pooling, so always allow a short firming period. Keeping consistent portions helps yield uniform eggs.
- For the filling blend the room temperature butter and powdered sweetener until fluffy and well incorporated: As you whip, the mixture becomes pale and aerated, with a soft, almost cloud like texture and a sweet, buttery scent. This aeration gives the filling body, preventing it from feeling heavy when combined with mascarpone . If the butter is too cold it will remain lumpy, while too warm will be greasy, so room temperature is essential. Overbeating can create an overly soft texture, so stop when it holds light peaks.
- Then add the mascarpone and blend briefly until smooth: The mixture should become luxuriously silky, and the mild tang of the mascarpone will brighten the flavor, balancing the sweetener. You want a smooth but stable filling, so I blend just until the streaks disappear to avoid thinning the mixture. Over-blending breaks down the structure and can make the filling runny, so mix just until homogenous. If you see separation, chilling briefly can help it firm up again.
- Now put 1/4 of this mix into a separate bowl and add 1/4 teaspoon food colouring to make the egg yolk mix: The yellow patch should look vivid but still soft and creamy, and the scent stays gently dairy forward. Concentrated colouring means you need very little to reach a pleasing hue, and the small separate portion gives you control over intensity. Avoid adding too much liquid colour that could thin the filling, and if the colour seems patchy, fold gently until uniform. Using the right proportion prevents the yolk from overpowering the texture.
- Now spoon the white mascarpone cream into the chocolate shells: The cool, creamy filling should contrast with the slightly brittle shell, and the tactile sensation as you press the cream in is soft and yielding. Make an indentation on top to accept the yolk portion so the look is authentic and the yolk remains centered. Work gently to avoid cracking the shell, and wipe the rim clean to ensure the seal will be smooth. A common mistake is overfilling which makes sealing messy and increases the chance of leaking.
- Make an indentation into the top and add the egg yolk mix: The small dollop of yellow should sit like a sunny spot, and when you flatten slightly it blends into the white filling without smearing. This visual surprise is the payoff for careful assembly, so take a moment to position it neatly. If the filling is too warm the yolk can sink or spread, so chill briefly if needed. Avoid pressing so hard that you push the filling out of the shell.
- Flatten: A gentle press evens the surface and prepares the cavity for sealing, and the feel should be cohesive, not sloppy. A clean flattening ensures the sealing chocolate will adhere well and gives a professional finish. If the surface is sticky, chill briefly, as trying to seal a warm surface can melt the shell. Over pressing can cause the shell to crack, so be delicate.
- Spoon over another teaspoon of melted chocolate over the top to seal your keto creme eggs using the remainder of the chocolate: The final layer should spread into a smooth, glossy cap that locks the filling inside, and the aroma becomes a focused chocolate note again. Work quickly but precisely so the chocolate bonds before it firms, and smooth with the back of a spoon for an even finish. If you see gaps, add a bit more, but avoid applying too much which affects bite. Sealing properly is what keeps the texture contrast intact during storage.
- Place back into the freezer for about 20 minutes until they are fully set: As they chill the shell will harden into a satisfying snap while the filling stays creamy, and you will notice the surface harden to a clean shine. This final set also helps the chocolate contract slightly for easy release. Do not leave them near strongly scented foods while freezing as chocolate can pick up odors. If you try to unmould too early the shells can deform, so be patient and ensure they are firm.
Notes
- Adjust chocolate intensity Swap between 70 percent and 90 percent dark chocolate to change bitterness and mouthfeel, keeping the rest of the recipe identical to maintain shell behavior.
- Use sugar free chocolate chips If you want convenience, choose chips labeled sugar free which often melt consistently and speed up the process without affecting set time much.
- Make smaller portions Use smaller moulds to reduce calories and net carbs per piece, and shorten freezing times slightly for faster turnaround.
- Swap butter proportions carefully If you try cream cheese substitution notes suggest adjusting amounts, do it in small increments and test a single egg before scaling up.
- Vary yolk color Use a tiny pinch of concentrated gel yellow food colouring to get vivid yolks, and mix in a small separate bowl for control.