Sugar Cream Pie
Sugar Cream Pie is a creamy, comforting custard style pie with a crisp crust and warm spice notes. This easy dessert uses simple pantry staples like sugar, cornstarch, and half and half to create a silky filling, perfect for an easy weeknight dessert or a fall gathering. Make ahead friendly and crowd pleasing, it s a persuasive reason to bake it today.
Equipment
- 9-inch pie plate
- Parchment Paper
- Pie weights or dried beans
- Medium Saucepan
- Whisk
- Spatula
Ingredients
- 19 -inch pie crust (from scratch, frozen, or a box of 2 refrigerated) Prebaked or frozen crust provides a ready-made shell that holds the filling and yields a crisp edge; choose a 19-inch crust to fit the recipe and prevent shrinkage during baking. Ensure crust is thawed if frozen and dock or weight if blind-baking to avoid bubbles. For homemade crust, chill thoroughly before rolling for best texture.
- 1 cup (200 g) granulated sugar Sweetens the custard filling and helps create a smooth, caramelized surface when heated; measure 1 cup (200 g) precisely for balanced sweetness. Dissolve sugar into the liquid base to avoid graininess and stir constantly while cooking to prevent scorching.
- 1/4 cup (32 g) cornstarch Thickens the filling by gelatinizing when heated with liquid, producing a custard-like set; use 1/4 cup (32 g) cornstarch for a creamy but sliceable texture. Mix with a small amount of cold liquid first to form a slurry to prevent lumps when added to the hot mixture.
- 2 cups (474 ml) half and half Adds richness, creaminess, and body to the custard while contributing to mouthfeel and flavor; 2 cups (474 ml) half and half provides a balance between milkiness and fat. Heat gently with sugar and cornstarch to activate thickening without scalding; higher-fat dairy will make a denser filling.
- 6 tablespoons (84 g) unsalted butter, sliced Enriches the filling with butterfat for a silky finish and slight gloss; 6 tablespoons (84 g) sliced into pieces melt evenly into the warm custard. Add gradually off heat or at the end of cooking and whisk until fully incorporated to avoid separating.
- 1 teaspoon vanilla Adds warm, sweet floral notes that enhance the custard's flavor profile; 1 teaspoon vanilla deepens overall taste without overpowering. Use pure vanilla extract for best results and stir in after removing from heat to preserve aroma.
- 1 teaspoon cinnamon Introduces a warm, aromatic spice element that complements the sweet filling; 1 teaspoon cinnamon provides a classic pairing with creamy pies. Use ground cinnamon and adjust slightly to taste, but maintain the measured amount for intended balance.
- Pinch nutmeg Provides a subtle warm, nutty background note that rounds out the spice blend; a pinch of nutmeg adds complexity without dominating the filling. Grate fresh nutmeg if possible for brighter flavor and sprinkle sparingly to keep it delicate.
Instructions
- My all butter pie crust: Place crust in 9-inch pie plate and chill at least 30 minutes. Preheat oven to 400°F. Line cold crust with parchment paper and fill pie with beans or pie weights. Bake 15 minutes. Carefully remove parchment with pie weights. Poke holes all over the bottom of the crust with the tines of a fork and continue to bake for 5-8 minutes, or until the bottom of the crust is no longer opaque.: Place crust in 9-inch pie plate and chill at least 30 minutes. Preheat oven to 400°F. Line cold crust with parchment paper and fill pie with beans or pie weights. Bake 15 minutes. Carefully remove parchment with pie weights. Poke holes all over the bottom of the crust with the tines of a fork and continue to bake for 5-8 minutes, or until the bottom of the crust is no longer opaque : The oven s initial heat causes the butter in the pie crust to steam, creating flaky layers, while chilling the dough first helps it keep its shape. As the crust bakes the edges should take on a faint golden hue and you ll hear a faint crackle as moisture leaves, signaling progress. Removing the parchment and weights lets the bottom brown a bit, and pricking the base prevents air pockets. A common mistake is removing the weights too soon, which can cause the sides to slump, so wait until the edges have set. You want the bottom to lose its opaque, doughy look; that visual cue shows the starches have cooked and the crust will stay crisp once filled.
- Pillsbury refrigerated crust: Place crust in 9-inch pie plate and chill at least 30 minutes. Preheat oven to 400°F. Line cold crust with parchment paper and fill pie with beans or pie weights. Bake 12 minutes. Carefully remove parchment with pie weights. Poke holes all over the bottom of the crust with the tines of a fork and continue to bake for 5-8 minutes, or until the bottom of the crust is no longer opaque.: Place crust in 9-inch pie plate and chill at least 30 minutes. Preheat oven to 400°F. Line cold crust with parchment paper and fill pie with beans or pie weights. Bake 12 minutes. Carefully remove parchment with pie weights. Poke holes all over the bottom of the crust with the tines of a fork and continue to bake for 5-8 minutes, or until the bottom of the crust is no longer opaque : Refrigerated crusts often respond faster to heat, so the slightly shorter blind bake time helps prevent overbrowning. You ll notice a more uniform, paler golden tone compared with an all butter crust. When you take out the parchment and weights the surface should look set, and a fork used to prick the base will leave evenly spaced dots. Be cautious of overheating, as these crusts can brown quickly around the rim; if the edges deepen too soon, shield them with foil to avoid bitterness, because burnt edges will carry through to every bite.
- Other type of crust: Follow the directions on the package or recipe for blind baking a crust for a single crust filled pie.: Follow the directions on the package or recipe for blind baking a crust for a single crust filled pie : Different crusts have unique behaviors, from frozen to pressed crumb crusts, so following the manufacturer s or recipe s guidance is the safest path. You should observe whether the base firms up and loses that raw appearance, and listen for a faint toasting aroma that indicates proper baking. A typical pitfall is assuming all crusts need the same time or weight level; crumb crusts rarely take weights and can overbake if treated like dough based crusts. Adjust based on visual and olfactory cues rather than strictly on time.
- The pie crust doesn’t need to be cooled before filling and baking, so once the crust goes in for the second bake, start making the filling.: Starting the filling while the crust finishes saves time and ensures the filling is hot when poured into the warm shell, promoting a smooth integration and a glossy finish. As the filling heats you ll smell butter and warm dairy, which is a good sign the mixture is coming together. Avoid letting the crust sit too long before filling because trapped steam can soften the bottom; the residual oven heat helps drive off moisture when the pie finishes baking.
- Whisk sugar, cornstarch and half and half in a medium saucepan and set over medium heat. Add the butter and stir until butter is melted, then stir constantly until mixture thickens and bubbles and coats the back of a spoon. Remove from heat and stir in vanilla.: As you warm the half and half with the dry sugar and cornstarch , you ll see the mixture go from milk like to glossy and slightly translucent, thickening as the starch gelatinizes. Adding sliced butter lets it melt evenly, enriching the texture and giving a silky sheen. Stir constantly to avoid scorching on the pan bottom; you should see small, vigorous bubbles and the mixture will cling to the back of a spoon like a ribbon. If you skip constant stirring you risk lumps or a burnt flavor, so keep your attention focused until you remove it from heat, then stir in the vanilla off heat so its aroma remains bright.
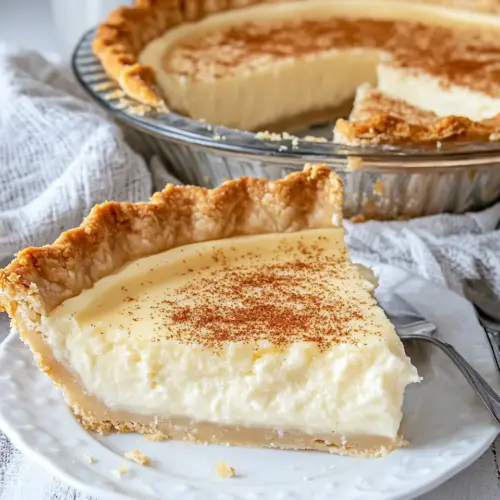
- Pour hot mixture into pie crust. Sprinkle with cinnamon and nutmeg.: The scent of warm spices will bloom as the hot filling meets the shell, creating an inviting aroma that fills the kitchen. Pour steadily so the filling settles evenly, and use a spatula to catch drips and smooth the top if needed. Dusting with cinnamon and a pinch of nutmeg before baking forms a lightly spiced top layer that deepens the flavor without overpowering the custard. A common oversight is piling spices in one spot; try to distribute them evenly for balanced notes in every forkful.
- Bake pie at 350°F for 15-20 minutes, or until the top seems set and the pie just slightly jiggles when you tap it.: During this gentle bake the filling firms and the surface may take on a faint golden tone, while the center retains a slight wobble that will finish setting as it cools. Listen for a subtle settling sound and watch for the edges to be slightly puffed; avoid overbaking, since that leads to a dry, curdled texture. The right moment to remove it is when a gentle tap yields a soft jiggle in the center, like a softly set custard, because carryover heat will finish the set while it cools. Removing it too early can cause runny filling, so err on the side of a brief extra minute if needed, but keep a close eye.
- Cool completely on the counter then cover with plastic wrap and chill for at least 1 hour before serving.: Cooling is crucial because it allows the filling to firm and the flavors to meld; you ll notice the surface tighten and the aroma settle into a comforting, steady note. Once chilled the pie slices cleanly and the texture becomes satiny rather than loose. A frequent mistake is slicing while still warm, which causes weeping and an untidy presentation. Wrapping the pie after it reaches room temperature prevents refrigerator odors from contaminating the flavor and maintains moisture balance.
- Store in refrigerator. Pie can also be frozen for up to 3 months.: In the fridge the pie keeps its texture and freshness for several days, and chilling preserves the custard s stability. For freezing, wrap tightly in plastic and foil to avoid freezer burn; thaw overnight in the refrigerator before serving to let the texture recover. Avoid repeated thawing and refreezing, as temperature swings can create a grainy texture in the filling. When serving after freezing, allow the pie to come to a cool but not warm temperature so the filling regains its smoothness.
Notes
- Use an all butter crust for flavor if you want a richer, flakier edge, the butter s steam creates distinct layers that enhance each bite.
- Refrigerated crust for speed choose a store bought refrigerated crust when you need to save time, it yields reliable results with less fuss.
- Prevent lumps by whisking combine cornstarch with the sugar before adding the half and half to ensure a smooth filling as it heats.
- Slice cleanly after chilling wait at least one hour in the refrigerator so the filling firms and the slices come out neat on the plate.
- Shield crust edges if browning too fast tent foil around the rim during the final bake to keep the crust from becoming overly dark while the filling finishes.
- Freeze for make ahead wrap the cooled pie tightly for up to three months, then thaw overnight in the fridge and serve chilled for best texture.