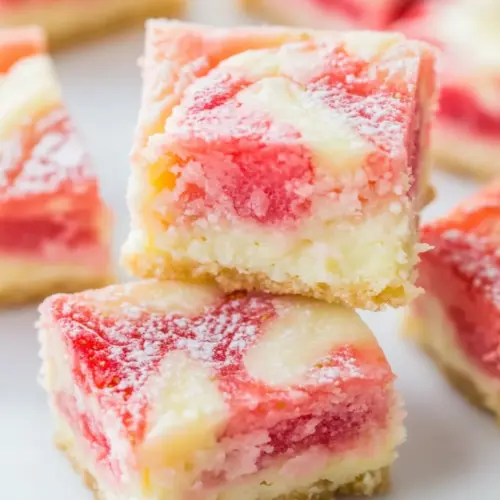
Strawberry White Chocolate Gooey Bars
Strawberry White Chocolate Gooey Bars are a creamy, sweet traybake with a tender cake mix base, pockets of melted white chocolate, and a sticky condensed milk ribbon. Easy to assemble and perfect for potlucks or weeknight treats, they deliver a mix of soft and slightly crisp textures. Make them for gatherings when you want a no fuss dessert that everyone will love.
Equipment
- Handheld electric mixer
- 9x9 inch pan
- Aluminum Foil
- Wire Rack
- Spatula
Ingredients
- 1/2 cup unsalted butter, very soft Soften and cream to provide a tender, rich base for the dough while contributing moisture and flavor; very soft butter helps bind the dry cake mix and creates a melt-in-your-mouth texture when baked. Work briefly to incorporate air for a lighter crumb, then avoid overmixing to keep gooey centers. Use unsalted to control overall salt level, adjusting later if needed.
- one 15.25-ounce box strawberry cake mix Add structure, sweetness, and strawberry flavor while acting as the primary dry component that forms the batter; a 15.25-ounce box of strawberry cake mix brings leavening agents and flavoring already balanced for quick assembly. Sift or gently combine to prevent lumps and ensure even distribution with the butter and egg. Cake mix streamlines the recipe by eliminating separate flour, sugar, and rising agents.
- 1 large egg Bind and enrich the batter by adding moisture, fat, and protein that help create a cohesive, tender texture; one large egg also supports structure so bars hold together while remaining gooey. Beat in until uniformly incorporated to ensure even cooking and lift. Use at room temperature to blend more smoothly with other ingredients.
- 1 cup white chocolate chips Provide pockets of creamy, sweet chocolate that melt into gooey pockets, enhancing richness and offering textural contrast in each bar; white chocolate chips also contribute additional sweetness and a smooth mouthfeel. Fold in gently to prevent breaking the chips while ensuring they are evenly distributed throughout the batter. Reserve a few to sprinkle on top if desired for visual appeal.
- about 60% of one 14-ounce can sweetened condensed milk, use about 8 ounces, I use fat-free Add concentrated sweetness, creaminess, and a sticky, gooey consistency that helps create the signature gooey center; using about 8 ounces (roughly 60% of a 14-ounce can) balances moisture without making the batter too thin. Pour gradually to control consistency and incorporate fully for even gooeyness. Fat-free condensed milk can be used to reduce calories while maintaining sweetness and binding properties.
Instructions
- Preheat oven to 350 F and line a 9×9-inch pan with aluminum foil (strongly recommended for easier cleanup) and spray with cooking spray; set aside.: Warm, slightly sweet aromas begin the moment the pan is ready, and preheating ensures the edges brown evenly. You should feel a steady heat if you place your hand near the oven door, and the foil makes release effortless once the bars cool. Why it matters, the correct oven heat encourages the edges to set while the center stays gooey. A common mistake is skipping lining the pan, which can make removal messy.
- To a large bowl, add the butter and beat with a handheld electric mixer on medium-high speed until smooth and creamy.: As you beat the softened butter , you will notice it lighten slightly and become glossy. This silky texture helps the dry mix cling and form a cohesive dough, and beating on medium-high incorporates tiny air pockets that aid tenderness. If the butter seems grainy, it may be too cold, so let it sit a little. Avoid overbeating to the point it becomes overly fluffy, which can change texture.
- Add the cake mix, egg, and beat on low speed to combine. The batter will be very thick; keep beating until it goes from pea-sized crumbles to a tacky, thick dough.: After adding the box of cake mix and the egg , switch to low so the dry mix is incorporated without dusting your counter. The batter will transition from powdery crumbs to a tacky mass. You will hear the mixer slow as the dough thickens, and your arms might feel the resistance if you switch to a manual stir. This gentle mixing preserves the intended texture. A common slip is over mixing on high which can make the dough dense.
- Add between half and two-thirds of the dough to the prepared pan to form an even, smooth base layer. I use a spatula but use your hands (sprayed with cooking spray) if that’s easier; set remaining dough aside.: Press the portioned dough into the pan until it forms a flat base. Use a spatula or lightly greased hands to smooth it, and you will feel the dough give under your palm as it evens. This base creates the foundation for the gooey middle, so an even layer helps uniform baking. If you press too hard you can make the base too compact; aim for gentle, even pressure.
- Evenly sprinkle the white chocolate chips over the dough.: Scatter the white chocolate chips so each bite gets a creamy surprise. The visual of white chips against the pinkish base is appealing, and when they begin to soften in the oven, you will see the chips swell and gleam. If you cluster them, some bars will be overloaded while others lack chocolate, so distribute them with attention.
- Evenly drizzle with about 60% of the can (about 8 ounces) of sweetened condensed milk; just eyeball it.: The glossy sweetened condensed milk should flow slowly as you pour, forming a shiny sheet over the chips. It creates the gooey ribbon that defines these bars, and the scent deepens to a caramel like sweetness as it bakes. Pouring too quickly can flood low spots, so go steady. Too much will cause a very loose center before baking fully sets it.
- Add the rest of the dough in approximately 1-inch pieces over the sweetened condensed milk, lightly pressing it down. You won’t have complete coverage; this is okay.: Place the reserved dough pieces on top so they dot the surface rather than cover it completely, creating islands that bake into crisp pockets. Lightly pressing ensures contact without fully sealing the gooey layer. This patchwork look is expected and part of the bars charm. Overworking the top dough can eliminate the desired irregular texture.
- Bake for about 27 to 30 minutes or until edges are set and the center is mostly set; it’s okay if it’s a little jiggly. I judged the doneness by looking at the edges and as they turned light golden brown, I removed the pan from the oven.: As the pan bakes, the aroma will intensify and the edges will turn a light golden brown. The center should wobble slightly when nudged, indicating a perfect gooey finish. The visual cue of set edges is key because overbaking drains the fudgy middle. A typical error is pulling it out the moment the center looks very wet; allow the carryover heat to finish the set.
- Allow pan to cool on a wire rack for at least 2 to 3 hours (overnight is better) or until bars have firmed up enough to cut.: Cooling is when the gooey layer stabilizes into sliceable bars, and the kitchen will smell warm and sweet as steam dissipates. Cutting too soon yields messy slices that fall apart, while patient cooling produces clean pieces with intact layers. If you must speed this up, chill briefly in the fridge, but rapid cooling can slightly change texture.
Notes
- Use full fat condensed milk for a richer, creamier center that feels more indulgent and glossy.
- Swap to regular or reduced fat white chocolate chips to adjust sweetness and melting behavior across seasons.
- Press the base more thinly if you prefer a higher goo to crust ratio, which creates softer bars.
- Chill before slicing for neat, bakery style squares that are served at gatherings without crumbling.
- Toast the edges lightly by leaving in a warm oven for a minute after turning off heat, which enhances the caramelized notes.
- Alter piece size depending on occasion, smaller bites are perfect for parties, while larger squares suit dessert plates.