Strawberry Topped Cheesecake
Strawberry Topped Cheesecake is a creamy classic with a buttery, toasty crust and a glossy crown of whole berries. This easy yet elegant dessert balances rich, smooth filling with bright, fresh strawberries, perfect for celebrations or an indulgent weekend treat. Make it ahead for fuss free entertaining, and enjoy slices that look impressive and taste irresistible.
Equipment
- Food Processor
- 10 inch springform pan
- Paddle attachment
- Oven
- Cooling rack
- Microwave
Ingredients
- 20 whole graham crackers (10 ounces, broken into pieces) Crushed and compacted to form the base, providing a crunchy, sweet foundation for the cheesecake and helping the filling set; breaking into pieces allows even mixing with melted butter for a cohesive crust.
- 3/4 cup (1 1/2 sticks) cold butter, diced Cold and diced to be cut into the graham cracker crumbs, contributing richness and tenderness to the crust; chilling helps maintain structure while blending and prevents over-softening of the crumb mixture.
- 1/2 cup brown sugar Added to the crust mixture to introduce molasses notes and balanced sweetness, enhancing complexity and browning; helps bind the crumbs slightly and complements the buttery flavor.
Instructions
- Preheat oven to 350º.: You should feel the warm oven preheating hum, and small waves of heat when you open the door briefly. A well preheated oven ensures even baking and proper rise; if the oven is not fully up to temperature, the center may cook unevenly. A common pitfall is rushing this step, which leads to a cheesecake that bakes unevenly and cracks. I recommend using an oven thermometer to confirm accuracy.
- Add graham crackers, butter, and brown sugar to a food processor and pulse till crumbs start to stick together.: As you pulse, listen to the rhythmic chopping and watch the crumbs transform from coarse bits to a cohesive mixture that holds when pressed. This texture signals the right proportion of fat to crumbs, essential for a crust that binds. Overprocessing can create a paste, while underprocessing leaves large pieces that resist compacting. If you do not have a food processor, use a heavy-duty plastic bag and a rolling pin, but aim for an even crumb size.
- Press crumbs on the bottom and most of the way up the sides of a 10-inch springform pan with 3-inch sides.: Press firmly and evenly so the crust has a compact base and defined sides to support the filling. You should feel the crust become solid under your hand, and visually it will look smooth and even. Patching gaps now prevents the filling from seeping underneath. A mistake I see is pressing too lightly, which causes the crust to crumble during slicing, so use the flat bottom of a measuring cup to compact it well.
- Bake for 10 minutes. Cool on rack. Keep the oven on while preparing the filling.: During this short bake, the crust develops a toasted scent and a slightly darker color, signaling that the butter has set. Remove it to cool on a rack briefly; cooling helps it firm up before adding the filling. If you skip this step, the crust can become soggy under the wet filling. Keep the oven on as the recipe indicates, and watch for a golden edge rather than a burned look.
- With the paddle attachment, beat cream cheese, sugar, lemon juice, vanilla, and salt together till very smooth, scraping down the edges of the bowl as needed.: As you beat the cream cheese mixture, it should transform from lumpy to glossy and velvety, with a light, slightly tangy aroma from the lemon juice . Stopping to scrape the bowl ensures no pockets of unmixed cheese remain, which would cause lumps in the baked filling. Overbeating at high speed can whip too much air into the batter causing cracks later, so keep the speed moderate. If the mixture looks curdled, let it come to room temperature briefly and continue gently.
- Add flour and mix till combined. Add eggs, one at a time, just till incorporated, scraping down the sides of the bowl as needed.: The addition of flour helps stabilize the filling, and adding eggs one at a time ensures a smooth, uniform batter. You will notice the mixture becoming silkier after each egg goes in, with a thicker sheen and a quieter beat. Overmixing after the eggs can introduce excess air which may cause cracking, so stop as soon as each egg is incorporated. A common error is rushing and dumping all eggs at once, which makes it harder to achieve a consistent texture.
- Pour batter into the crust and bake for about 55 minutes. The center should be just set and the top will be puffed and brown in spots. Cool on a rack for 10 minutes while preparing the topping. Keep oven on.: Pouring the batter releases a dense, creamy aroma and you will see the top puff and begin to set while the center remains slightly jiggly. The baking time produces a set edge and a center that moves gently when nudged, indicating the ideal doneness. If you leave it too long, the top will brown excessively and the filling can dry out. Avoid opening the oven during the first part of baking to prevent a sudden temperature drop that could cause cracking.
- Mix sour cream, sugar, and vanilla. Spread over the top of the cake, stopping just short of the edge.: Letting the cheesecake rest allows residual heat to finish the set without overbaking, and it makes the surface less fragile for the topping. In this short window, prepare the sour cream mixture so it is ready. A mistake is moving the cake too soon to chill which can trap steam and affect texture, so follow the cooling time carefully.
- Bake for 5 minutes. Run a knife around the perimeter of the cheesecake.: The sour cream topping adds a tangy, silky layer that balances sweetness and provides a glossy base for the berries. Spread it gently, leaving a small border so it does not spill over during the next bake. If the topping is too runny, it will slide off, so ensure your mixture has the right thickness. An uneven spread can mar the presentation, so use an offset spatula for control.
- Allow to cool on a rack, then cover and chill overnight.: This brief bake sets the topping and refreshes the cake surface, and when you run a knife around the edge, it prevents sticking as the cake cools. You should notice the topping firm slightly and the knife glide smoothly between cake and pan. If you skip the perimeter cut, the cake may stick to the pan sides and crack as it shrinks while cooling. Use a thin, flexible knife for a clean release.
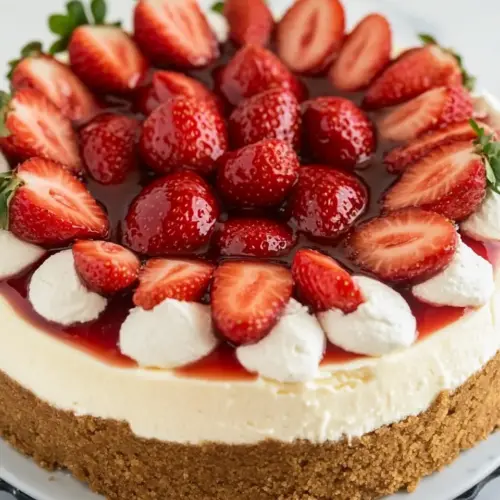
- Before serving, release the sides of the springform pan. Arrange whole berries, pointed sides up, over top of cheesecake.: Cooling first on the rack releases residual heat, then covering and chilling overnight lets flavors develop and the texture fully set, resulting in clean slices. The chilling stage is when the filling tightens into that ideal creamy yet sliceable consistency. A rushed chill can leave the center too soft, so give it the full overnight rest if you can.
- Gently melt jelly in the microwave, then allow it to cool to lukewarm. Brush over top of berries to glaze. Berries may be glazed up to 6 hours before serving. May serve with extra glaze if desired.: Releasing the pan carefully prevents smudging the cake edge, and arranging whole strawberries pointed side up gives a polished, abundant look. The berries will add a fresh aroma and a juicy contrast to each slice. Be gentle when placing them so you do not dent the surface; a common misstep is overcrowding the top, which makes cutting slices messy.
- Gently melt jelly in the microwave then allow it to cool to lukewarm Brush over top of berries to glaze Berries may be glazed up to 6 hours before serving May serve with extra glaze if desired: Warming the jelly makes it fluid enough to brush evenly, and the lukewarm temperature keeps the berries from cooking. The glaze adds shine and seals the fruit, preventing juices from running when sliced. If too hot, the glaze will make the berries soft, so let it cool properly. Brushing lightly avoids pooling, and glazing ahead saves time while keeping the top fresh.
Notes
- Make it gluten free Replace the graham crackers with a certified gluten free cracker or cookie, and press the crumbs firmly to form the same sturdy base required for clean slices.
- Smaller pans If you need individual servings, divide the crust and batter into a muffin tin lined with paper cups or small springform pans, adjusting bake time down until centers are just set.
- Flavor twists Fold a small amount of citrus zest into the filling for extra brightness, making sure to mix gently so the texture stays silky and not grainy.
- Advance prep Bake and chill the cheesecake the day before, then glaze and top with fresh strawberries the morning of service to save time while preserving freshness.
- Transport tips Chill the cheesecake thoroughly and use a flat box with a non slip surface, it will maintain its shape better en route to gatherings.