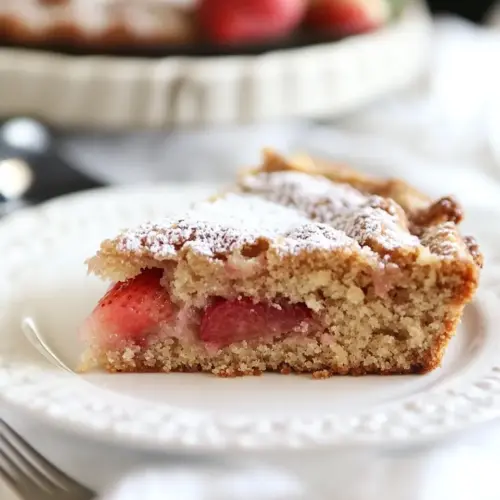
Strawberry Rhubarb Coffee Cake
Strawberry Rhubarb Coffee Cake is a tender, jam infused spring cake with bright, tangy fruit and a buttery crumb. The flaky topping contrasts the soft, slightly tart filling creating a cozy yet fresh bite, perfect for brunch or a relaxed dessert. This easy to love coffee cake highlights seasonal strawberries and rhubarb, making it a must try for warm weather gatherings.
Equipment
- 19-inch cake pan
Ingredients
- 2 cups diced fresh strawberries Provide juicy sweetness and fresh berry flavor that brightens the cake; diced to release juices and create pockets of fruit throughout the crumb. Add texture contrast and visual appeal while contributing natural moisture during baking.
- 1 -1/2 cups diced fresh rhubarb Contribute tangy, slightly tart flavor that balances the sweetness of the strawberries; diced to soften and meld into the fruit filling. Release pectin and moisture when cooked, helping the filling set with a pleasant, sharp note.
- 1 tablespoon lemon juice Add bright acidity to the fruit mixture to enhance flavors and prevent browning; lemon juice also heightens the strawberries' natural sweetness. Provide a subtle freshness that lifts the overall taste profile of the topping.
- 1/2 cup brown sugar Sweeten the fruit mixture with a deep, molasses-like flavor that complements rhubarb's tartness; brown sugar helps balance acidity. Melt during cooking to create a syrupy glaze that binds the fruit pieces together.
- 2 tablespoons cornstarch Thicken the fruit filling by absorbing released juices and forming a stable gel when heated; cornstarch prevents a runny topping. Ensure the fruit layer sets properly so slices hold their shape when served.
- 3 tablespoons salted butter Enrich the fruit filling with a silky, buttery mouthfeel and slightly caramelized flavor when melted; salted butter adds richness and depth. Help create glossy, cohesive fruit topping and improve overall texture.
- 1/3 cup all-purpose flour Tenderize the streusel or crumble topping by contributing a small amount of dry structure; flour helps bind the topping ingredients when mixed with butter and sugar. Provide a base that browns nicely in the oven for crisp edges.
- 1/3 cup brown sugar Offer sweet, caramel notes to the crumb or streusel topping; brown sugar adds moisture and chewiness unlike granulated sugar. Combine with butter and flour to produce a flavorful, crunchy topping component.
- 1 -1/2 cups all-purpose flour Form the bulk of the cake batter's structure by providing starch and gluten for lift and crumb; measure carefully for proper texture. Work with leaveners and liquids to create a tender yet sturdy cake base that holds fruit.
- 1/2 cup granulated sugar Provide sweetness and help tenderize the cake crumb; granulated sugar also assists with browning and creating a fine texture. Interacts with butter and egg to incorporate air when creamed, contributing to lightness.
- 1/2 teaspoon baking powder Leaven the batter gently by releasing carbon dioxide when combined with acid and heat; baking powder contributes rise and a soft crumb. Balance texture without creating large holes, ensuring even cake structure.
- 1/2 teaspoon baking soda React with acidic ingredients like buttermilk to produce immediate lift and tenderness; baking soda supports browning and helps neutralize acidity. Work in tandem with baking powder for proper rise and crumb.
- 1/4 teaspoon kosher salt Enhance overall flavor by balancing sweetness and reducing bitterness; kosher salt rounds out other ingredients. Strengthen gluten network slightly and improve the perception of all combined flavors in the cake.
- 8 tablespoons salted butter Provide rich creaminess and fat that tenderizes the crumb and adds flavor; salted butter contributes both moisture and savory balance. When creamed with sugar, help incorporate air for a lighter cake texture.
- 3/4 cups buttermilk Add acidity and richness to the batter, creating a tender crumb and reacting with leaveners for lift; buttermilk also imparts subtle tang. Contribute moisture while helping achieve a soft, fine-textured cake.
- 1 large egg Bind the batter together while adding structure and richness; egg also contributes moisture and helps with leavening through steam and coagulation. Incorporate proteins that set during baking to stabilize the cake.
- 1/2 teaspoon vanilla extract Impart warm, aromatic flavor and enhance sweetness perception; vanilla extract rounds and deepens the overall flavor profile. Use sparingly to avoid overpowering the delicate fruit notes while unifying the batter.
- Powdered sugar, optional Provide an optional light dusting of sweetness and attractive finish when the cake is cooled; powdered sugar dissolves quickly for a delicate glaze-like appearance. Add a sweet contrast to tart fruit and signal a bakery-style presentation.
Instructions
- In a large saucepan add strawberries, rhubarb, and lemon juice.: As the fruit hits the warm pan you should notice a soft crackle and a fresh, tangy aroma from the lemon juice ; this combination wakes up the strawberries and rhubarb . Make sure your pieces are evenly diced so they cook uniformly, and avoid overcrowding the pan which can steam rather than gently simmer the fruit. A common mistake is adding sugar too early, which can draw out juices prematurely and prevent proper softening.
- Cook on low heat for about 5 minutes until the rhubarb and the strawberries start to soften.: You will see gentle bubbling and the colors deepen as the fruit softens; the rhubarb should lose its firmness while the strawberries begin to break down. Low heat keeps the fruit from scorching and helps flavors meld. Watch carefully because high heat will make the mixture reduce too quickly, concentrating sweetness and risking a burnt bottom.
- While stirring, mash the fruit so it starts to breakdown and become smooth.: Use a wooden spoon or potato masher to press the fruit against the pan surface; you'll create a thick, rustic purée with flecks of fruit for texture. The aroma becomes more jam like as juices release. Overmashing can produce a completely smooth filling if you prefer some texture, stop once you have a mix of smoothness and small pieces.
- In a small bowl mix together brown sugar and cornstarch.: Combining these dry elements ensures the cornstarch disperses evenly and prevents clumping when it hits the hot fruit. The mixture will look sandy and uniform; this step is crucial so you do not get lumps in the filling. A usual slip is adding cornstarch directly to hot liquid where it can clump immediately.
- Pour the brown sugar and cornstarch into the hot fruit mixture, stir constantly and bring to a boil.: As the mix reaches a gentle boil, you will see the liquid thicken and become glossy; stir continuously to avoid sticking. The brown sugar melts into the fruit, lending a deeper color and caramel like undertone. If you stop stirring, the mixture can seize or catch on the pan, so keep moving until thickened.
- Keep stirring until the mixture is thick and then remove from heat and set aside.: When it coats the back of a spoon and the bubbles look more syrupy than watery, it is done; you will also notice the fragrance intensify. Cooling the filling slightly before layering prevents it from sinking into the batter. A common error is to skip the cooling, which can cause the batter to become soggy and the filling to run.
- In a small microwave safe mixing bowl add butter and melt.: Melt the butter until just liquified, you should hear barely a whisper of bubbling if it gets hot; cooled melted butter binds with the dry ingredients for the crumb topping. Do not overheat the butter to the point it smokes, as that will impart an off flavor. If the butter is too hot when mixed with sugar and flour, it can make the topping greasy rather than crumbly.
- Once melted stir in the flour and brown sugar until it looks like coarse crumbs, set aside.: The texture should resemble rough sand with pea size bits, and it should hold its shape when pressed lightly between fingers. This crumb mixture bakes into a crisp, flavorful topping that contrasts the soft cake. If you overwork it, the crumbs can become pasty instead of remaining light and crisp in the oven.
- Preheat oven to 350 degrees F and line the bottom of a 9-inch cake pan with parchment paper and then spray the pan with non-stick spray, set aside.: As the oven warms you will feel the kitchen begin to fill with a warm dry heat that primes the batter for even rise. Lining and spraying the pan ensures easy removal after cooling. Skipping the parchment or spray often results in a cake that sticks, tearing when you try to remove it.
- In a large mixing bowl combine flour, sugar, baking powder, baking soda and salt. Using a pastry blender cut in butter until mixture resembles wet sand and has some pea size crumbles.: The sound of the pastry blender moving through the dry mix is reassuring, and visually you want small pieces of butter about the size of peas. These bits melt during baking creating pockets of tenderness and lightness. If you let the butter get too warm before cutting it in, the mixture will be pasty and the cake texture will suffer.
- In a small bowl whisk together buttermilk, eggs and vanilla extract.: Whisk until the mixture is smooth and slightly frothy; the scent of vanilla extract blends with the tang of buttermilk to form a creamy, slightly tangy liquid that helps produce a tender crumb. A well blended wet mix ensures even distribution when combined with the dry ingredients. If you do not whisk thoroughly, pockets of egg or unincorporated buttermilk can create uneven texture in the baked cake.
- Pour buttermilk mixture into the flour mixture and stir till combined.: As you fold the liquids into the dry mix the batter will come together into a thick, smooth consistency; you may hear a soft scraping sound from the bowl as you scrape down the sides. Avoid overmixing, which develops gluten and yields a tougher crumb, instead stir until just combined and no large streaks remain. Over mixing is the most common cause of a dense cake here.
- Spread half the batter into the prepared pan making sure to cover the bottom of the pan.: The batter should be spread evenly so the fruit layer sits on a uniform base; you can use an offset spatula to smooth it gently. A good visual cue is that the batter creates a thin, even layer that covers all corners. If you press too hard you may compress the batter, so handle it gently for even baking.
- Carefully spread the cooled filling on top of the batter in the pan.: The cooled jam like filling should be spooned gently to avoid tearing the base, and you will notice a shiny surface and thick consistency as you spread. Keep the filling centered and leave a little space near the edge to allow room for the jam to bubble as it bakes. If the filling is too warm it can sink into the batter and cause uneven layers.
- Gently drop the remaining batter on top of the filling and if you can gently spread it over the filling.: Work in small dollops and coax the batter to meet in the middle, leaving some pockets where the filling shows through; this creates a rustic, layered look once baked. The top layer will rise and meld with the filling, creating delightful pockets of fruit throughout. Avoid aggressively spreading which can break through the filling layer and mix the components together.
- Sprinkle crumbly topping over top the cake and add to the oven.: Scatter the crumb topping so it covers the exposed batter and fruit edges, creating golden crunchy accents after baking. You should see contrast between the pale batter and the darker crumbs; these will brown and crisp in the oven. If you heap too much topping in one spot it can stay dense rather than crisping evenly.
- Bake for about 35-45 minutes until the cake is fully cooked. The jam will bake up around the edges and be slightly jiggly but you should be able to see that the top is browned and the top layer is fully cooked.: During baking the kitchen fills with a warm, fruity aroma and you will notice the edges bubbling slightly as the filling sets. Test doneness by checking that the top is golden and a toothpick in the cake portion comes out with a few moist crumbs but not wet batter. A common oversight is pulling the cake out too soon while the center is still very jiggly, which leads to a runny cut slice once cooled.
- Once cooked remove from the oven and let cool completely. This is an important step – if you do not let the cake completely cool and attempt to cut a slice or remove from the pan the jam will run. The cooling process helps the jam set up so it cuts nicely with the cake.: Cooling is when the filling firms and the flavors settle; you will notice the jam lose its high shine and become slightly gel like. Patience here is rewarded by neat slices and a clean presentation. Cutting while warm is the biggest mistake, because the jam will ooze and the cake will not hold shape.
- Sprinkle the top with powdered sugar if desired.: A light dusting of Powdered sugar adds a soft, snowy finish and a whisper of extra sweetness. It is purely decorative and should be applied when the cake is fully cooled so it does not melt. If you add it while the cake is warm the sugar will dissolve and disappear.
Notes
- Cool completely Before slicing, give the cake ample time to come to room temperature; the filling firms as it cools and this prevents a gooey, runny center which is the most common problem.
- Even dice Cut both the strawberries and rhubarb to similar sizes so they cook evenly; uneven pieces can lead to bits that remain too firm or that dissolve completely into the filling.
- Measure flour properly Spoon your all purpose flour into the cup and level it off rather than scooping, this prevents a dense cake from too much flour.
- Use chilled butter for crumbs Cold butter yields better crumb texture; if it warms you risk a greasy topping rather than crisp crumbs.
- Adjust sweetness sparingly If your strawberries are especially sweet, reduce the added sugar slightly to keep the filling balanced and avoid cloying results.