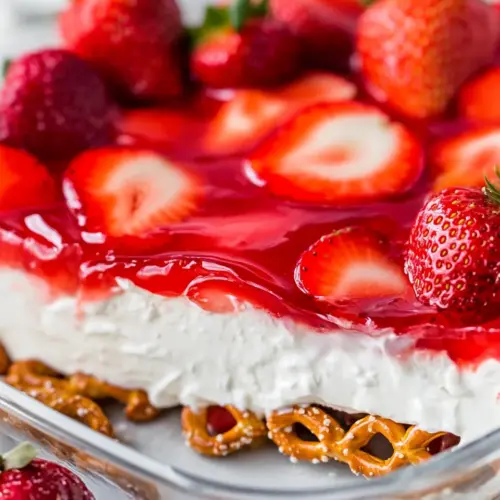
Strawberry Pretzel Salad
Strawberry Pretzel Salad is a creamy, crunchy layered dessert with a salty pretzel crust, tangy cream cheese filling, and glossy strawberry jello topping. It is easy to assemble, crowd friendly, and perfect for potlucks or make ahead occasions. The contrast of textures and bright fresh strawberries make it a must try for anyone who loves a nostalgic, refreshing dessert.
Equipment
- 13 x 9 baking pan
- Mixing Bowls
- Electric Mixer
- Measuring Cups
- Spatula
Ingredients
- 2 cups crushed pretzels Crushed to form a crunchy, salty base that contrasts the sweet filling; combine with melted butter and sugar then press into the pan to bake briefly so it sets firmly for slicing.
- 1/2 cup unsalted butter Melted to bind the pretzel crumbs and sugar into a cohesive crust; adds richness and helps the crust hold its shape once cooled.
- 1/4 cup granulated sugar Sprinkled into the pretzel crust mixture to add sweetness and balance the salty pretzels; helps the crust caramelize slightly when baked for texture.
- 8 oz cream cheese softened Softened and beaten until smooth to create a creamy, tangy layer that supports the whipped topping; contributes richness and helps stabilize the middle cream layer.
- 1/2 cup granulated sugar Whisked into the cream cheese layer to sweeten and lighten the filling; helps achieve a spreadable, dessert-like consistency.
- 8 oz whipped topping such as Cool Whip, thawed Folded into the sweetened cream cheese to create an airy, light topping that provides volume and a smooth, cloud-like texture; helps the strawberry layer sit evenly.
- 6 oz strawberry jello I used two 3oz packages Dissolved in boiling water to create a gelatinous strawberry layer that sets over the cream layer; provides concentrated strawberry flavor and a firm, glossy finish.
- 2 cups boiling water Poured over the gelatin mix to dissolve the powder and activate the gelling process; the hot water ensures the jello properly sets into a firm layer once chilled.
- 4 cups sliced strawberries fresh Sliced and arranged into the jello or stirred into the set gelatin to add fresh fruit texture and bright flavor; contributes natural sweetness and visual appeal to the top layer.
Instructions
- In a medium bowl, combine crushed pretzels, sugar and melted butter.: The moment you stir these together you should notice the pretzel crumbs begin to glisten as they soak up the unsalted butter . The aroma will be warm and toasty, and you want an even coating so the crust bakes uniformly. If any clumps remain, press them gently with the back of a spoon to break them apart. A common mistake is not mixing thoroughly which causes uneven binding, leading to a crust that falls apart when sliced.
- Preheat oven to 350 degrees F.: You will feel a subtle warmth in the kitchen as the oven climbs to 350 degrees F, which is the ideal temperature to crisp the crust without overbrowning. Preheating ensures the crust starts setting immediately when baked. A frequent oversight is placing the pan in before the oven is fully hot, which can result in a softer, less crisp base.
- Press the pretzel mixture into the bottom of a 13" x 9" baking pan. Bake for 7 minutes. Cool completely before adding filling.: When pressing, use the bottom of a measuring cup to create a compact, even layer. As it bakes for 7 minutes, the scent of toasted pretzel and butter will fill the room and the crust will firm, turning slightly darker at the edges. Cooling fully is crucial so the cream cheese layer does not slide; if you rush this, the filling may sink into the warm crust and become soggy.
- In a large mixing bowl, mix cream cheese with an electric mixer for 30 seconds.: As you whip the room temperature cream cheese , it should soften and loosen, becoming smoother and easier to incorporate other ingredients. The texture will shift from dense to pliable in just 30 seconds. Avoid starting with cold cream cheese because lumps will remain and ruin the silky mouthfeel of the filling.
- Add sugar and whip until fluffy, about 3 to 4 minutes.: Once the granulated sugar is added, continue whipping until the mixture is light and airy, roughly 3 to 4 minutes. You'll see tiny air pockets form and the color lighten slightly, signalling readiness. Overwhipping can introduce too much air and make the filling unstable, so stop when it holds soft peaks and feels pillowy.
- Add 1/3 of whipped topping and fold in gently with a spatula. Repeat until all whipped topping is folded in.: Folding the whipped topping in thirds preserves the cloudlike texture. Use a sweeping motion and turn the bowl rather than stirring aggressively, so you keep the volume. If you mix vigorously, the filling will deflate and feel dense instead of light.
- Spread the filling over cooled crust. Place pan in the fridge and chill for 30 minutes.: When the filling meets the cooled crust, the contrast of cool creaminess on the crisp base is satisfying. Smooth it evenly with a spatula to create a flat surface for the fruit layer. Chilling for 30 minutes firms the filling so the subsequent jello pour will not sink in; skipping this step often leads to an uneven top and mixed textures.
- Add jello to boiling water. Stir until it dissolves. Cool to room temperature.: Dissolving the strawberry jello in 2 cups of boiling water should yield a clear, fragrant liquid. Stir until fully dissolved and then let it reach room temperature so it will set properly when poured. Pouring while warm can melt the filling and when too cool it may begin to gel and form stringy clumps, so aim for that comfortable room temperature.
- Arrange strawberry slices over filling. Slowly pour cooled jello over slices.: Arrange the strawberries in an even layer, taking a moment to place prettier slices on top if presentation matters. Slowly pour the cooled strawberry jello so it envelopes the fruit gently rather than displacing it. Pouring too quickly can push the berries around and cause gaps in the top layer, while pouring too late when the jello starts to thicken can lead to uneven pockets.
- Place the dessert in the fridge to set, for at least 4 hours.: As the pan chills, the strawberry jello will firm and the layers will knit together. Expect a cool, slightly springy top when it is properly set. Patience here ensures clean slices with distinct layers; cutting into it too soon yields a runny top and messy portions. For best results, make it the day before and chill overnight.
Notes
- Crust packing: Press the pretzel mixture with the bottom of a measuring cup for a compact crust that holds together when sliced.
- Butter control: Use melted unsalted butter measured precisely to avoid an oily crust; allow it to cool slightly so it does not soften the pretzel crumbs excessively before baking.
- Sugar adjustment: Reduce the granulated sugar in the filling by one to two tablespoons if you prefer a less sweet dessert, tasting before chilling to ensure balance.
- Whipped topping folding: Fold whipped topping in gently in thirds to retain air, turning the bowl and using a wide spatula so the filling stays light.
- Jello cooling: Let the strawberry jello reach room temperature on the counter, stirring occasionally to avoid skin formation before pouring over the fruit.
- Make ahead: Chill the assembled dessert at least 4 hours or overnight for best slicing and flavor melding, which also frees up time on the day you serve it.
- No bake crust option: If you prefer not to bake, press the crust firmly and refrigerate for at least 30 minutes to firm, though baking provides a crisper texture.