Strawberry Poke Cake
Strawberry Poke Cake is a creamy, fruity dessert that combines a tender white cake with bright gelatin filled pockets and a cloud of whipped topping, making an easy weeknight or party dessert. The freeze dried strawberries and fresh slices add intense berry flavor and texture. This pretty, simple cake is worth making when you want a crowd pleasing, sliceable treat with minimal fuss.
Equipment
- Nordic Ware Metal 9×13 Covered Cake Pan
- KitchenAid 9-Speed Digital Hand Mixer
Ingredients
- 1 box white cake mix 15.25 ounces Provide a light, tender cake base when prepared according to package instructions; yields the structure and bulk for the poke cake. Follow box directions for mixing and baking times to ensure proper rise and crumb texture.
- Water, vegetable oil, and eggs/egg whites as called for on the cake mix box Combine liquids and fats as specified to activate leavening and create a moist batter; these components ensure the cake bakes evenly. Adjust measurements exactly per the cake mix box to maintain intended texture and consistency.
- 1 ounce freeze-dried strawberries 28 grams, chopped Add an intense concentrated strawberry flavor and vibrant color when finely chopped; contributes natural fruit essence without extra moisture. Sprinkle or fold into batter or topping as specified to enhance strawberry aroma and speckles throughout the dessert.
- 1 package strawberry-flavored gelatin 3 ounces Deliver a classic strawberry-flavored gelatin concentrate that dissolves to form a soakable syrup; provides sweetness, flavor, and pink hue for the poke holes. Dissolve thoroughly for even distribution so the cake absorbs the flavored liquid uniformly.
- 1 cup boiling water Dissolve gelatin and create a hot, pourable syrup that soaks into the cake holes; boiling water activates the gelatin and blends flavors. Pour carefully to ensure the cake soaks up the mixture without becoming overly saturated.
- 8 ounces frozen whipped topping thawed Whip into a light, airy topping or fold gently to add creamy sweetness and stabilize the final texture; provides a cool contrast to the cake layers. Thaw completely before spreading to achieve smooth, even coverage without lumps or separation.
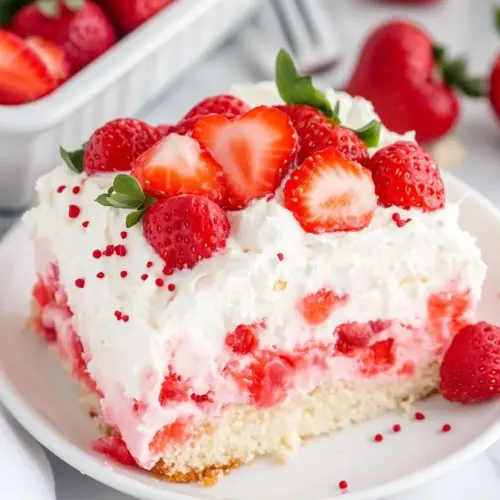
- 1 1/2 cups fresh strawberries sliced Garnish and add fresh strawberry brightness and texture when sliced; offers natural juiciness and visual appeal. Arrange on top just before serving to retain freshness and vibrant color.
Instructions
- Preheat oven to 350°F and line a 9×13-inch pan with parchment paper or spray with non-stick cooking spray.: The air in the oven warms and you may smell a faint warmth even before baking, which signals the oven is ready to bake the cake evenly. Ensuring the pan is prepared with parchment or spray prevents sticking and makes removing the cake effortless, preserving the top surface for the poke step. A common mistake is skipping parchment, which can cause corners to tear when lifting the cake. If your oven runs hot, use an oven thermometer to verify it truly reads 350 degrees. I like to set the prepared pan on the counter so it's ready when the batter is mixed, reducing the temptation to overmix while searching for tools.
- In a large bowl with an electric hand mixer, beat together the cake mix, water, oil and eggs or egg whites on medium-high speed for 2 minutes. Be sure to scrape the bottom of your bowl as needed.: As you mix, the batter will change from grainy to smooth and slightly glossy, and you can hear the mixer soften its pitch as the ingredients emulsify. Beating for the full two minutes builds structure and distributes air for a light cake crumb. Avoid undermixing which leaves pockets of dry mix, and avoid overmixing which can toughen the cake. Scrape the bowl with a spatula at least once to incorporate any dry streaks. If the batter seems too stiff compared to the box photo, check that you added the correct amounts of liquid from the package directions.
- Use a rubber spatula to gently fold in the chopped freeze-dried strawberries into the batter.: Folding keeps the batter airy while dispersing the concentrated strawberry pieces. You will see little red flecks swirl through the batter, and the dry pieces will soften slightly as moisture migrates during baking. A heavy hand here can deflate the batter, so use gentle lifts and turns until evenly distributed. If you notice large clumps, break them up with the spatula, but avoid vigorous stirring which can change texture. The reward is pockets of real strawberry flavor in the finished cake.
- Pour batter into the prepared pan and use an offset spatula or spoon to spread the batter into an even layer.: The batter should settle into the corners smoothly, with an even top that will bake uniformly. Visual cues are important here, a level surface prevents thin edges from overbrowning. Tap the pan gently on the counter to release large air bubbles; you may hear little fizzing as bubbles pop. One pitfall is leaving high ridges, which can bake faster than the center. If that happens, use the offset spatula to smooth and redistribute before sending it to the oven.
- Bake in preheated oven for 30-35 minutes, or until the top of the cake springs back when lightly touched.: The kitchen will begin to smell sweet and warm, and the cake edges will pull away slightly from the pan. A springy top and a toothpick with a few moist crumbs are the right cues that the cake is done without overbaking. Overbaking dries the crumb and makes the gelatin soak unevenly, so check at the 30 minute mark. If the center feels jiggly, give it a few more minutes and test again. Rotating the pan once midway through baking can help if your oven has hot spots.
- Allow cake to cool for 20 minutes. Using a smoothie straw or the handle of a wooden spoon, poke holes across the cake, spaced every inch or so, halfway into the cake.: Cooling makes the crumb set so it holds the holes without collapsing, and when you poke you should hear a soft give, not a gummy resistance. The holes should be deep enough to reach the center but not all the way through, so the gelatin pools inside the cake rather than leaking out. A common error is poking too shallow, which prevents the gelatin from penetrating. Space the holes evenly, and if your tool starts to tear the surface, switch to a slightly thinner implement to create neater channels.
- In a large liquid measuring cup with a spout, whisk together the strawberry jello mix and boiling water until the gelatin is fully dissolved. Carefully pour strawberry gelatin evenly over top of cake. Cool completely on a wire rack.: The gelatin will dissolve quickly in boiling water , creating a smooth, glossy liquid that smells distinctly of concentrated strawberry . Whisk until no granules remain, you should see a clear pink syrup. If the gelatin appears grainy, continue whisking and allow a few more seconds of high heat to dissolve it completely. Pouring grainy gelatin can leave sandy bits in the cake, so take the extra moment to ensure a silky finish.
- Evenly spread the whipped topping onto the cake. Cover and refrigerate for at least 4 hours.: As the warm gelatin hits the cake it will sink into the holes with a soft splashing sound and you may see glossy pink liquid bead across the surface. Pour slowly and use the measuring cup spout to control flow so each hole receives some of the mixture. Let the cake cool on a wire rack to allow air circulation under the pan, preventing condensation from making the bottom soggy. If you poured too quickly and gelatin pooled on one side, gently tilt the pan to redistribute while it is still warm and fluid.
- Just before serving, top with sliced strawberries.: The cool whipped topping will contrast with the warm cake, and smoothing it creates a soft white blanket that tames the vivid gelatin beneath. Use a chilled spatula for a silky finish and work from the center outward for even coverage. Refrigeration lets the gelatin set and the flavors meld, resulting in a firmer, sliceable cake. Do not skip the chilling step, as serving too soon yields a runny texture. Covering prevents the cake from absorbing fridge odors.
- Just before serving, top with sliced strawberries.: Fresh sliced strawberries add shine, a burst of juicy acidity, and a pretty contrast that makes the dessert pop on the table. Arrange them in rows or casual clusters depending on the occasion, and they will glisten against the whipped topping. If you slice too early, strawberries can release juice that softens the topping, so wait until serving time for the best presentation. A light dusting of powdered sugar is optional, but the strawberries are lovely as is.
Notes
- Check your cake mix instructions because different brands sometimes require slightly different amounts of water, oil, or eggs, which affects batter consistency and final texture.
- Measure the freeze dried strawberries by weight for consistent flavor distribution, and chop them finely so they disperse evenly without clumping.
- Use boiling water to dissolve the gelatin, whisking until completely smooth to avoid a grainy texture in the syrup that will soak into the cake.
- Space your poke holes evenly about every inch to ensure each slice has a good balance of cake and gelatin filled pockets, improving both flavor and appearance.
- Refrigerate for at least four hours to allow the gelatin to set and flavors to meld, which makes slicing cleaner and the texture more cohesive.