Strawberry Pierogi
Strawberry Pierogi are tender, fruit filled dumplings with a pillowy dough and bright strawberry filling. This easy to follow recipe yields a balance of sweet and tangy, perfect for brunch or dessert and ideal as an easy weeknight treat or festive gathering offering.
Equipment
- Large Bowl
- Rolling Pin
- Glass or cutter
- Large Pot
- Slotted Spoon
Ingredients
- 1 egg Beat and incorporate into dough to provide structure and richness; adds moisture and helps bind the pastry together. Use at room temperature to ensure even mixing and a tender texture.
- 100 ml milk Combine with egg to create a pliable dough and add hydration; contributes to tenderness and slight richness in the pierogi wrapper. Warm slightly if needed to help dissolve salt and meld ingredients smoothly.
- 100 ml water Adjust hydration and dough consistency while creating a silky, workable dough; helps control firmness and elasticity. Use measured amount to avoid a gummy or overly stiff wrapper.
- 500 g all-purpose flour Provide the primary structure and bulk for the dough, creating the gluten network that gives pierogi their chew; sift or aerate to avoid lumps. Measure accurately to maintain proper dough hydration and texture.
- a pinch of salt Enhance overall flavor balance and strengthen gluten slightly; prevents blandness and highlights sweetness of the filling. Dissolve into the liquid phase for even dispersion throughout the dough.
- 500 g strawberries Bring sweet-tart flavor and juicy filling for the pierogi; can be chopped or mashed to create a cohesive fruit filling. Choose ripe berries for best taste and gently drain excess juice to avoid soggy dumplings.
- 100 g sugar Sweeten and preserve the strawberry filling while balancing acidity; adjust amount to taste based on berry ripeness. Dissolve into fruit over low heat if making a compote to concentrate flavors and bind the filling.
- sour cream (optional) Offer a cool, tangy accompaniment for serving and add a creamy contrast to sweet pierogi; optional use enhances mouthfeel and balances sweetness. Serve dolloped on top or on the side for individual preference.
Instructions
- In a large bowl, sift the flour with a pinch of salt. Make a well in the center and add the egg. Start mixing the egg with the flour using a fork. Combine the milk and water, and slowly add it to the flour, mixing everything together.: The first scent you will notice is the faint, nutty aroma of freshly sifted all-purpose flour , brightened by the tiny mineral edge of salt . Sifting aerates the flour so the dough starts light and easy to work with, rather than dense. Use a fork to make a shallow well in the center so the egg can sit without immediately running into the dry flour . If you skip sifting, you risk pockets of dry flour that make kneading take longer, so resist the urge to rush this part.
- Transfer the dough to a countertop and knead it. Note: The dough will be very stiff, but that's ok – you don’t need to worry about that. Knead for 5–10 minutes until it smooths off.: When the egg lands in the well, you will see the contrast between yolk and white against the pale flour , and the visual helps you control how it combines. The egg adds richness and elasticity; it helps the dough hold together without excessive kneading. If the egg is cold it may resist blending, so bring it to room temperature when possible. A common error is cracking the egg directly into a wide bowl and losing control of liquids, so the well technique keeps everything tidy.
- Then, form the dough into a ball, wrap it tightly in plastic wrap, and let it sit for 1 hour at room temperature. Let the dough rest for an hour, as it will change texture and become softer and more pliable.: The sound here is subtle, a soft scraping as the fork brings flour into the liquid. Mixing gradually rather than dumping all the liquid ensures a uniform crumb and prevents gummy patches. Work from the center outward, gently folding in dry flour until the mixture thickens. If you stir too vigorously you may overwork the gluten, making the dough tough, so keep motions patient and controlled.
- Wash and dry the strawberries. If desired, you can cut them, but it’s quicker and easier to use whole strawberries or halved ones.: As you mix the milk and water you will see a pale, glossy blend that hydrates the dough. This balance of dairy and plain liquid softens the dough without making it overly rich. Pour slowly so the liquid absorbs evenly into the flour , and stop if the dough reaches a smooth, cohesive ball. Adding liquids too quickly risks a sticky mess that needs excess flour to correct.
- Cut off a small portion of dough, keeping the rest wrapped to prevent drying. Lightly flour the surface and roll out the dough thinly. Cut out circles using a glass or cutter, and wrap the remaining dough in plastic wrap. Tip: Use flour sparingly, only dusting the rolling pin and surface lightly.: Listen for a change in texture as the dry flour becomes a shaggy mass, then a firmer dough, with a slight tackiness but not wetness. The gradual approach ensures hydration is even, preventing dry crumbs or overwet spots. If you see small dry bits, fold them in with your hands instead of more liquid. Avoid dumping the remaining liquid at once, which can force uneven kneading later.
- Flatten each circle slightly in your hand, place a few strawberry pieces in the center, and sprinkle with sugar. Fold the edges of the dough together and pinch them tightly to form a crescent or dumpling shape. Repeat with the rest of the dough.: The kneading transforms the dough from a rough mass into a smooth ball, and you will feel the resistance change under your palms as gluten develops. The ideal sound is a quiet, slightly floury rub, and the surface should grow less sticky. Knead with purpose, using the heel of your hand and stretching then folding, until elasticity appears. A common mistake is underkneading, leaving a crumbly texture, or overkneading, which yields a tough bite, so aim for a supple, slightly springy dough.
- Place the prepared pierogi on a floured board, making sure they don’t touch each other to prevent sticking.: This firmness is expected because the recipe favors structure for shaping. As you continue to knead the dough becomes more cohesive, and the initial stiffness will give way to smoothness. If the dough seems impossibly firm, rest for a few minutes and then resume; brief rests help the gluten relax. Too much added water to combat stiffness will produce a sticky rather than workable dough.
- Optional: You can freeze some of them and enjoy them later. If you want to freeze them, place the board in the freezer for 2–3 hours, then transfer the pierogi to a bag for storage.: Time becomes a guide here, and by 5 to 10 minutes you should notice a glossy sheen and uniform elasticity. The surface will feel satiny, and when you press it a shallow dent should spring back slowly. This texture ensures the dough seals reliably when you fill the circles. If the dough tears easily it needs more kneading, but if it resists stretching it has likely been overworked.
- To cook the pierogi, bring a large pot of salted water to a boil. Once boiling, reduce the heat to a simmer and gently drop the pierogi into the water. Once they float to the surface, cook for an additional 2–3 minutes. Remove with a slotted spoon.: Resting is where the dough relaxes and hydrates, and the aroma of flour softens into a pleasant neutral scent. After an hour the dough will be noticeably more pliable, making rolling simpler and reducing tears while sealing. If you skip resting, expect more ripping and frustration. Keep it wrapped tightly to prevent a dry skin from forming on the surface.
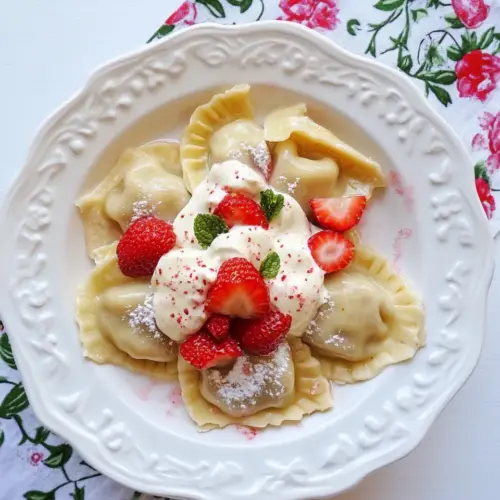
- Sprinkle the cooked pierogi with sugar and serve with fresh sour cream. Serve warm, though they’re also delicious cold!: Fresh strawberries should smell sweet and slightly floral after washing and drying; moisture left on berries can dilute the filling or make it soggy. Pat them dry so they retain concentrated flavor, and select firm berries for better structure during filling. If berries are overly ripe and mushy they will release too much juice and can make the dough soggy when boiled.
- If desired, you can cut them, but it’s quicker and easier to use whole strawberries or halved ones: Whole or halved strawberries give textural contrast, and when cooked they yield pockets of warm fruit. Cutting smaller pieces will reduce large bursts of juice, which some people prefer. A mistake here is overstuffing with large wedges that push seams open during cooking, so match piece size to your dough circles.
- Cut off a small portion of dough, keeping the rest wrapped to prevent drying: Working in batches keeps the dough supple and prevents crusting on unused portions. The scent of fresh dough at the cutting board is subtle and comforting, and the tactile pleasure of a yielding piece in your hands is part of the fun. If you leave the dough exposed it forms a dry film that is hard to incorporate back, so always keep the bulk wrapped.
- Lightly flour the surface and roll out the dough thinly: A floured surface prevents sticking, and rolling thinly ensures the dough cooks through while remaining delicate around the filling. You will see the dough become almost translucent in places, which is a good sign. Use flour sparingly because too much will dry the edges and make sealing difficult.
- Cut out circles using a glass or cutter, and wrap the remaining dough in plastic wrap: The circular cut produces uniform pierogi that cook evenly and look attractive on a platter. Press cleanly to avoid ragged edges that struggle to seal. Keep leftover dough wrapped tightly or it will stiffen, making later rolling more work.
- Use flour sparingly, only dusting the rolling pin and surface lightly: Excess flour makes the dough dry and less elastic, so a light dusting is enough to prevent sticking. You want the dough to still feel soft and slightly tacky for good seals. If the dough becomes dusty, mist with a few drops of water and knead briefly to restore balance.
- Flatten each circle slightly in your hand, place a few strawberry pieces in the center, and sprinkle with sugar: When you assemble, the aroma of fresh strawberries and sugar mingles into an inviting fragrance. Don’t overfill the center so the edges can be sealed cleanly, and press the filling flat to avoid lumps that make sealing uneven. Overfilling causes seams to burst while boiling, so be conservative.
- Fold the edges of the dough together and pinch them tightly to form a crescent or dumpling shape: The tactile satisfaction here is unmistakable as the dough bonds around the fruit. Pinch firmly and consider crimping with a fork or rolling the edges to ensure a watertight seal. A weak seal will open during cooking, releasing filling into the water, so invest attention in a snug closure.
- Repeat with the rest of the dough: As you form more pierogi you will find a rhythm, and the sound of dough meeting board and cutter becomes comforting. Keeping the unused dough wrapped ensures each batch is as easy to work as the first. Rushing through repetition leads to inconsistent sizes and seals, so keep a steady pace.
- Place the prepared pierogi on a floured board, making sure they don’t touch each other to prevent sticking: Spacing prevents them from bonding together, and the slight dusting of flour keeps surfaces dry. When transferring to the pot later, they will slide off more easily. Stacking them while warm will cause them to stick irreversibly, so give each one room.
- Optional: You can freeze some of them and enjoy them later : Freezing uncooked pierogi arrests the texture and makes future meals effortless. Lay them flat in the freezer until firm, then bag them; the sound of tiny dumplings clinking in a container is oddly satisfying. If you skip this step you lose convenience, but always freeze before boiling to prevent soggy thawed dough.
- If you want to freeze them, place the board in the freezer for 2 to 3 hours, then transfer the pierogi to a bag for storage: Quick freezing prevents sticking and preserves shape and flavor. After firming up, slide them into a bag and squeeze out excess air to avoid freezer burn. Don’t thaw before cooking; cook from frozen for best texture.
- To cook the pierogi, bring a large pot of salted water to a boil: The pot should smell faintly saline and the surface will roar as it reaches boil. Salting the water seasons the dough from the inside and enhances the fruit, so be generous but not excessive. A common oversight is under-salting which leads to flat tasting dough.
- Once boiling, reduce the heat to a simmer and gently drop the pierogi into the water: A gentler simmer keeps the pierogi intact; the surface should show soft rolling bubbles rather than a violent boil. Drop them in carefully so they do not collide and tear. Boiling too vigorously will agitate them and risk open seams.
- Once they float to the surface, cook for an additional 2 to 3 minutes: Floating is the key visual cue that the dough is cooked through, and the additional minutes ensure the filling warms and the seams seal. The texture should be tender and slightly pillowy, with the aroma of warmed strawberries filling the kitchen. Overcooking will yield a gummy texture, so watch the clock closely.
- Remove with a slotted spoon: Using a slotted spoon keeps the pierogi from carrying too much water to the plate, preserving texture and preventing dilution of the sweetness. Let them drain briefly on a towel or floured board before plating. Dropping them onto a hot surface immediately after removal can cause bursting, so handle gently.
- Sprinkle the cooked pierogi with sugar and serve with fresh sour cream: The final touch of sugar adds sparkle and balances the tang of optional sour cream . Serve them warm, and watch the steam carry the aroma of fruit and pastry. If you cool them completely they are still flavorful, but warm pierogi offer the best texture and scent.
Notes
- Rest the dough fully before rolling so it becomes supple and less likely to tear while shaping.
- Use room temperature egg to ensure even mixing and a smoother dough texture when combining with flour.
- Pat strawberries dry after washing to avoid extra moisture that can make the filling watery during cooking.
- Freeze on a tray first if you plan to store pierogi long term, that way they won’t stick together in the bag.
- Keep a light dusting of flour on your board and rolling pin, but avoid burying the dough in flour which makes sealing difficult.