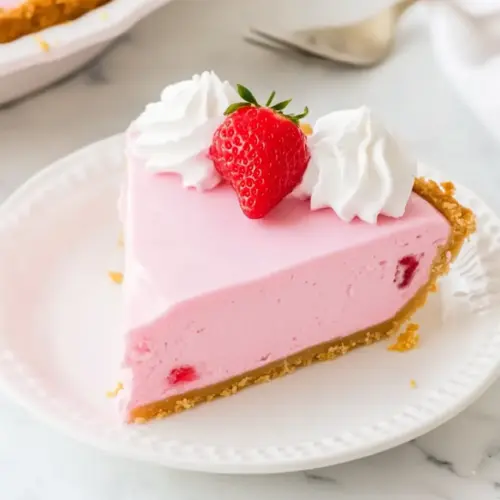
Strawberry Jello Pie
Strawberry Jello Pie is a creamy, easy no bake dessert that combines bright strawberry flavor with fluffy whipped topping and a crisp graham crust. This fridge set pie is perfect for summer gatherings, potlucks, and casual dinners when you want a quick, nostalgic sweet that looks lovely on the table. Make it for crowd pleasing simplicity and colorful presentation.
Equipment
- Saucepan or kettle
- Mixing Bowl
- Whisk
- Spatula
- Refrigerator
Ingredients
- 2/3 cup boiling water Dissolve in powdered gelatin by pouring directly to activate and incorporate heat; boiling water melts the Jello for a smooth base. Serve immediately into a bowl to cool slightly before adding cold water and folding with other ingredients for proper set.
- 3 ounces Jello Strawberry Flavor Provide concentrated flavor and gel structure that sets the pie filling when hydrated; powdered Jello adds strawberry taste and color. Sprinkle or pour into hot liquid and whisk to fully dissolve any granules for a consistent texture.
- 1 cup ice cold water Cool the dissolved gelatin quickly and control final firmness by adding chilled water; ice cold water lowers temperature so the mixture begins to thicken properly. Pour gently to avoid splashing and help the filling reach a spreadable consistency before combining with whipped topping.
- 16 ounces Cool Whip Lighten and create creamy volume while stabilizing the filling; Cool Whip adds a smooth, airy texture and keeps the pie soft. Fold gently into partially set gelatin to maintain fluffiness and ensure a uniform, cloud-like filling.
- 1 ready-to-use graham cracker crumb crust (9-inch) Provide a ready-made crunchy base that contains and supports the filling; graham cracker crumb crust offers buttery, sweet contrast to the creamy center. Use a 9-inch prepared crust to save time and achieve consistent shape and portioning.
Instructions
- Boil your water as you prepare your other ingredients.: You will notice a sharp kettle whistle and steam rising, signaling the water is at a rolling boil, which is important for dissolving the gelatin fully. I usually boil slightly more than needed to account for evaporation, then measure out the required amount. If you skimp on heat the strawberry powder can become grainy, so avoid letting the water sit before mixing. One common mistake is using warm water from the tap, which can leave undissolved specks, so always bring it to a true boil.
- Stir together the boiling water and strawberry Jello for two minutes until completely dissolved.: The mixture transforms from powdery to glossy as you whisk, releasing a sweet strawberry perfume into the steam. Keep stirring for the full two minutes so every granule dissolves, scraping the sides and bottom of your bowl to avoid clumps. You should end up with a clear, bright liquid, not cloudy or gritty. If you see any undissolved bits, continue stirring with a whisk until smooth, because leftover granules will ruin the silky texture of the final filling.
- Add the ice cold water to the gelatin mixture and stir until slightly thickened.: Pouring cold water chills the solution and begins the setting process, and you will notice the liquid go from fully fluid to slightly syrupy. This change helps the gelatin hold its shape when folded with the whipped topping, and gives you a useful window for combining without collapsing the airiness. If the mixture cools too much and gels completely, it can be difficult to blend; avoid letting it sit undisturbed for long periods before the next step.
- Whisk in 2 cups Cool Whip until well blended.: When you add the Cool Whip , the sound changes subtly as air is incorporated, and the color lightens to a pastel pink. Use a gentle folding motion to preserve the whipped texture while distributing the gelatin evenly. The filling should be smooth and fluffy, not liquid or runny. A frequent error is vigorous mixing which deflates the topping and yields a dense filling, so fold with patience.
- Refrigerate the pie filling for 30 minutes.: During this chill the aroma settles and the filling firms slightly, becoming easier to spread into the crust without sinking. You will feel the bowl cool to the touch and notice a gentle set at the surface, which signals readiness. This intermediate chill prevents the filling from seeping into the crust and makes the final texture consistent. If you skip this step, the filling can be too loose and may cause the crust to soften or collapse.
- Smooth out into the prepared pie shell and refrigerate 4 hours or overnight before serving.: As you spread the filling, you can hear the faint soft scrape of a spatula and see the surface transform to glossy and uniform. Chill time is when the pie attains its final structure, so give it the full four hours for best slicing, or overnight if you can plan ahead. If you try to cut it too soon you will get messy, wobbly slices, so resist the temptation and allow sufficient refrigeration for clean pieces.
Notes
- Fresh berries addition — If you have strawberries on hand, dice a small amount and fold them gently into the filling just before you refrigerate it, this adds textural pops and bursts of fresh fruit without changing the set dramatically.
- Crust alternatives — Swap the ready graham crust for a chocolate cookie crumb shell for a contrasting flavor profile that pairs nicely with strawberry, press the crumbs firmly to avoid crumbling when slicing.
- Chill time patience — Give the pie the full four hours or overnight for neat slices, rushed chilling is the most common reason for runny servings so plan ahead to avoid disappointment.
- Even spreading technique — Use an offset spatula to smooth the filling into the crust for a professional looking top, draw the spatula from the center outward to avoid air pockets.
- Serving temperature — Keep the pie cold until just before serving, it holds its shape better and the texture is more satisfying when chilled, warm pieces will be too soft to plate neatly.