Strawberry Curd
Strawberry Curd is a creamy, vibrant spread made from ripe strawberries, eggs, and butter, delivering a bright, silky fruit flavor perfect for toast, pastries, and desserts. This easy, quick recipe yields a glossy, custard like curd in under an hour, ideal for breakfasts and special treats. Make it for a weekend brunch or as a thoughtful homemade gift that showcases seasonal berries.
Equipment
- Food Processor
- Medium Saucepan
- Fine mesh sieve
- Whisk
- Spatula
Ingredients
- 1 pounds strawberries (fresh) Brighten and sweeten the curd by providing fresh strawberry flavor and natural acidity; hull and mash or purée for a smooth texture. Use ripe berries to maximize aroma and color, and gently cook them with sugar to release juices without overcooking.
- 1/2 cup granulated sugar Sweeten and balance the tartness by dissolving into the fruit mixture; adjust to taste while cooking to prevent graininess. Granulated sugar also helps preserve the curd and contributes to its glossy finish once chilled.
- 1 tablespoon lemon juice Acidify and enhance brightness by adding a clean lemon tang that balances sweetness and stabilizes the curd. Lemon juice also aids in setting the curd by interacting with the eggs, so add it sparingly to preserve strawberry character.
- 2 large eggs Emulsify and thicken the curd while contributing body and richness; whole eggs provide structure when gently cooked with the warmed fruit and sugar. Whisk thoroughly to combine yolks and whites, temper with hot fruit to avoid curdling, and cook until the mixture coats the back of a spoon.
- 3 large egg yolks Concentrate richness and help the curd set with added fat and lecithin from yolks; use fresh yolks for a silkier, more stable texture. Combine with whole eggs and temper carefully, as the yolks are key for a smooth, velvet curd when cooked low and slow.
- 1/2 cups salted butter (cut into 1-tbsp pieces) Enrich and create a glossy, spreadable finish by adding salted butter in pieces and incorporating off-heat for a silky emulsion. Use small pieces to melt evenly, whisking until fully incorporated to stabilize the texture and add a subtle savory balance.
Instructions
- Rinse, de-stem, and roughly chop strawberries. Place the chopped strawberries in a food processor or blender and purée.: The first sense you notice is the fresh, green strawberry aroma as you rinse and trim the strawberries , and chopping releases juices that make puréeing easier; be sure to remove any bruised bits to avoid off flavors. Why this matters, the quality of the fruit at this stage determines color and sweetness for the entire curd. Troubleshooting tip, avoid soaking the berries for long periods, as they can lose flavor and become waterlogged which dilutes the purée.
- Transfer the puréed strawberries to a medium saucepan and add sugar and lemon juice.: As you pulse, you will see the strawberries break down into a vibrant red purée with a slightly coarse texture that smooths with more blending; the sound is a brief buzzing that stops once everything is uniform. The purpose of puréeing is to create an even base so the curd cooks consistently, and it also shortens the cook time. Common mistake, overprocessing can heat the fruit slightly and dull its fresh aroma, so work in short bursts if needed.
- Cook over medium heat, whisking regularly, and simmer for about 10 minutes until reduced by half.: Once combined, the sugar begins dissolving into the purée and the lemon juice lifts the fruit notes, creating a glossy mixture that smells both sweet and tangy; you can see the liquid become more cohesive. This stage helps balance flavors and prepares the mixture for reduction. Watch out for adding eggs too soon, as heat from a still hot purée can scramble them.
- Use a spatula to press the strawberry mixture through a sieve into a clean bowl or saucepan and cool to room temperature.: During reduction you will hear a gentle simmer and see the volume shrink while the aroma concentrates into a deeper, jam like scent; tiny bubbles should form steadily without violent boiling. Reducing concentrates sugars and intensifies flavor, which is essential for a curd that is bold rather than watery. Mistake to avoid, cranking the heat to speed things up can burn the fruit and create bitter notes, so keep the temperature steady.
- When the strawberry mixture is cool, add it to a clean saucepan. I used the same saucepan but washed it while the strawberry mixture cools.: Pressing through a sieve yields a velvet smooth purée, removing seeds and any fibrous bits; you will notice a clean, silky texture in the strained liquid. Cooling is important because it prevents the eggs from cooking immediately on contact, which would lead to grainy curd. A frequent error is skipping the sieve, which leaves seeds and can create a less refined mouthfeel.
- Add the eggs and egg yolks to the mixture, whisking to combine.: Putting the cooled purée into a clean pan avoids any leftover scorched bits from the previous reduction, and the visual cue is a calm, glossy liquid ready for thickening. The clean pan helps you control heat evenly during the delicate cooking of the curd. Avoid adding eggs while the purée is warm, which risks curdling and ruining the texture.
- Cook over medium-low to medium heat for 6 to 8 minutes, whisking constantly until the curd thickens.: As you whisk, the mixture becomes uniformly pale and slightly thicker in appearance, and you may notice tiny bubbles from the whisking action; this even distribution is essential for gentle coagulation. Thorough mixing ensures the proteins are evenly dispersed so the curd sets smoothly. A common pitfall, adding eggs without adequate whisking can leave streaks of cooked egg later in the process.
- Remove from heat and whisk in the pieces of butter.: During this phase you will hear a soft, steady simmer and see the custard deepen in color and cling slightly to the whisk, forming ribbons when lifted; the smell becomes richer and more concentrated. Constant whisking prevents hot spots that could scramble the eggs, and the gentle heat coagulates proteins into a silky matrix. Troubleshooting, if you stop whisking the curd may stick to the pan and cook unevenly, so keep a steady motion.
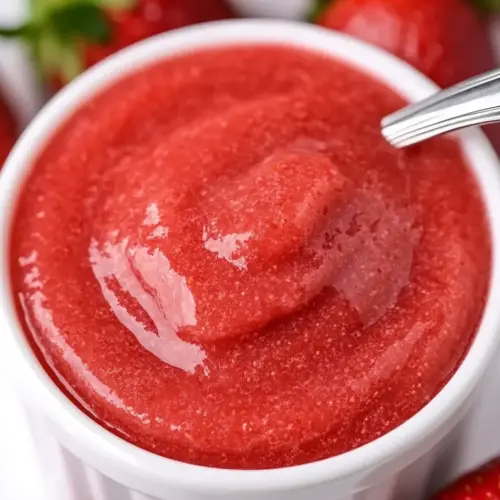
- Transfer the hot strawberry curd to sterile canning jars or a heat-proof bowl. Press plastic wrap onto the surface of the curd to prevent it from forming a skin while cooling.: Off the heat, the butter melts into the hot curd and transforms it into a glossy, velvety spread; you will notice the foam subside as the fat emulsifies the mixture. The butter enriches mouthfeel and stabilizes the texture, giving that luxurious finish. Avoid adding cold butter in one piece which can create lumps; small pieces incorporated gradually yield a smooth blend.
- Cool curd to room temperature and then chill for at least an hour or two before using. The plastic wrap can be removed once the curd has cooled.: Pouring the curd into jars while hot traps the scent and makes it easier to press plastic wrap directly onto the surface, which prevents a skin from forming; the visual is a glass filled with vivid, jewel toned curd. Sterile containers help extend shelf life and keep flavors bright. Common mistake, using warm but not sterile jars can lead to shorter storage life and potential spoilage.
- Press plastic wrap onto the surface of the curd to prevent it from forming a skin while cooling: The surface will appear glassy and uniform when wrapped properly, and this prevents an unsightly film that can alter texture; the curd cools evenly underneath. This step maintains pristine appearance and preserves the silky mouthfeel. A simple error is leaving air pockets under the wrap which still allow skin to form, so press gently to remove air.
- Cool curd to room temperature and then chill for at least an hour or two before using: As the curd cools in the fridge, it firms slightly and the flavors settle into a harmonious balance; you will notice the texture becomes more spreadable and less liquid. Chilling also improves sliceability for desserts and helps flavors meld. Mistake to avoid, using the curd hot can lead to runny results and a less polished presentation, so be patient and allow proper cooling time.
Notes
- Choose berry quality first, opt for fragrant, fully ripe strawberries to maximize natural sweetness and color, and if your berries are less ripe, taste the purée after reduction and add more granulated sugar in small increments to balance acidity.
- Adjust texture with sieving or blending, if you prefer a rustic curd leave some pulp and skip the sieve, but for a refined finish press the purée through a fine mesh until silky and seed free, which also helps the curd set more uniformly.
- Control the heat precisely, maintain medium low to medium heat during thickening so the eggs coagulate gently, and if you notice tiny curdled bits, immediately remove from heat and whisk vigorously to smooth the mixture.
- Finish with butter for gloss, add the salted butter pieces off the heat so they melt slowly and emulsify into a shiny, velvety curd, stirring until no streaks of fat remain visible.
- Store properly, transfer to sterile jars and press plastic wrap onto the surface to avoid skin, then refrigerate; properly stored, the curd keeps for up to a week and makes a lovely homemade gift.