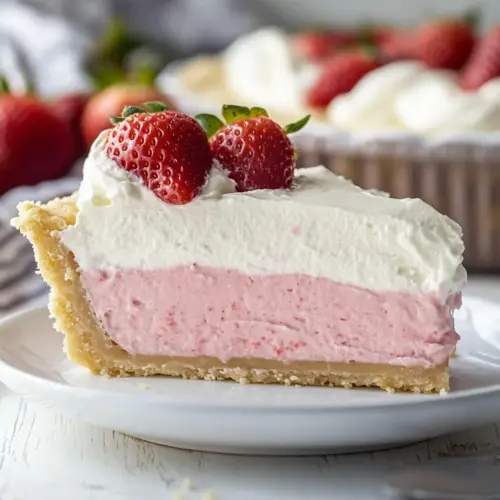
Strawberry Cream Pie
Strawberry Cream Pie is a creamy, fruity dessert with a crunchy graham cracker crust and a silky strawberry pudding filling. The luscious cream cheese and airy heavy cream topping make each slice rich yet balanced, perfect for summer gatherings and easy weeknight celebrations. Make it ahead for clean slices and a crowd pleasing finish.
Equipment
- Food Processor
- 9 inch deep dish pie pan
- Small Saucepan
- Spatula
- Mixing Bowl
Ingredients
- 1 1/2 cups crushed graham cracker crumbs about 12 whole graham crackers Crush thoroughly to form a fine, even crumb base that will compact into the pie crust; press firmly into a pie pan to create a sturdy foundation for the filling. Combine with melted butter and sugar to bind and add flavor, then chill briefly so it sets evenly before adding the filling.
- 7 tablespoons melted butter Melt completely and mix into the cracker crumbs to bind the crust components together; butter also adds richness and helps the crust brown slightly and hold its shape. Use warm melted butter so it evenly coats the crumbs and press the mixture firmly into the pan for a cohesive shell.
- 1/4 cup granulated sugar Sweeten moderately to balance the tartness of the strawberries and the tang of the cream cheese, integrating into the crust or filling as specified. Dissolve the sugar fully to prevent graininess and help create a pleasant overall sweetness in the pie.
- 1/4 teaspoons salt Season lightly to enhance all flavors without making them salty; a small pinch brings out sweetness and balances acidity. Sprinkle evenly and incorporate into the crust or filling mix to avoid concentrated pockets of salt.
- 10 ounces frozen sliced strawberries in syrup thawed Thaw and drain slightly before using to retain natural strawberry flavor and syrup sweetness, adding bright fruitiness and color to the pie filling. Mash or chop as desired to distribute fruit throughout the filling, contributing texture and a sweet-tart profile.
- 2 cups whole milk Heat gently with cornstarch and sugar to create a creamy custard base that thickens and sets the filling when cooked and cooled. Use whole milk for body and flavor, ensuring the custard is smooth and rich without being overly heavy.
- 8 ounces cream cheese softened Soften fully to allow smooth blending into the filling, contributing tangy richness and a silky texture when whipped with the milk mixture. Beat until creamy to remove lumps and integrate evenly, helping stabilize the filling and deepen flavor.
- 1/3 cup granulated sugar + 3 Tb for the whipped cream Measure precisely and add sweetness to the filling, with an additional portion reserved for lightly sweetening the whipped cream topping. Combine the sugar with cream cheese and milk mixture until smooth to prevent grit and maintain a velvety texture in both filling and whipped cream.
- 3 1/2 tablespoons cornstarch Dissolve thoroughly into the milk while heating to thicken the custard rapidly and create a stable, smooth filling that holds shape when cooled. Whisk constantly while cooking to prevent lumps and ensure the correct pudding-like consistency.
- 2 teaspoons vanilla extract Add aromatic warmth and depth to the filling with a small amount, enhancing vanilla notes and rounding out the dairy and fruit flavors. Stir in toward the end of cooking to preserve its delicate fragrance and avoid cooking off the aroma.
- 1/4 teaspoons salt Season sparingly to fine-tune flavor balance in the filling or whipped cream; a touch of salt enhances sweetness and rounds the overall taste. Dissolve or blend completely to avoid salty pockets and ensure a uniform flavor profile.
- 2 1/2 cups heavy cream Chill thoroughly and whip to soft or stiff peaks to create a light, airy topping that contrasts the creamy filling and crumbly crust. Use cold heavy cream for best volume and texture, sweeten with reserved sugar, and spread or pipe over the cooled pie for a decorative finish.
Instructions
- Place the graham crackers in a large food processor. Pulse into fine crumbs. (If you don’t have a food processor, you can place the graham crackers in a large zip bag and use a rolling pin to smash them into crumbs.): Close your eyes for a second and listen to the steady, mechanical rain as the graham crackers pulverize, the smell shifting from dry sweetness to a toasty aroma. Pulsing into fine crumbs ensures the crust will compact and hold together when pressed into the pan. If you don t have a food processor, use a heavy rolling pin inside a sealed bag and rhythmically roll and strike until the crumbs are fine, being careful to contain the mess. A common slip is leaving chunks behind which creates weak points in the crust, so check by rubbing a pinch between your fingers for a uniform texture. Fine crumbs pack more tightly and give a clean slice, while overprocessing into dust can make the crust too firm.
- Add the melted butter, sugar, and salt to the food processor. Pulse again to combine. Once the mixture is smooth, pour it into a 9 inch deep-dish pie pan.: When the warm melted butter meets the crumbs the mixture should glisten slightly, and each grain will hold together when pinched. Pulse just enough so the sugar and salt are evenly distributed, keeping a slightly sandy texture. Pour the mixture into the pie pan and observe the color shift to a deeper, butter kissed hue. If the butter is too hot you ll melt excess sugar and create greasy spots, so let it cool slightly. A frequent error is uneven distribution, which causes patches that won t compact properly, so tip the pan to level the crumbs before pressing.
- Use your fingers to press the crumb mixture up the sides of the pan, and flat on the bottom. Try to make the crust as even and smooth as possible. Then refrigerate until ready to fill.: The tactile part is important, press firmly with the heel of your hand to compact the crumbs into a cohesive shell, listening for the subtle settling sound as the pieces compress. Make the walls evenly thick so slices cut cleanly and the weight of the filling is supported. Refrigeration chills and firms the butter, locking the crumbs together. Do not skip chilling, or the crust may crumble when sliced. One mistake is pressing too thin at the edges, which can cause the filling to seep under the crust, making it soggy; aim for a uniform thickness about the same all around.
- Wash the food processor bowl to reuse. (Or use an electric stand mixer with a whip attachment.) Pour the heavy cream into the food processor and add 3 tablespoons sugar. Turn on high to whip the cream into firm peaks. Scoop the firm whipped cream into a separate bowl. Refrigerate.: The first gust of sweet creaminess when whipping heavy cream is immediate, and you ll see clouds of texture turn into glossy peaks. Whipping in a processor is fast, so watch carefully as the cream transforms and stop when firm peaks hold shape but still look satiny. Transfer to a cold bowl and chill; a cool whipped cream holds structure better when folded into warmer elements. An easy misstep is overwhipping, which shifts the cream from silky to grainy, even buttery. If that happens, you can sometimes rescue it by adding a splash of unwhipped cream and gently folding to restore smoothness.
- Next add the strawberries in syrup, whole milk, sugar, cornstarch and salt to the food processor. Puree until very smooth.: As the blades sweep through the strawberries and whole milk , the mixture will turn from chunky to a vibrant, glossy pink. The cornstarch needs even dispersion so the puree becomes a reliable pudding when heated. Watch for a uniform, velvety texture without white streaks of undissolved starch. If you see lumps, pulse more slowly and scrape down the sides. A common pitfall is adding cornstarch in clumps which creates grainy pockets in the final pudding, so pre mixing with a portion of the milk is a good safety step if you re unsure.
- Pour the pudding mixture into a small sauce pan. Heat over medium heat. Stir and simmer for 3-5 minutes to thicken the pudding. It’s ready when it coats a spoon with thin opaque layer that stays separate when you run your finger through it.: Heat changes everything here, the air will carry a warm strawberry perfume as the sugars bloom and the cornstarch activates, turning the liquid into a glossy custard. Keep stirring gently and consistently to prevent sticking and to ensure even thickening. Look for the coat and separation test on a spoon as your cue; this visual is more reliable than a timer. If you cook too long at high heat the pudding can curdle or taste overly starchy, while undercooking leaves it loose and unable to set properly. Beware of rapid boiling, which can break down the texture, so maintain a gentle simmer.
- Then pour the pudding back into the food processor and add the cream cheese and vanilla extract. Puree until smooth. (Adding the cream cheese later helps to bring down the pudding temperature.): Adding the softened cream cheese while the pudding is warm helps it incorporate without lumps, and the vanilla extract brings aromatic depth. The puree should become glossy and homogenous, the tang of the cream cheese balancing the fruitiness. The temperature here matters, as very hot pudding could overly soften the cream cheese and make the mixture too loose, whereas too cold can make it lumpy; aim for warm to cool. If you notice streaks of cream cheese, pulse longer and scrape the bowl. A common mistake is adding cold cream cheese straight from the fridge, which resists blending and leaves specks.
- Place the mixture in the refrigerator for 10-15 minutes to bring the pudding temperature down to room temperature.: Cooling slightly is a small but crucial pause. The pudding will release a gentle steam as it cools and become more manageable to fold with the whipped cream. This rest prevents the whipped cream from melting on contact and keeps the filling airy. If you skip this step and the pudding is too warm, the whipped cream will deflate and the filling will become runny. Letting it cool also tightens the flavor, giving you a better sense of final sweetness and balance.
- Once the pudding has cooled to room temperature, scoop HALF the whipped cream into the pudding mixture and gently fold it in with a spatula. Once the whipped cream is fully combined and the filling is smooth, scoop the mixture into the graham cracker crust. Spread the filling to the sides of the crust.: The first fold should be gentle and deliberate, using the spatula to lift from the bottom and fold over so air is preserved in the mixture. The texture will shift to a lighter, mousse like body with soft peaks from the cream integrated throughout. Folding too aggressively will deflate the mixture, losing the airy lift that makes the filling light. A regular issue is rushing the fold and ending up with a dense filling; take measured, rhythmic folds until the color and texture are uniform.
- Scoop the remaining whipped cream on top of the pie filling. Use a spatula to spread it into a visually pleasing mound.: As you transfer the filling, you ll notice a silky ribbon as it flows into the chilled crust, settling into a glossy surface. Use a spatula to nudge the filling to the edges so there are no air pockets against the crust, which helps slices stay intact. Smooth the top lightly, but avoid overworking it which can create small air holes. A common mistake is leaving gaps between filling and crust that cause the pie to slump, so press gently to make contact all around.
- Refrigerate for 4+ hours, before serving.: The final whipped layer should be pillowy and inviting, spreading with soft ridges that catch light. This cap adds an immediate creamy contrast and a cooling surface. Keep the motions light to preserve the whipped cream s volume and texture. If the topping seems too loose, it may be underwhipped; conversely, if it separates or looks grainy you may have overwhipped earlier. Either issue affects presentation and mouthfeel.
- Refrigerate for 4+ hours, before serving.: Give the pie time to rest and fully set. The refrigerator calms the layers, allowing the pudding to firm and the crust to stabilize so slices lift cleanly. Overnight chilling yields the best texture and clean cuts. A frequent error is slicing too early, which results in sloppy plates and a filling that hasn t developed the right body. Patience at this stage pays off in presentation and the satisfying texture of each forkful.
Notes
- Crust firmness: Press the crumbs firmly and refrigerate the crust for at least 15 minutes to ensure it sets well and supports the filling.
- Prevent lumps: Soften the cream cheese fully and pulse with the warm pudding so it blends smoothly without streaks.
- Whipping warning: Watch the heavy cream as you whip; stop when firm peaks form to avoid turning it buttery.
- Cooling pause: Let the pudding cool to near room temperature before folding in whipped cream to keep the filling airy.
- Make ahead: The pie can be made a day ahead; longer chilling improves sliceability and melds flavors.
- Gluten free option: Use gluten free graham crackers measured to equal 1 1/2 cups of crumbs.