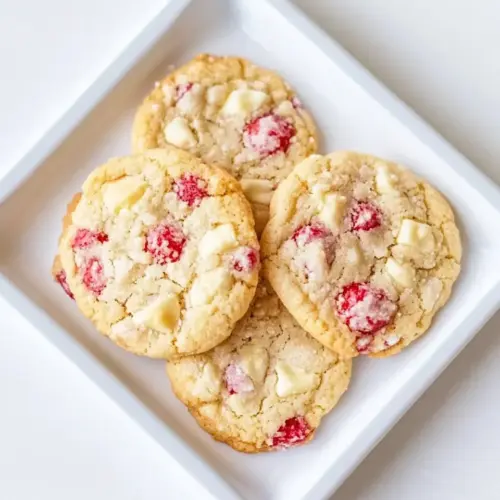
Strawberry Cookies
Strawberry Cookies offer a tender, slightly crumbly texture studded with fresh, juicy strawberries and pockets of creamy white chocolate chips. These easy cookies bake up golden and aromatic, perfect for spring gatherings or simple everyday treats, and they deliver a bright, sweet contrast that makes them irresistible. Make a batch to share and enjoy a reliably delicious, quick bake.
Equipment
- Electric Mixer
- Baking Sheet
- Parchment paper or silicone mat
- wire cooling rack
- Spatula
Ingredients
- 1/2 cup unsalted butter Creams and provides rich fat that contributes to tender texture and golden browning; helps incorporate air when beaten with sugar for lightness. Adds a smooth mouthfeel and balances sweetness in the dough, aiding structure and flavor delivery.
- 1 cup granulated sugar Sweetens the dough and helps with creaming to trap air for a lighter cookie; contributes to spread and caramelization during baking. Balances tartness from fruit and enhances overall flavor complexity when combined with butter and vanilla.
- 2 teaspoons lemon juice Adds bright acidity that balances sweetness and enhances fruity notes; helps prevent the cookies from tasting flat. Can react mildly with leavening to improve rise while intensifying fresh strawberry flavor.
- 1 teaspoon pure vanilla extract Imparts warm aromatic flavor and enhances other flavors in the cookie; acts as a flavor amplifier that rounds out sweetness. Small amount provides familiar dessert character without overpowering the strawberry notes.
- 2 cups all-purpose flour Builds the bulk and structure of the cookie dough by forming gluten when mixed with wet ingredients; determines texture and crumb. Provides a neutral base that allows the strawberry and white chocolate flavors to shine.
- 2 teaspoons baking powder Leavens the cookies to create a light, tender crumb by releasing gases during baking; helps achieve gentle rise and proper texture. Balances density from flour and butter for a pleasant chew without excessive spread.
- 3/4 cup diced strawberries Contributes concentrated fresh fruit flavor and moisture, adding bursts of strawberry taste in each bite; provides visual color and textural contrast. Should be diced and gently folded in to distribute fruit without overworking dough.
- 3/4 cup white chocolate chips divided Provides pockets of sweet, creamy cocoa butter-based sweetness that melt into the cookie; divided use allows some to be mixed in and some to top for texture contrast. Enhances richness and adds contrast to the tangy strawberry pieces.
- 1 egg – OPTIONAL some people prefer to add an egg to the dough for a wetter consistency. Optional binder that increases moisture and richness for a softer, chewier cookie; helps emulsify fats and stabilize the dough if used. Can be omitted for a crisper texture or included for a more cake-like, tender result.
Instructions
- Preheat the oven to 350℉.: As the oven comes up to temperature you should notice a faint warm, dry smell and steady oven light. Preheating ensures even rise and consistent baking, helping cookies brown evenly on the bottoms. A common mistake is putting cookies into a cool oven which can cause uneven baking and spreading, so wait until your oven reaches the full 350℉ and holds steady for a minute before sliding the sheet in.
- Line a baking sheet with parchment paper or a silicone mat.: Lining prevents sticking and encourages an even, light golden underside. The surface will look clean and slightly matte, and the cookies will release easily when cooled. Avoid placing dough directly on an unlined pan, as this can lead to uneven browning and make cleanup harder.
- Using an electric mixer, cream together the butter and sugar until light and fluffy. This may take 3-4 minutes.: When creamed properly, the mixture should turn a paler shade and feel airy, holding soft peaks if you lift the beater. This trapped air gently lifts the cookie as it bakes, creating a tender crumb. Rushing this step or under creaming yields dense cookies, while over creaming can make the dough too soft and cause excess spread during baking.
- Stir in the lemon juice, vanilla extract, egg (if using) and food dye (if using). Stir until combined.: Once added, you should see the mixture become smoother and slightly more glossy as the liquids incorporate, with citrus aroma from the lemon juice brightening the scent. The egg, when used, binds and enriches the dough, making it more cohesive. Over mixing here can develop gluten once the flour is added, so stir just until the ingredients are homogenous to avoid a tough texture.
- Next, stir in the flour and baking powder until a dough forms. Do not overmix.: As the flour disappears into the batter, the texture shifts from glossy to a pliable, slightly sandy dough. You want a cohesive mass but still tender; stop mixing when you no longer see streaks of flour. A dense or overly elastic dough means you mixed too much, which can produce tough cookies rather than tender ones.
- Fold in the diced strawberries and half a cup of the white chocolate chips.: Folding gently preserves the soft chunks of strawberries and the pockets of chips, distributing them evenly without crushing the fruit. You should see flecks of red and creamy white throughout the dough. Aggressive stirring can mash the fruit and add excess moisture, altering the dough balance.
- Using your hands, as the dough can be very thick and dry, work the dough together, almost as you would knead bread dough.: Working with your hands warms the dough slightly and helps coax it into a cohesive ball, creating a tactile connection that reveals when the dough is ready. You may feel a crumbly texture that gradually comes together; that’s normal. Avoid over kneading, which can activate gluten and lead to chewier cookies rather than the desired tender crumb.
- Scoop the cookie dough, approximately two tablespoons at a time, and work the dough into a compact ball, then place on the cookie sheet. Repeat with remaining dough. This dough is dry and crumbly, you want to use some elbow grease to work the dough balls together.: Compacting the dough helps the cookie keep its shape while baking, producing a slightly rounded top and even interior. When pressed gently, the ball should feel firm and uniform. If you leave the dough loose, the cookies can spread unevenly and bake into irregular shapes.
- Bake for 12-14 minutes or until the bottom of the cookies are slightly golden.: As they bake you will notice the kitchen fill with a warm sweet aroma and the edges set first, then the centers follow. Check the cookie bottoms for a faint golden tone rather than deep brown, which signals readiness. Leaving them in longer can dry the interior, so aim for that gentle golden cue and remove promptly.
- Remove from oven and place baking sheet onto a wire cooling rack.: The sheet will be quite warm and you may hear a soft settling sound as steam escapes. Moving them to a rack prevents residual heat from overbaking the bottoms and encourages even cooling. If you leave cookies on a hot sheet on the counter, they will continue to cook and risk becoming too crisp.
- Add a few more white chocolate chips on top of each cookie as soon as they are removed from the oven.: Pressing chips into the hot surface creates a glossy, appealing finish and gives each cookie a bakery style look. The chips will soften and adhere quickly, making a pretty contrast. If you wait too long, the chips will not adhere well and the surface will cool, reducing that melt in appearance.
- Allow to cool for at least ten minutes prior to removing from the pan with a spatula.: During this rest the cookies firm up, making them easier to transfer without breaking, and the interior sets into the perfect tender texture. You should feel the cookie’s edges give slightly when touched but not crumble apart. Trying to move them too soon often causes tearing or collapsing, so patience here yields neat, intact cookies.
Notes
- Chill the dough briefly: If your kitchen is warm and the dough feels soft, refrigerate it for 15 to 20 minutes to help the balls hold their shape when baking. This also concentrates flavors and prevents excessive spread.
- Adjust strawberry size: For a more even distribution, dice the strawberries into small uniform pieces; larger chunks can create uneven air pockets or soggy spots after baking.
- Swap white chocolate timing: Reserve extra white chocolate chips to press onto the cookie tops right after they come out of the oven for a glossy, bakery style finish and immediate visual appeal.
- Optional egg for chewier cookies: If you prefer a moister, chewier texture, include the optional egg noted in the ingredient list; it will bind the dough more and yield a less crumbly bite.
- Room temperature storage: Keep cooled cookies in an airtight container at room temperature for three to four days, layering with parchment to prevent sticking and preserve their tender crumb.