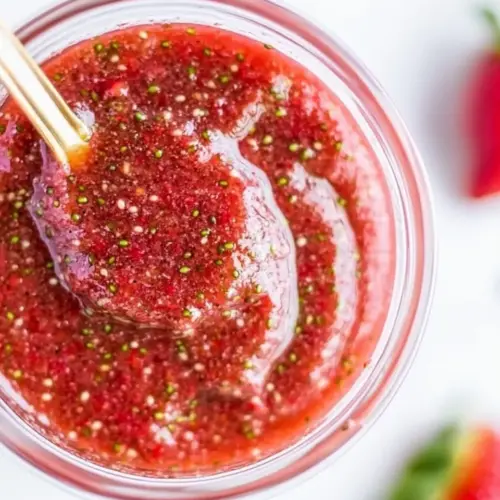
Strawberry Chia Jam
Strawberry Chia Jam is a quick and wholesome spread that combines bright berries with maple syrup and chia seeds for a naturally thickened, spoonable jam. The result is fruity, slightly tangy, and perfect for toast or yogurt, making it an easy pantry maker and a great choice for busy mornings and easy weeknight breakfasts.
Equipment
- Heavy-Bottomed Saucepan
- Fork or Potato Masher
- Measuring Cups
- Jar or airtight container
- Blender or small food processor
Ingredients
- 4 cups berries Provide natural sweetness and bulk while contributing bright flavor and texture; cook down slightly to release juices that form the jam base and balance acidity. Chop or mash as desired to control chunkiness, and select ripe berries for optimal sweetness and color.
- 1/4 cup maple syrup Add gentle sweetness and depth without overpowering the fruit; dissolve into the warm fruit mixture to help achieve desired consistency and preserve a clean, natural flavor profile. Adjust quantity for sweetness preference and to complement the berries’ natural sugars.
- 1/4 cup chia seeds Thicken and add body while absorbing released fruit juices to create a gel-like jam texture; sprinkle in to set the mixture as the chia seeds swell and create a spreadable consistency. Offer a boost of fiber, protein, and healthy omega-3 fats while keeping the recipe simple and plant-based.
- 2 teaspoons fresh lemon juice Brighten flavor and enhance freshness by providing subtle acidity that balances sweetness and intensifies berry notes. Squeeze in near the end of cooking to preserve its bright character and help stabilize the jam’s overall flavor.
Instructions
- Wash and dry fresh the strawberries, then remove the hull and slice them in half.: As you clean the berries , notice the leafy caps releasing a wet, green scent that signals freshness; drying them prevents excess water diluting the jam. Slicing reveals vivid red flesh and a burst of aroma, which helps you gauge ripeness. Why this matters, the surface area from slicing helps the fruit break down faster when heated, creating more juice and a smoother cook. A common mistake is skipping the drying step, which can lengthen cooking time and water down flavor; pat them dry gently on a towel to avoid that.
- Place the berries, along with the maple syrup in a heavy-bottomed saucepan and give the mixture a good stir to combine.: When the berries and maple syrup hit the pan, you should hear a soft, wet hiss and see the syrup pooling around the fruit, shining like varnish. The heavy bottom helps distribute heat evenly so the fruit cooks uniformly, preventing hot spots that burn. Stirring blends the sweetener into the fruit juices so flavor develops evenly. If you use a thin pan, expect hot spots and a chance of scorching, so opt for sturdy cookware or lower the heat sooner.
- Over medium-high heat, bring the mixture to a boil and then reduce the heat to medium-low. Stirring and mashing often with a fork or potato masher, until the berries are soften. This should take about 15 minutes.: As the pot warms you will see vigorous bubbling begin, and steam will carry a concentrated fruity aroma. The initial boil encourages the fruit to release more juice and helps the sugars meld. After the vigorous boil, reducing to medium low creates a gentler simmer that prevents the jam from sticking and burning while still breaking down the fruit. If you leave it at high heat you risk caramelizing and changing the flavor profile too aggressively, so turn down the heat once boiling starts.
- Remove the pan from the heat, and stir in the lemon juice and chia seeds. Allow the jam to cool to room temperature (at least 15 minutes).: With frequent stirring you will hear soft pops as berries burst and a bubbling cadence that signals the mixture is thickening. Mashing controls texture so you can choose chunky or smooth. The breakdown of cell walls releases natural pectin and sugars, which helps the jam set. Over mashing makes the jam overly uniform, while under mashing leaves large whole pieces, so adjust according to preference. A mistake here is inconsistent mashing, which yields uneven texture; aim for steady, even pressure.
- At this point, you can opt to blend the jam for smoother consistency or transfer the jam to a jar or airtight container and store in the refrigerator for up to 10 days. While you can enjoy the jam warm, I find it is better to let it chill for at least 4 hours to allow the chia seeds to fully thicken the jam.: After you pull the saucepan off the heat, the steam will carry a refined, jammy fragrance; stirring in the lemon juice brightens that aroma instantly, and adding the chia seeds starts the thickening process. The residual heat hydrates the seeds, which expand and create body without further cooking. If you add them while the pot is boiling, they may clump, so adding off heat gives a more even distribution. A typical error is mixing them in too vigorously, which can create small clumps; fold gently for best results.
- Directions for Blending: If desired, transfer the cooled jam to a blender or small food processor fitted with an s-blade. Blend on low speed or pulse lightly until the jam reaches the consistency you like. Transfer the blended jam to a jar or airtight container and refrigerate as directed.: As the mixture cools you will notice the bubbling slow to a soft sigh and the texture begin to cling to the spoon, signaling initial setting. Cooling lets the chia seeds absorb liquid and fully thicken, so patience here yields a better set. If you jar the jam while it is still very hot the texture may be looser and the seeds may not hydrate evenly, causing a runny result; let it rest until it reaches a warm or room temperature.
- At this point, you can opt to blend the jam for smoother consistency or transfer the jam to a jar or airtight container and store in the refrigerator for up to 10 days: The choice to blend affects mouthfeel; if you transfer to a blender you will hear a steady whirr and smell an intensified fruit scent as cells are pureed. Blending creates a silkier texture that spreads easily, while leaving it chunky offers more fruit presence. Storage in a clean jar helps the jam keep its quality, and refrigeration slows microbial growth. A common pitfall is using an unsterilized jar, which can shorten shelf life, so clean containers well before filling.
- While you can enjoy the jam warm, I find it is better to let it chill for at least 4 hours to allow the chia seeds to fully thicken the jam: Chilling deepens the flavor and firms the texture, and during this rest you will notice the jam turn from loose and glossy to more set and matte. This waiting period gives the seeds their full thickening potential and results in a spread that holds its shape. If you rush into using it warm, the jam will be softer and may run off bread or pastries; patience yields the ideal body.
- Directions for Blending If desired, transfer the cooled jam to a blender or small food processor fitted with an s blade: When you blend cooled jam, the machine sound is steady and the aroma becomes concentrated as air and fruit mix; pulsing gives control over final texture. Blending cold reduces steam and prevents pressure buildup, making it safer than blending hot. A mistake is blending hot jam, which can create pressure and cause splattering; always cool before blending and pulse gently until you reach your preferred consistency.
- Blend on low speed or pulse lightly until the jam reaches the consistency you like: Low speed keeps the texture controlled, and pulsing helps you stop at just the right moment when the jam is smooth but still has character. If you overprocess, the jam can become too thin, since the seeds and pulp are broken down more thoroughly. To avoid a too watery texture, check frequently and stop as soon as the desired smoothness appears.
- Transfer the blended jam to a jar or airtight container and refrigerate as directed: As you spoon the jam into containers, note how it clings to the spoon in ribbons, indicating a good set. Airtight storage preserves flavor and keeps the jam stable for the recommended storage time. Leaving air pockets or using a warm jar can reduce shelf life, so cool containers first and press to remove air before sealing for best preservation.
Notes
- Swap berries freely. You can replace all or part of the berries with raspberries, blackberries, or blueberries for different flavor notes; blending varieties changes sweetness and tartness, so taste as you go.
- Adjust sweetener intensity. If you prefer a less sweet spread, reduce the maple syrup slightly, or increase it if you want a richer, dessert like jam; remember that chilling concentrates perceived sweetness.
- Control texture with blending. For a smooth spread, blend cooled jam briefly in a small food processor; for more presence of fruit, mash by hand to keep chunkier pieces intact.
- Use frozen fruit when needed. Frozen berries work well straight from the freezer and can extend the season for jam making; expect a longer simmer while they break down.
- Make smaller batches. Halve the recipe to experiment with flavors or to avoid having too much on hand; smaller pots heat quickly so watch closely to avoid burning.
- Freeze for long term storage. Transfer cooled jam to freezer safe containers leaving room for expansion, freeze up to three months, and thaw overnight in the refrigerator before using.