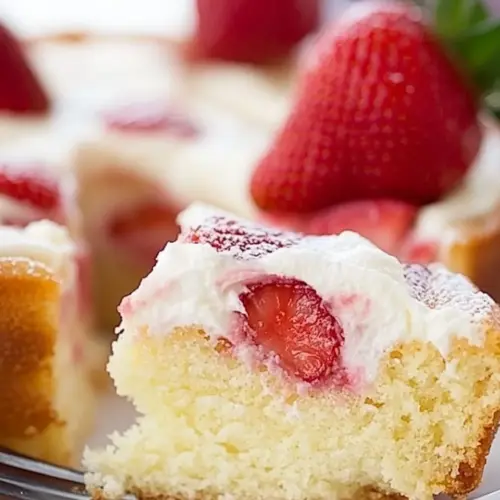
Strawberry Cake
Strawberry Cake is a tender, fruity dessert that balances soft crumb and roasted berry brightness. The cake is airy yet moist, with caramelized strawberries on top creating a glossy finish. It is an easy, approachable bake perfect for an easy weeknight dessert or a small spring gathering, and it rewards simple techniques with deeply satisfying flavors.
Equipment
- Electric Mixer
- Paddle attachment
- 10-inch cake pan
- Medium Bowl
- Oven
Ingredients
- 1 pound (500 g) strawberries, hulled and halved Fresh and juicy, hulled and halved strawberries provide bright, fruity flavor and moisture to the cake. Serve as a component in the batter or layered on top to add natural sweetness and color. Chop or puree as needed to distribute flavor evenly throughout the crumb.
- 1 1/2 cups all-purpose flour Versatile and structure-building, all-purpose flour gives the cake its framework and crumb. Measure accurately and sift or spoon into the cup to avoid a dense texture. Combine with leaveners to balance tenderness and strength.
- 1 1/2 teaspoons baking powder Light and reactive, baking powder supplies lift and airiness to the cake by producing gas bubbles during baking. Use the correct amount to achieve a tender, well-risen crumb without an off taste. Ensure freshness for reliable leavening performance.
- 1/2 teaspoons salt Savory-balancing and texture-enhancing, salt intensifies the other flavors and controls sweetness perception. Dissolve into the batter to ensure even distribution and improved taste clarity. Even small quantities noticeably sharpen overall flavor.
- 6 tablespoons unsalted butter, room temperature Creamy and rich, unsalted butter at room temperature contributes fat, moisture, and a tender crumb to the cake. Soften to allow proper creaming with sugar, which traps air for lightness and improved texture. Use unsalted to control overall sodium.
- 1 cup sugar Sweet and aerating, sugar not only provides sweetness but helps with creaming to incorporate air for a lighter cake. Measure and cream thoroughly with butter to develop volume and a fine crumb. Adjust a separate sprinkle if topping or macerating fruit.
- 1 large egg Binding and enriching, a large egg adds structure, moisture, and emulsification to the batter. Beat in at room temperature to combine smoothly with fats and liquids for a cohesive mixture. Contributes color and tenderness when baked.
- 1/2 cup milk Mild and thinning, milk loosens the batter and adds moisture, helping achieve the desired consistency and a tender crumb. Warm or room-temperature milk blends more readily with butter and eggs to prevent curdling. Adjust amount slightly to control batter thickness.
- 1 teaspoon vanilla extract Fragrant and sweet, vanilla extract enhances and rounds out the cake's flavor profile with warm, aromatic notes. Stir into wet ingredients to distribute flavor evenly throughout the batter. Use pure vanilla for the best depth of flavor.
- 2 tablespoons sugar Extra-sweet finishing touch, sugar added separately can be used for macerating strawberries or sprinkling before baking for a crisp top. Apply as needed to intensify fruit juices or create a slight caramelized surface. Use fine granulated sugar for even distribution.
Instructions
- Preheat the oven to 350°F (176°C). Butter a 10-inch (25 cm) cake pan. In a medium bowl, sift together the flour, baking powder, and salt. Hull the strawberries and cut them in half.: When you step into the kitchen you should notice a steady warm scent as the oven comes up to temperature, a signal that the air will cradle the cake evenly. A properly preheated oven ensures the initial rise is consistent, creating a delicate crumb and preventing the cake from setting too slowly which can make it dense. If the oven runs hot, the edges will brown too quickly while the center remains undercooked, so use an oven thermometer if you are unsure about calibration. The sound of the oven fan settling and the faint heat shimmer near the door are good cues that the environment is ready. Avoid opening the door frequently in the first 20 minutes as sudden temperature changes can deflate the cake's rise.
- Place the butter and 1 cup of sugar in the bowl of an electric mixer fitted with the paddle attachment. Mix on medium-high speed until pale and fluffy, about 3 minutes. Reduce the speed to medium-low and mix in the egg, milk, and vanilla.: Rubbing softened butter into the pan gives a thin, even sheen that helps the cake release cleanly, and you can feel the pan's surface go from matte to glossy under your fingers. This small tactile act prevents sticking and encourages attractive edges. A common error is skimping on the grease in corners, which can cause the cake to cling and tear upon removal. After buttering, dust a light coating of flour or line with parchment if you prefer, which adds insurance against adhesion while keeping the pan's exterior from smoking in the oven.
- Reduce the speed to low and gradually mix in the flour mixture. Transfer the batter to a buttered pie plate. Arrange the strawberries on top of the batter, cut sides down and as close together as possible. Sprinkle 2 tablespoons of sugar over the strawberries.: As you sift, you will see the dry mixture become airy and pale, which helps it blend smoothly into the batter. This step helps distribute the rising agent uniformly so the cake rises evenly without concentrated pockets. If you skip sifting, lumps or uneven rise may occur, leaving you with pockets of raw flour. The visual cue to look for is a fine, homogenous mixture that feels light when you whisk it; that texture helps the batter stay tender rather than gummy.
- Bake the cake for 10 minutes. Then, reduce the oven temperature to 325°F (150°C) and continue baking until the cake is golden brown and the center is cooked through, about 1 hour. Let it cool, cut into wedges, and serve immediately.: Handling the strawberries should be gentle, because firm berries hold their shape and release less juice while softer ones may bleed and wet the batter. Halving exposes the sweet interior, allowing caramelization and the formation of a slightly jammy top as the cake bakes. Avoid cutting them too small, which can sink into the batter, or leaving them whole, which limits surface contact. The ideal berry will glisten and smell fresh, offering a bright contrast when arranged cut side down over the batter.
- Place the butter and 1 cup of sugar in the bowl of an electric mixer fitted with the paddle attachment: When creaming, you will notice the mixture transform from pale yellow to almost ivory as air is incorporated, which is the signal that you have trapped enough bubbles for a light texture. This step is crucial because it creates the lift that compensates for the modest amount of baking powder. If the butter is too cold, the creaming will be ineffective, and if it is too warm, the air cannot hold, leading to a dense cake. Scrape the bowl periodically so everything mixes evenly and you do not leave pockets of unmixed fat.
- Mix on medium-high speed until pale and fluffy, about 3 minutes: Listen for the change in sound of the mixer as the mixture becomes lighter, and watch the texture shift to a cloudlike consistency that holds soft peaks for a beat. This aeration is the backbone of the cake's tender crumb. Overbeating can lead to breakdown and a curdled appearance, while underbeating yields a compact result. Aim for a steady, rhythmic blend and stop when you see a noticeably lighter color and smoother texture.
- Reduce the speed to medium-low and mix in the egg, milk, and vanilla: As these liquids fold in, the batter will become silkier and smell warmly of vanilla , a comforting cue that flavors are marrying. The egg enriches and stabilizes, while the milk loosens the batter just enough for proper spreading. If you add the liquid too quickly, the batter can separate or curdle slightly; take it steady. The right texture after this step is smooth and slightly glossy, not runny, which indicates balance between fats and liquids.
- Reduce the speed to low and gradually mix in the flour mixture: Adding the dry mix slowly prevents overworking the gluten, which helps keep the crumb tender and fine. As the flour disappears into the batter, you will see it thicken and become more matte, signaling readiness for the pan. Overmixing here creates toughness, so stop as soon as streaks vanish. If you detect small lumps of dry flour, a few gentle turns by hand will finish the job without kneading the mixture.
- Transfer the batter to a buttered pie plate: Spoon or pour the batter and feel its weight settling into the pan, forming a slightly domed surface that will even out as it bakes. The batter should spread easily but not be runny; this balance leads to an even crumb. If the batter runs too thin, the cake may bake too quickly and lose structure; if it is overly stiff, you may get a dense interior. Tap the pan gently on the counter to settle the batter and release any large air pockets.
- Arrange the strawberries on top of the batter, cut sides down and as close together as possible: Placing the strawberries face down creates a glossy, slightly caramelized top and concentrates their juices against the surface of the cake. The visual result is a mosaic of ruby halves that will deepen in color and perfume the kitchen while baking. If you leave gaps, the top will be uneven and some berries may sink; if you crowd them too tightly, they may produce excess moisture. Aim for an attractive, snug arrangement that feels intentional and balanced.
- Sprinkle 2 tablespoons of sugar over the strawberries: This final dusting encourages a shiny, slightly crackled finish as the sugar melts and caramelizes around the berry edges. You will see tiny crystals glint before baking, promising a delicate crunch and intensified sweetness. A common oversight is using too little sugar, which results in a dull top, or too much, which can turn to an overly hard crust. The right amount yields a pleasant contrast against the soft fruit.
- Bake the cake for 10 minutes: During this initial period the cake will begin to set around the edges while the fruit warms and the top starts to glisten, creating a reassuring aroma. This short burst of higher heat jumpstarts the rise and helps the center begin to take shape. Avoid opening the oven repeatedly at this stage, which can collapse the delicate lift you have built. Your visual signal to proceed is a gently puffed surface and lightly bronzed edges after the ten minutes.
- Then, reduce the oven temperature to 325°F (150°C) and continue baking until the cake is golden brown and the center is cooked through, about 1 hour: Lowering the heat promotes even cooking, allowing the center to set without the edges overbrowning, and it helps the strawberries roast into a jammy, concentrated topping. You should notice slow, steady browning and a sweet aroma that fills the kitchen as the sugar caramelizes. Use a toothpick to check the center for a few moist crumbs, not wet batter; inserting a skewer too early can leave the cake underdone. If the top browns too quickly, tent with foil to protect it while the interior finishes.
- Let it cool, cut into wedges, and serve immediately: Cooling briefly allows the juices to set so slices hold their shape, while serving warm maximizes the contrast between the tender crumb and the syrupy berry top. You will see fragrant steam and hear the cake yield as you slice, both good signs of a successful bake. A typical slip is slicing too soon, which can cause bleeding and a messy presentation; let it rest until the center firms slightly for cleaner wedges.
Notes
- Bring ingredients to room temperature before you begin, because this ensures the butter, egg, and milk blend smoothly into a cohesive batter, preventing curdling and encouraging even texture.
- Use an oven thermometer to confirm the actual temperature, since many home ovens run hotter or cooler than their dial indicates, which affects browning and internal doneness.
- Choose firm, fragrant strawberries that are not overly ripe, because they will hold shape and roast instead of dissolving into the batter, preserving the cake's texture.
- Do not skip the initial high-heat burst of baking, it jumpstarts the rise and creates a gentle set at the edges, improving structure and crumb.
- Tent with foil if the top browns too fast, which allows the interior to continue cooking without burning the fruit or crust, keeping the presentation attractive.
- Slightly underbake rather than overbake if you must choose, as residual heat will finish the center and preserve a moist crumb rather than leaving it dry.