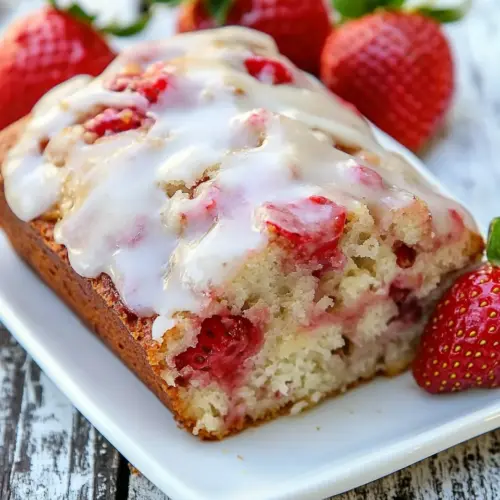
Strawberry Bread With Glaze
Strawberry Bread With Glaze combines tender crumb, juicy strawberries, and a silky sweet topping for a simple, crowd pleasing loaf. The texture is moist and easy to slice, with toasted pecans adding a pleasant crunch. Perfect for brunch or a cozy snack, this easy loaf delivers fresh berry flavor and an irresistible glaze, making it a recipe you'll reach for again and again.
Equipment
- Loaf Pan
- Mixing Bowls
- Whisk
- Spatula
- Oven
Ingredients
- 1 1/2 cups all-purpose flour Provide structure and bulk to the loaf by forming the gluten network when mixed; sifts smoothly with other dry ingredients to ensure even texture and tender crumb after baking.
- 1/2 teaspoon baking powder Lighten the crumb and assist with rise by releasing carbon dioxide when reacting with wet ingredients; measure precisely to avoid over-rise or dense texture in the bread.
- 1/2 teaspoon ground cinnamon Add warm spice and aromatic complexity to the batter, complementing the strawberries; use measured amount to enhance flavor without overpowering the loaf.
- 1/4 teaspoon kosher salt Balance and enhance flavors while controlling dough chemistry; helps strengthen other seasonings and can moderate sweetness to prevent a flat taste.
- 1/2 -1 cup granulated sweetener I used Truvia baking blend Sweeten and tenderize the batter while contributing moisture depending on the type used; adjust quantity within the range to achieve desired sweetness and calorie profile.
- 1/2 cup of neutral oil canola, avocado Provide fat for moistness and a tender crumb, contributing to mouthfeel and shelf stability; choose a neutral oil to let strawberry flavor remain prominent.
- 2 large eggs Bind ingredients, incorporate air when beaten, and contribute to structure and richness; room-temperature eggs mix more evenly and improve overall texture.
- 2 cups chopped fresh strawberries Deliver fresh fruity flavor, moisture, and bursts of juiciness throughout the bread; chop uniformly to distribute fruit and prevent large wet pockets.
- 1/2 cup toasted pecans chopped Add crunchy texture, nutty flavor, and richness while providing contrast to the soft crumb; lightly toasting intensifies flavor and prevents sogginess in the loaf.
- 1 cup confectioner’s sugar sugar alternative is fine Create a smooth, sweet glaze that adds a glossy finish and additional sweetness; choose a sugar alternative if desired for lower glycemic impact.
- 1/2 teaspoon vanilla extract Impart warm vanilla aromatics that enhance overall flavor complexity; stir into the glaze to round out sweetness and complement the strawberries.
- 3 -4 Tablespoons heavy cream Adjust glaze consistency and add rich creaminess for a silky finish; add gradually to reach a pourable but not runny coating for the bread.
Instructions
- Pre-heat oven to 350°F. Lightly grease the loaf pan(s) with unsalted butter and dust with flour. Set aside.: Walk into the oven step by taking a moment to set the scene, the small hum as the oven warms, and a faint toasty smell as it approaches temperature. The visual cue is steady warmth, the racks hot when you carefully place your hand near the oven door for an instant, not lingering. Greasing with unsalted butter ensures the bread releases cleanly, while a light dusting of flour prevents sticking; you will see a thin white film in the pan. This technique matters because it preserves the loafs crust and prevents broken slices, and it also encourages even browning. A common mistake is over greasing or using too much flour, which creates a pasty residue on the bottom of the loaf. If your pan seems slick, tap out the excess flour so you have a smooth, barely coated surface.
- In a large mixing bowl whisk together the flour, baking powder, cinnamon and salt.: As you whisk the dry ingredients you will notice the powdery, slightly sweet scent of the flour blending with the warm spice of the cinnamon . Whisking aerates the mix so the baking powder disperses evenly, which helps achieve a uniform rise. The mixture should look pale and evenly combined, with no streaks of salt or clumps. This matters because uneven leavening causes tunnels or dense pockets in the crumb. A typical error is insufficient whisking, leaving pockets of leavening or spice; take an extra ten to fifteen seconds to whisk until consistent.
- In a separate mixing bowl beat the butter and sweetener until light and fluffy. Add the vanilla extract and eggs and mix until well combined.: When you beat the butter with the sweetener you are incorporating air, which contributes to the loafs lift and tenderness. The texture should progress from glossy to pale and slightly voluminous, and you will hear the mixer soften to a steady hum rather than an aggressive beat. Adding the vanilla extract releases a gentle perfume, and the eggs should be added one at a time so they emulsify smoothly into the fat. The batter will look cohesive and satin like. This step matters because proper emulsification keeps the batter stable, preventing separation during baking. A common pitfall is adding eggs when the butter is too cold, which causes small lumps; ensure your butter is softened to room temperature for a seamless mixture.
- Add the butter mix in the flour mix and fold ingredients together until just combines. Add in the strawberries and pecans.: Folding is a delicate motion meant to combine without developing gluten; you will see streaks of flour disappear into a glossy batter as you fold with a spatula. When the batter looks uniform but still slightly lumpy, stop. Then gently fold in the chopped strawberries and pecans , noting how the fruit sinks slightly and the nuts provide visible flecks of brown. This technique preserves the berries intact so they burst in the oven rather than turning to mush. Over mixing at this stage causes toughness, so avoid vigorous stirring. If you go too far, the loaf may be denser and chewier than desired.
- Bake mini loves for 25-30 minutes. A large 9"x 4" loaf should bake for up to 60 minutes. A tooth pick placed in the center of the loaf should come out clean.: As the loaf bakes, watch for visual cues; the top will transform from shiny batter to a golden dome, and you may hear faint crackling as moisture escapes and the crust sets. The aroma evolves from sugary fruit to a deeper, warm berry and spice smell, signaling progress. For minis, the edges will pull away slightly from the pan sooner, while a large loaf needs that full hour for the center to set without over browning. Use a toothpick test in the thickest part to ensure doneness, it should come out with a few moist crumbs but not wet batter. A common mistake is removing the loaf too early, resulting in a gummy center, so err on the side of a few extra minutes and check repeatedly in the final five to ten minutes.
- Cool in the baking pan for 30 minutes.: Cooling in the pan allows the loaf to finish cooking from residual heat while the crumb firms up, and you will notice steam rising gently as the internal temperature settles. After thirty minutes the loaf will be easier to turn out without collapsing, and the crust will set so slicing produces neat pieces. This resting phase matters because cutting too soon squashes the crumb and can produce a gummy interior. The common error is impatience, removing the loaf while it is still too warm, which ruins the texture. Be patient and let gravity do the gentle work of finishing the bake.
- Place confectioner’s sugar in a small mixing bowl.: The confectioner s sugar is the canvas for the glaze, and its fine texture ensures a smooth finish. Sifting it into the bowl helps prevent lumps and gives you a silky base to mix with liquids. The dry sugar will appear soft and powdery; this is the part where you set the tone for the glaze s consistency. This matters because a lumpy glaze looks grainy and will not spread evenly. A typical mistake is skipping sifting, which can leave small clumps in the glaze; take a moment to whisk the sugar to ensure uniformity.
- Add vanilla extract and 2 tablespoon of heavy cream stirring until smooth. Add additional cream to reach your desired consistency.: When you add the vanilla extract and the first measure of heavy cream , whisk briskly and watch the glaze transform into a shiny ribbon that slowly falls from the whisk. The aroma becomes richer and slightly creamy, and the texture should be pourable but not runny. If you want a thicker glaze for a glossy top, stop at two tablespoons; for a thin drizzle use up to four. This step matters because the glaze sets quickly and its thickness determines how it clings to the loaf. A common issue is adding too much cream at once, producing a glaze that slides off the bread; add a tablespoon at a time until you reach the look you want.
- Top of cooled strawberry bread.: Once the loaf is fully cooled and the top no longer feels warm, drizzle or spread the glaze and watch it settle into nooks and accent the crumb. The glaze should slightly firm to a tender shell, offering a pleasant contrast to the soft interior. This final flourish elevates the loaf aesthetically and in flavor, catching the light with a delicate shine. Avoid glazing while the loaf is warm, which can make the glaze run off and soak in, losing that pretty finish. If your glaze is too thin, it will pool at the base; if too thick, it may crack as it sets, so aim for a balanced pour.
Notes
- Mini loaves or one large loaf: Use one 9"x3" loaf pan for a classic loaf or three 5"x3" mini loaf pans for giftable portions, adjusting bake time accordingly so the centers set without over browning.
- Sweetness control: Adjust the granulated sweetener between 1/2 and 1 cup depending on how ripe your strawberries are, choosing less for very sweet berries and more if they are tart.
- Nut free option: Omit the pecans entirely if you or guests have nut sensitivities, and consider adding a tablespoon of rolled oats for a slight texture without introducing allergens.
- Glaze thickness: Start with 2 tablespoons of heavy cream for a thick glaze, add more only a teaspoon at a time to get a looser drizzle to suit presentation and preference.
- Oil swap notes: Use canola or avocado oil for a neutral flavor, and measure carefully to maintain the loafs moist crumb; avoid flavored oils that could compete with the strawberries.