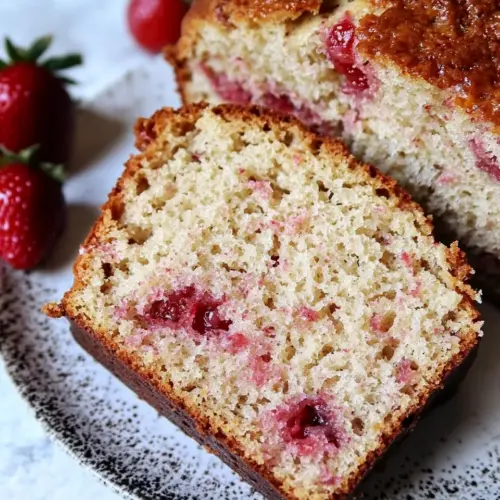
Strawberry Bread
Strawberry Bread is a soft, moist loaf bursting with fresh berry flavor and a tender crumb. This easy, quick loaf delivers bright fruit notes, a touch of tang from yogurt and buttermilk, and a crunchy turbinado sugar topping, perfect for easy weeknight breakfasts or casual brunches. Make it when strawberries are in season for the best results, and enjoy a simple bake that feels special.
Equipment
- 9 x 5 loaf pan
- Mixing Bowls
- Whisk
- wire cooling rack
Ingredients
- 2 cups all purpose flour Provides the primary structure and bulk for the bread, forming the gluten network when mixed with wet ingredients; sifts or whisk to remove lumps and ensure even incorporation for a tender crumb.
- 1 teaspoon baking soda Leavens the loaf by releasing carbon dioxide when reacting with acidic components like buttermilk and yogurt, creating lift and lightness; measure carefully to avoid metallic or bitter aftertaste.
- 1/2 teaspoons salt Balances flavor and enhances gluten development control while helping regulate dough hydration; dissolve evenly into dry ingredients to ensure consistent seasoning throughout the batter.
- 1/2 cup granulated sugar Adds sweetness and tenderness while aiding in moisture retention and crust color through caramelization; cream with wet ingredients to help distribute sugar evenly for consistent sweetness.
- 1/4 cup brown sugar Contributes deep, molasses-like sweetness and moisture, enriching flavor complexity and creating a softer texture; pack lightly into the measuring spoon for accurate quantity.
- 1 large egg Provides structure and richness through protein that coagulates during baking, helping to bind ingredients and contribute to a fine crumb; beat lightly before adding to avoid overmixing.
- 1/2 cup plain Greek yogurt Adds tangy moisture and contributes acidity to react with baking soda, which boosts leavening while imparting a creamy texture and slight tang that complements strawberries.
- 1/2 cup buttermilk Introduces additional acidity and liquid for chemical leavening with baking soda, promoting lift and a tender, moist interior; keep cold to prevent curdling when combined with other dairy.
- 1/3 cup canola vegetable, or melted coconut oil Supplies fat to tenderize the crumb, add moisture, and enhance flavor; choose based on desired neutrality or coconut aroma and measure melted oil accurately for batter consistency.
- 1 1/2 teaspoons vanilla extract Introduces aromatic sweetness and depth, enhancing overall flavor with subtle warm notes; stir into wet ingredients to evenly distribute aroma throughout the batter.
- 1 heaping cup chopped strawberries plus 1 tablespoon flour Provides fresh fruit flavor and moisture while adding bursts of sweetness; lightly coat chopped strawberries with a bit of flour to prevent them from sinking and ensure even fruit distribution.
- 3 tablespoons turbinado sugar for sprinkling on top Creates a crunchy, caramelized topping that adds texture and visual appeal, enhancing sweetness and giving a bakery-style finish when sprinkled before baking.
Instructions
- Preheat the oven to 350 degrees F. Spray a 9 x 5 loaf pan with nonstick cooking spray and set aside.: You will feel and smell the warmth building in the oven as it approaches temperature, which ensures the loaf begins baking evenly the moment it goes in. Proper preheating promotes steady rise and a golden crust, and skipping this can lead to uneven texture. If your oven runs hot or cool use an oven thermometer to verify the temperature.
- In a large bowl, whisk together the flour, baking soda, and salt. Set aside.: When you lightly coat the pan you’ll notice the surface sheen which prevents sticking and helps the bread release easily after cooling, preserving the loaf’s shape. Greasing properly prevents broken crusts and ragged edges when unmolding. If you skip this the loaf can cling to the pan and tear when removed.
- In a medium bowl, whisk together the brown sugar, granulated sugar, and egg. Whisk until smooth and there are no brown sugar clumps. Whisk in the Greek yogurt, buttermilk, oil, and vanilla extract.: Whisking combines and aerates the dry ingredients producing a uniform mixture you can see as a slightly fluffy, pale blend. This ensures even leavening and distribution of salt for consistent flavor. Failing to mix these thoroughly can cause pockets of baking soda or salt, which ruin texture and taste.
- Slowly pour the wet ingredients into the dry ingredients and gently whisk until there are no more lumps. Don’t overmix. Gently toss the strawberries in the tablespoon of flour and add them to the batter. Gently fold in the strawberries.: As you whisk, the sugars begin to dissolve and the mixture smooths out, becoming glossy and cohesive, which helps create a consistent batter. Properly combining these prevents grainy spots and ensures even sweetness. Underwhisking leaves clumps of brown sugar, causing uneven texture.
- Pour batter in prepared pan and sprinkle the top with turbinado sugar. Bake for 60 minutes, loosely covering the bread with aluminum foil after 45 minutes to prevent the top from getting too dark. A toothpick inserted in the center of the loaf will come out clean when the bread is done. Remove from the oven and allow the bread to cool for 15 minutes on a wire cooling rack. Use a knife to loosen the bread around the edges in the pan. Carefully remove the bread from the pan and cool completely.: The mixture will loosen and smell tangy sweet as you incorporate the dairy and oil, producing a creamy batter base that contributes moisture and tenderness. This step builds the batter’s emulsion for even crumb. Add ingredients at room temperature to avoid curdling, and if something looks separated whisk until smooth.
- Note - the bread will keep covered on the counter for up to 3 days.: As the batter comes together you’ll see pockets of flour disappear and the color even out. Gentle mixing preserves the tender crumb by avoiding excess gluten development, so stop once lumps are gone. Overmixing leads to a tough, dense loaf rather than a soft one.
- Don’t overmix: Feeling the texture is key, you want a slightly lumpy batter that still holds together, not a perfectly smooth cake batter. This restraint keeps the final crumb light and tender. Overworking the batter develops gluten and yields a chewy texture.
- Gently toss the strawberries in the tablespoon of flour and add them to the batter: Coating the strawberries creates a protective dusting that absorbs excess juice and prevents them from sinking, and you’ll notice they look matte rather than glossy once tossed. This also disperses the fruit so each bite has a consistent fruit presence. If you skip this step you may get wet streaks and heavy fruit pockets in the loaf.
- Gently fold in the strawberries: Folding keeps the batter airy while distributing fruit evenly, and you’ll see lovely pink streaks where the berries have marbled through. The visual cue of even distribution without deflation is what you want. Vigorous stirring collapses air and results in a dense loaf.
- Pour batter in prepared pan and sprinkle the top with turbinado sugar: As the batter fills the pan it should have a modest dome and the coarse sugar will sparkle on the surface, offering a crunchy contrast after baking. That sugar also helps create small caramelized pockets on top. Uneven spreading can produce an irregular rise, so level the batter gently with a spatula.
- Bake for 60 minutes, loosely covering the bread with aluminum foil after 45 minutes to prevent the top from getting too dark: During baking you will notice the aroma deepen and the crust turn golden, and the foil shields the top so it browns without burning. The center should spring back lightly when touched. If you omit the foil the top can get overly dark before the center is cooked.
- A toothpick inserted in the center of the loaf will come out clean when the bread is done: Use a toothpick to gauge doneness, and if it comes out with crumbs but not wet batter the loaf is cooked through. This simple test prevents under baking which yields a gummy center. If the toothpick comes out wet continue baking in five minute increments and recheck.
- Remove from the oven and allow the bread to cool for 15 minutes on a wire cooling rack: Cooling lets the crumb set and finish cooking from residual heat, and you’ll notice the aroma mellow into a homey sweetness. This brief rest makes unmolding easier and reduces tearing. Cutting too soon can lead to a gummy texture and a collapsed loaf.
- Use a knife to loosen the bread around the edges in the pan: Running a knife around the pan’s edge releases any areas that may cling, ensuring the loaf comes away cleanly and retains its shape. This careful step helps with presentation. Forcing the loaf out can break the crust and tear the sides.
- Carefully remove the bread from the pan and cool completely: Once on the rack let it cool fully to room temperature, which makes slicing easier and preserves crumb structure. As it cools you’ll see steam subside and the loaf firm up slightly. Slicing too hot will result in messy, compressed slices.
- Note the bread will keep covered on the counter for up to 3 days: Stored in a cool, airtight container the loaf maintains moisture and flavor for a few days, and the texture remains pleasant for casual snacking. If you need longer storage wrap tightly and freeze. Leaving it uncovered will dry the crumb quickly.
Notes
- Swap oils thoughtfully Try canola for a neutral profile or melted coconut oil for a subtle aroma, both keep the crumb tender.
- Adjust sugar levels If your strawberries are exceptionally sweet, reduce granulated sugar by a tablespoon or two to allow the fruit to shine.
- Use smaller fruit pieces Chop strawberries finely to avoid large pockets of moisture, which helps the loaf maintain structure.
- Make mini loaves Divide batter into smaller pans to bake for shorter times, ideal for gifting or portion control.
- Freeze slices for later Wrap individual slices tightly and freeze, then thaw at room temperature for a quick treat.