Strawberry Almond Cream Tart
Strawberry Almond Cream Tart is a creamy, glossy, and slightly crunchy dessert that blends a buttery graham crust with silky cream cheese and a bright strawberry glaze. Perfect for spring gatherings and easy weeknight baking, this tart balances fresh fruit and nutty crunch for an irresistible finish that looks bakery crafted, yet comes together simply at home.
Equipment
- Tart Pans with Removable Bottoms
Ingredients
- 36 honey graham crackers 9 sheets Crush into fine crumbs to form the tart crust base; provide sweet, wheaty flavor and structure when combined with butter and sugar. Press evenly into the pan to create a firm, uniform foundation that holds the filling and bakes to a crisp, golden texture.
- 2 tablespoons sugar Add to the crust mixture to enhance sweetness and help caramelize during baking; balance the graham cracker base and intensify flavor. Sprinkle gradually and taste as needed to achieve the desired level of sweetness without overwhelming other components.
- 2 tablespoons butter melted Melt and incorporate to bind the crushed crackers and sugar together into a cohesive crust; contribute richness and help the crust set firmly. Pour while warm and mix thoroughly so the crumbs absorb the fat uniformly for even browning.
- 4 teaspoons water Stir into the crust mixture to moisten and help the butter distribute evenly; assist in achieving the right crumb texture when pressed into the pan. Add slowly and mix until the mixture holds together without becoming soggy.
- 2/3 cup 1/3 less fat cream cheese about 5 ounces Soften and beat until smooth to create the creamy filling base with a tangy, slightly reduced-fat dairy profile. Combine with sugar and extracts for a velvety texture that complements the strawberries while keeping the filling lighter than full-fat cream cheese.
- 1/4 cups sugar Whip into the cream cheese to sweeten and stabilize the filling; adjust to taste for the desired sweetness level. Beat until fully dissolved to ensure a smooth, lump-free cream that sets well in the tart.
- 1/2 teaspoons vanilla extract Fold in to provide a warm, familiar vanilla aroma and enhance overall flavor depth; balance the other extracts and fruit. Use pure extract sparingly and mix completely to avoid concentrated pockets of flavor.
- 1/2 teaspoon almond extract Add sparingly to impart a distinct, nutty almond aroma that complements both the filling and sliced almond topping. Combine with vanilla for a layered flavor profile and to echo the toasted almond garnish.
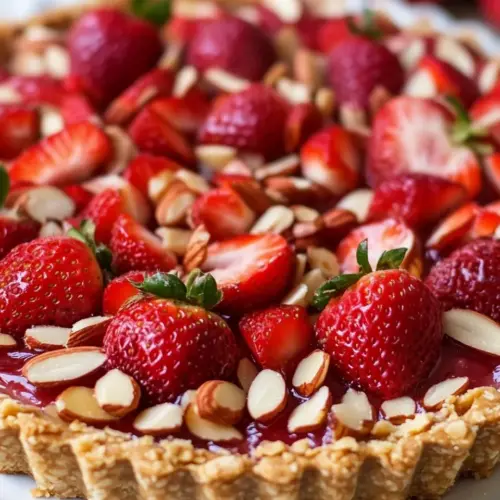
- 6 cups fresh strawberries hulled Hull and slice to provide the fresh, juicy fruit topping that gives bright color, acidity, and natural sweetness to the tart. Arrange attractively over the cream filling and reserve some for simmering into a glaze if desired.
- 2/3 cups sugar Cook with strawberries to macerate and create a glossy glaze or syrup; enhance the fruit's sweetness and help set the topping. Dissolve evenly to avoid graininess and adjust amount based on strawberry juiciness and desired glaze thickness.
- 1 tablespoon cornstarch Mix with fruit juices and sugar to thicken into a clear, stable glaze that holds the sliced strawberries in place. Dissolve thoroughly before heating to avoid lumps and whisk constantly until the glaze becomes translucent and glossy.
- 1 tablespoon fresh lemon juice Squeeze in to brighten the strawberry topping with fresh acidity and balance sweetness; help the glaze set and preserve fruit color. Add a small amount at a time, tasting to ensure the tart retains a lively, well-balanced finish.
- 1/4 cups sliced almonds toasted Toast lightly and scatter over the finished tart to add crunch, warmth, and visual contrast; enhance the almond undertones from the extract. Cool completely before sprinkling to preserve crispness and prevent sogginess from the filling or glaze.
Instructions
- Preheat oven to 350°.: You will notice the kitchen begin to warm and the smell of heated air will make the butter aroma more pronounced, creating anticipation even before baking. Preheating ensures the crust starts cooking immediately and browns evenly, which is crucial for that crisp edge that supports the filling. A common mistake is to skip full preheating, causing uneven browning and a softer crust. If your oven runs hot, reduce the temperature slightly to avoid burning the crumb edge, and always place the tart in the center rack for even heat distribution.
- To prepare crust, place crackers in a food processor; process until crumbly. Add 2 tablespoons sugar, butter, and 4 teaspoons water; pulse just until moist. Place cracker mixture in a 9-inch round removable-bottom tart pan or 4 individual tart pans, lightly coated with cooking spray, pressing into bottom and up sides of pan to 3/4 inch. Bake at 350° for 10 minutes or until lightly browned. Cool completely on a wire rack.: As you pulse, listen to the rapid chopping and watch the crackers break down into fine crumbs, almost like sandy soil. This texture helps the crumbs bind with butter, creating a compact shell. If you over-process, the crumbs can become too powdery and hold less structure when pressed into the pan. Pulse in short bursts and check frequently for even crumb size so the crust remains cohesive after baking.
- To prepare filling, combine cream cheese, 1/4 cup sugar, and extracts in a medium bowl; stir until smooth. Spread cream cheese mixture evenly over bottom of tart shell.: The mixture should hold together when pinched, feeling slightly tacky but not wet. The sugar aids browning, while the melted butter brings richness and the water helps the crumbs come together. If you add too much water, the crust may become soggy after baking, so add only what is needed to achieve a moldable texture. Make sure the butter is fully melted and evenly distributed to avoid greasy pockets.
- To prepare topping, place 2 cups strawberries in food processor, and process until smooth. Combine strawberry puree, 2/3 cup sugar, and cornstarch in a small saucepan over medium heat; stir with a whisk. Bring to a boil, stirring constantly. Reduce heat to low; cook 1 minute. Remove glaze from heat. Cool to room temperature, stirring occasionally.: Pressing firmly creates a compact shell that will hold the filling, and the visual cue is a smooth, even surface with defined edges. Use the bottom of a measuring cup to press the crumbs uniformly. A common issue is uneven thickness, which can cause thin spots to burn or thick spots to remain soft; take the time to press the sides and base evenly for consistent baking.
- Combine the remaining 4 cups strawberries and juice; toss to coat. Arrange berries, bottoms up, in a circular pattern over filling. Spoon half of glaze evenly over berries (reserve remaining glaze for another use). Sprinkle nuts around edge. Cover and chill 3 hours.: During baking the kitchen fills with a warm, toasty aroma and the crust firms up and darkens slightly at the edges. Baking solidifies the structure so the filling does not seep in, and the golden tone indicates the right level of caramelization. Overbaking will make the crust too hard and underbaking will lead to a soggy bottom, so watch for a gentle golden color rather than deep brown.
- Cool completely on a wire rack.: Cooling allows steam to escape and the crust to set fully, keeping it crisp when filled. A warm crust can soften from contact with filling, so patience here pays off. Avoid refrigerating the hot crust immediately, which traps moisture and ruins the texture; instead let it reach room temperature on the rack for best results.
- To prepare filling, combine cream cheese, 1/4 cup sugar, and extracts in a medium bowl; stir until smooth.: Mixing yields a silky, ointment like filling that spreads beautifully, and you should notice a glossy sheen as the cream cheese becomes homogeneous with the sugar and extracts. The extracts enhance aroma and balance the tang of the cheese. Be careful not to overbeat which can introduce air pockets and affect slicing; stir gently until smooth for a dense, clean filling.
- Spread cream cheese mixture evenly over bottom of tart shell.: The filling should form an even layer that reaches close to the edges without spilling over, creating a smooth canvas for the berries. Use an offset spatula for precision to avoid thin spots. If the filling is too soft, chilling briefly helps firm it so the topping does not sink; conversely, cold filling can be hard to spread, so aim for a spreadable, cool consistency.
- To prepare topping, place 2 cups strawberries in food processor, and process until smooth.: Processing transforms berries into a vivid, fragrant puree with a bright red color. The puree forms the base of the glaze and releases the strawberry aroma intensely. Avoid over-processing with seeds if you prefer a very smooth glaze; if you want tiny texture, pulse briefly. Removing large chunks ensures the glaze cooks evenly without lumps.
- Combine strawberry puree, 2/3 cup sugar, and cornstarch in a small saucepan over medium heat; stir with a whisk.: As you heat, the mixture will steam and the aroma of cooked strawberries will sweeten, while the cornstarch dissolves to prevent lumps. Whisking constantly avoids scorching and ensures even thickening. A frequent pitfall is turning the heat too high, which can break down the fruit and create an overly thick, pasty glaze; keep the heat moderate and stir continuously.
- Bring to a boil, stirring constantly.: The glaze will transition from runny to glossy as the cornstarch activates, and the bubbling indicates the starch has begun to thicken. Boiling briefly ensures the glaze will set when cooled, giving a smooth sheen. Do not let it boil vigorously for long, or the glaze can become overly thick or lose its bright color; one steady boil is sufficient.
- Reduce heat to low; cook 1 minute. Remove glaze from heat.: Cooking briefly on low completes thickening while preserving fresh flavor, and you will notice the glaze take on a translucent shine. Cooling starts the setting process, so removing promptly prevents overcooking. Overcooked glaze becomes dull and stiff, so timing here keeps the consistency spoonable and glossy.
- Cool to room temperature, stirring occasionally.: As the glaze cools its texture becomes silkier and easier to spoon, and stirring prevents a film from forming on top. Cooling also prevents the glaze from steaming the berries when applied, which could soften them. If you pour hot glaze onto fresh fruit you risk wilting the berries, so ensure it is cooled to room temperature before application.
- Combine the remaining 4 cups strawberries and juice; toss to coat.: Tossing coats the berries in their own juice for even sweetness and sheen, and you will see the berries glisten as they pick up a light glaze. Coating also helps the berries arrange neatly and prevents dry spots on the tart surface. Avoid over-tossing which can bruise the fruit and create excess juice that makes the topping watery.
- Arrange berries, bottoms up, in a circular pattern over filling.: Placing berries with their bottoms up presents a uniform, domed look and releases a burst of color from the cut surface. The visual cue of concentric circles tells you you are done arranging. A common mistake is overcrowding the tart which can create an unstable top layer; leave a bit of space so the glaze can settle between berries.
- Spoon half of glaze evenly over berries (reserve remaining glaze for another use).: Spoon carefully so the glaze coats the tops without pooling at the edges, creating a glossy, protective layer that locks in juices and adds shine. Using half keeps the berries flavorful without drowning them. If you add too much glaze, the tart can become overly sweet and runny, so distribute conservatively and save the rest for reheating and glazing another dessert.
- Sprinkle nuts around edge.: Toasted sliced almonds around the perimeter add crunch and visual contrast, and you will smell their warm, nutty aroma as they meet the glazed berries. The nuts create a defined border that frames the tart. Avoid placing nuts on top of every berry, which can overwhelm the fruit; a neat ring preserves balance and texture.
- Cover and chill 3 hours.: Chilling allows the filling and glaze to set fully, making slicing clean and ensuring the flavors meld. The tart becomes firmer and the glaze achieves that jewel like finish after adequate chilling. A common error is slicing too soon, which causes the filling to squish and the glaze to drip; wait the full chill time for best results.
Notes
- Choose Firm, Ripe Strawberries: Selecting berries that are ripe but not mushy preserves texture during tossing and arrangement, preventing excess juice that can make the tart soggy.
- Pulse Crumbs to Even Texture: Process the graham crackers in short bursts so you end up with uniform crumbs that bind well with butter for a stable crust.
- Measure Cornstarch Carefully: Too much cornstarch yields a pasty glaze, so level your tablespoon for a glossy, spoonable consistency that sets nicely when cooled.
- Cool Components Before Assembly: Let the crust and glaze reach room temperature to avoid melting the filling or softening the crust when you combine the parts.
- Toast Almonds Lightly: A brief toast enhances aroma and crunch, but watch them closely because nuts can go from golden to burnt in seconds under high heat.