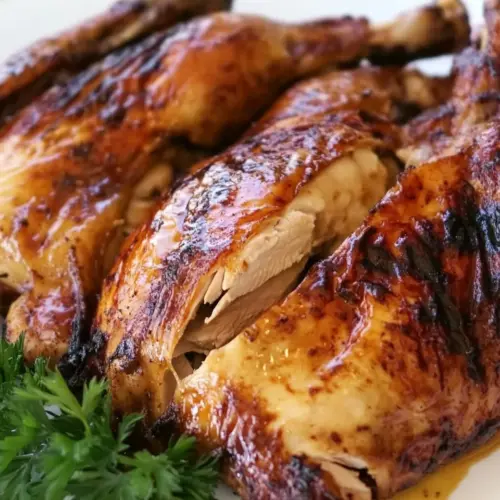
Spatchcock Chicken
Spatchcock Chicken yields juicy meat and crispy skin with minimal fuss. This fast, easy weeknight dinner method brings smoky grill flavor and a caramelized finish from a brush of bbq sauce, perfect for summer gatherings or casual family meals. Try it when you want bold texture and simple preparation that impresses without hours of work, a great reason to make it tonight.
Equipment
- Grill
- Kitchen shears
- Instant read thermometer
- Pastry Brush
Ingredients
- 1 whole fryer chicken Flatten and split open the bird along the backbone to allow even cooking and faster roasting; provides the main protein and centerpiece of the dish while exposing skin for crisping and seasoning penetration.
- canola oil Coat and rub over the chicken skin and cavity to help promote browning, crisp texture, and even heat transfer during roasting while preventing sticking to the pan.
- salt Season generously across the skin and cavity to enhance natural flavors, balance richness, and help form a savory crust during high-heat cooking.
- bbq sauce Brush or toss as a finishing glaze to add tangy-sweet flavor, moistness, and a caramelized surface that complements the roasted chicken.
Instructions
- Clean and rinse whole chicken. Using kitchen shears or a very sharp knife, cut out the backbone of the chicken. Open the whole chicken up and cut a little notch in the breastbone to help it lay flat.: You will notice a cool, slightly metallic scent as you rinse the chicken under cold water, and the skin should look pale and taut when it is ready. After rinsing, pat the bird very dry with paper towels until the surface feels nearly dry to the touch, this helps the skin crisp during grilling. Moisture on the skin steams and prevents browning, so the dryness is crucial to achieve that crackle. A common mistake is rushing this step, leaving damp spots that make the skin rubbery instead of crisp, so take the time to thoroughly dry each cavity and the skin surfaces.
- Brush the whole bird with some canola oil and sprinkle with salt. Place chicken on hot grill, skin side down. {I used a charcoal grill with all my hot coals on one side so I could have a hot side and a cool side, just in case my bird was cooking too quickly or not quick enough.}: As you make the incision to remove the backbone, you will hear the satisfying resist of cartilage and feel the knife or shears pass through. Lay the chicken breast side down on a stable surface, and with sturdy kitchen shears or a very sharp knife, cut along both sides of the backbone from tail to neck, removing it completely. This opening allows the bird to lay flat and promotes even contact with the grill, which reduces cooking time and improves browning across the entire bird. If you struggle with the shears, take measured small cuts rather than forcing a single pass, because slipping could nick the meat and alter the shape.
- Flip chicken over once skin has browned and brush with bbq sauce. Continue cooking on the other side until meat reaches an internal temperature of 165 degrees.: When you press the bird open, you will feel the breastbone resist, and then with a small cut or notch it will relax, allowing the chicken to splay evenly. Turn the bird over and press firmly on the breast to flatten it; you may hear small cracks as the sternum gives way, which is normal. This step is what ensures uniform thickness and consistent cooking, so be intentional about flattening the thighs and breasts to the same plane. A frequent issue is not flattening fully, leaving the center higher which leads to uneven doneness and longer cook times.
- Remove from grill and cover with foil to rest 10 minutes. Cut and serve.: As you brush the skin with oil, it will gleam and take on a slight sheen, and the oil helps the salt adhere and the skin crisp. Use a pastry brush or your hands to distribute the oil in a thin layer, then season evenly with salt. Getting a consistent sprinkle across wings, thighs, and breasts ensures every bite is seasoned. Overapplying oil can cause flare ups on a grill and mask the seasoning, so a light touch is better than a heavy coat.
- Place chicken on hot grill, skin side down: The instant the chicken meets the grill, you will hear a pronounced sizzle and smell the aroma of fat rendering, which signals the start of skin browning. Position the bird on the hot side of the grill to get immediate sear and color on the skin, but keep a cooler zone available to move the bird if it begins to char too quickly. This searing locks in flavor and gives you that prized golden exterior; however, watch closely because high heat can quickly push sugars to burn. If you see extreme flare ups, shift the bird to the cooler side briefly to calm the flames.
- Flip chicken over once skin has browned and brush with bbq sauce: After the skin achieves a deep golden brown, flipping will reveal the underside which will be beginning to render its own juices, and at this point brushing with bbq sauce adds a glossy, flavorful layer. Apply the sauce sparingly at first, and then add more toward the end so the sugars caramelize without blackening. The aroma will shift to sweet and smoky, and the surface will bubble slightly as the sauce cooks. A typical error is slathering sauce too early, which leads to sticky burnt patches before the interior is done, so time your glazing carefully.
- Continue cooking on the other side until meat reaches an internal temperature of 165 degrees: As the bird finishes on the second side, listen for a steady gentle sizzle and watch juices bead near the thigh, an indicator that the meat is heating through. Use a reliable instant read thermometer in the thickest part of the thigh, avoiding bone, to confirm the safe internal temperature of 165 degrees . Cooking to this temperature ensures the meat is safe but still juicy, because resting will raise the temperature slightly more. One mistake is relying on juices running clear as the only cue, which can mislead; always verify with a thermometer to avoid under or overcooking.
- Remove from grill and cover with foil to rest 10 minutes: After removing the bird, you might still sense the faint aroma of smoke and sizzling. Tent the chicken loosely with foil and let it rest for about 10 minutes so the juices redistribute, turning a slightly firmer surface into moist slices. Resting ensures the carved meat does not lose its juices onto the cutting board, and the texture firms up so you can slice cleanly. Avoid leaving it covered too long in a tightly sealed container, which can trap steam and soften the skin.
- Cut and serve: When you carve the chicken, you will notice the skin remains crisp in many areas and the meat yields easily to the knife. Slice along the joints, portion out breasts and thighs, and serve immediately while warm. The visual contrast of glossy bbq sauce and golden skin invites immediate appetites, and the aroma of roasted meat is always welcoming. A common carving error is sawing through instead of using clean, confident strokes, which can tear the meat and make portions look ragged, so use a sharp knife and steady pressure.
Notes
- Swap the finishing sauce Use a different glaze instead of bbq sauce such as a citrus based glaze or a honey mustard, brushing it in the last minutes to build flavor without burning.
- Vary your seasoning Try a light dusting of smoked paprika, garlic powder, or herbed salt before grilling to layer additional aromatics onto the skin.
- Control smoke level If you prefer subtle smoke, use a small handful of wood chips on a gas grill or move coals to the edge on a charcoal grill to reduce direct exposure.
- Adjust cook heat For slightly juicier breast meat, sear on high then move to indirect heat to finish cooking more gently until the thermometer reads 165 degrees.
- Make it ahead Spatchcock and season the chicken earlier in the day, refrigerate uncovered to dry the skin, then bring to room temperature before grilling for an evenier sear.