Southwest Chicken
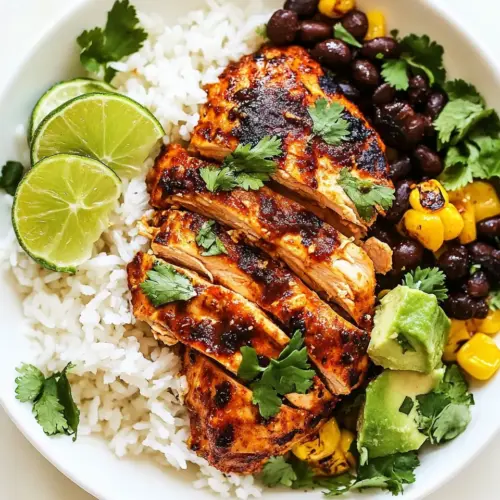
Southwest Chicken is a smoky, citrus bright weeknight favorite with tender, juicy chicken and a crisp seared exterior. The marinade of lime, smoked paprika, and cumin creates a bold yet approachable profile, perfect for tacos, bowls, or salads. Quick to prep and fast to cook, it makes an easy weeknight dinner that keeps well for lunches later in the week, so make it when you crave flavor and simplicity.
Equipment
- Large Bowl
- Large Skillet
Ingredients
- 1.25 pounds boneless, skinless chicken breast 2 small breasts, cut in half Sear and baste to build a juicy, protein-rich base for the dish; chicken breast provides the main substance and soaks up the seasonings and lime flavors. Trim and halve for even cooking, then marinate briefly to tenderize and impart Southwest character. Serve sliced or shredded to integrate with sides like rice, beans, or salads.
- 3 tablespoons olive oil divided Drizzle and reserve to coat the chicken and prevent sticking while adding richness and mouthfeel; olive oil helps the spices adhere and promotes caramelization. Divide usage between marinating and cooking to maintain moisture without excess greasiness. Choose a light olive oil for a subtle fruity note that complements the spices.
- 1 lime Squeeze and brighten the marinade with acidic citrus to tenderize and add zesty contrast to the smoky spices; lime juice balances richness and highlights flavors. Rub zest into the chicken for extra aromatic oils if desired. Use fresh juice for the cleanest, most vibrant acidity.
- 1 tablespoon smoked paprika Season and infuse a deep smoky sweetness that defines the Southwest profile; smoked paprika adds color and complexity to the spice rub. Combine with other spices to create layers of flavor that cling to the chicken. Toast briefly in a dry pan beforehand to intensify its aroma if desired.
- 1 teaspoon cumin Spice and warm the blend with earthy, slightly bitter notes that complement the paprika and lime; cumin provides depth and an unmistakable Southwestern aroma. Use ground cumin sparingly to avoid overpowering the mix. Toasting whole seeds and grinding fresh yields a brighter flavor.
- 1 teaspoon light brown sugar Sweeten and balance the heat and acidity while enhancing caramelization during cooking; light brown sugar adds a subtle molasses note to the rub. Dissolve into the marinade to help form a sticky glaze when seared. Adjust amount to control sweetness without masking savory spices.
- 1/2 teaspoon garlic powder Flavor and add savory garlic essence in a concentrated form that blends evenly into the rub; garlic powder gives consistent taste without added moisture. Sprinkle into the marinade to ensure even distribution of garlicky notes. Pair with onion powder for rounded allium flavor.
- 1/2 teaspoon onion powder Season and contribute mild, slightly sweet onion flavor that complements garlic powder and adds backbone to the spice mix; onion powder integrates smoothly into dry rubs and marinades. Use in combination with other dried spices for balance. Avoid fresh onions if a dry, uniform coating is desired.
- 1/2 teaspoon dried oregano Herb and introduce a subtle Mediterranean earthiness to the Southwest profile; dried oregano lends a hint of savory complexity without overwhelming other spices. Crumble between fingers before adding to release oils. Use sparingly to avoid herbal dominance.
- 3/4 teaspoon salt Salt and enhance all the individual flavors while aiding moisture retention for juicier cooked chicken; the specified amount balances seasoning across the breasts. Dissolve into the marinade or rub evenly to avoid hotspots. Taste and adjust if using salted components elsewhere.
- 1/4 teaspoon pepper Season and provide mild heat and sharpness to round out the spice mixture; ground black pepper adds a bright bite that lifts other flavors. Grind fresh where possible for maximum aromatic impact. Use cautiously to prevent overshadowing the smoky and citrus elements.
Instructions
- In a large bowl, whisk together 2 tbsp oil, 2 tbsp lime juice, 1 tsp lime zest, and all the seasonings until smooth.: When you first whisk the marinade the aroma is immediate and bright, with citrus popping against the warm, smoky notes of smoked paprika and cumin . The mixture should be glossy, indicating the olive oil is emulsifying with the lime juice and allowing the dry spices to bloom. This blooming step matters because it awakens the spice oils, making the flavors more pronounced in the final chicken . If the mixture seems too thin, it will still work, but it will coat less evenly. A common mistake here is under-whisking, which can leave clumps of sugar or paprika that cook unevenly and create blotchy seasoning on the meat.
- Slice each chicken breast in half widthwise to make 4 thinner pieces. Lightly pound to even thickness.: By slicing and gently pounding the pieces, you create uniformly sized portions that cook at the same rate, which is why the interior ends up juicy rather than overcooked. As you pound, you’ll hear a light thud and see the meat flatten and slightly spread, which helps it take on the marinade more fully. This mechanical tenderizing also shortens the cook time so the surface caramelizes before the center dries out. Avoid pounding too thin, which can cause the chicken to tear or cook past moistness.
- Add chicken to the bowl and toss to coat. Cover and refrigerate for at least 30 minutes or up to 8–10 hours.: Tossing ensures every inch of the chicken is hugged by the marinade, and you’ll notice the color deepen as the spices adhere. Refrigeration time lets the acid and salt do their work, brightening and seasoning the meat throughout. The texture shifts subtly during marination, becoming more tender and flavorful. A frequent error is marinating only a few minutes, which results in surface level seasoning only; conversely, overly long marinating in high acid can slightly change the texture to too tender or mealy, so stick to the recommended window.
- To grill chicken, see note 1. Otherwise, heat a large nonstick skillet over high heat. Add the remaining 1 tbsp oil. Once hot, add the chicken in a single layer. Cook 3–4 minutes per side, or until nicely browned and cooked through (160°F or juices run clear).: When the pan is properly hot you should hear an assertive sizzle as the chicken hits the oil, which signals that the surface will caramelize and form a flavorful crust. The smell of caramelizing sugars and toasty spices will fill the kitchen. Cook time is short, because the pieces are thin; rely on the visual cue of a golden brown exterior rather than time alone. Using a thermometer is the most reliable way to confirm doneness, aiming for 160°F before resting. A common pitfall is crowding the pan, which reduces heat and causes steaming instead of searing, leading to a pale surface and less depth of flavor.
- Transfer to a cutting board, cover loosely with foil, and let rest for 5 minutes before slicing or dicing.: Resting is where juices redistribute, so the sliced chicken stays moist rather than leaking liquid onto the board. During these minutes the internal temperature evens out and the meat relaxes, which improves tenderness and mouthfeel. You’ll notice the juices settle and the surface sheen calm, which makes slicing easier and prettier. Skipping the rest often causes immediate slicing that lets valuable juices run out, leaving the pieces drier than intended.
Notes
- Grill for charred flavor Use the grill method in the notes to add a smoky char, preheat to medium high and oil the grates so the chicken releases cleanly.
- Make it saucier Reserve a few spoonfuls of the marinade before adding raw chicken, then simmer that reserved portion briefly to serve as a finishing sauce.
- Double the batch Cook extra at once to repurpose for tacos, salads, or grain bowls during the week, storing in an airtight container for up to four days.
- Adjust heat Add a pinch of cayenne to the marinade if you want more kick, stirring it in with the other dry spices for even distribution.
- Brighten with extra lime Squeeze a touch more fresh lime over the cooked chicken just before serving to sharpen the flavors and add a citrus lift.