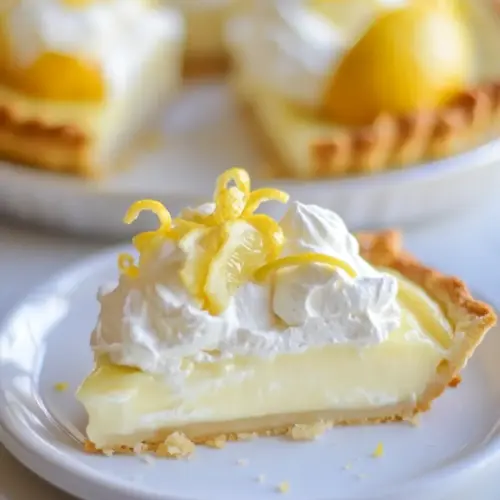
Sour Cream Lemon Pie
Sour Cream Lemon Pie is a creamy, tangy custard tart with bright fresh lemon and a silky sour cream finish. The filling is glossy and smooth, set in a buttery crust and topped with lightly sweetened whipped cream for a balanced, easy spring dessert. Perfect for gatherings when you want an elegant but uncomplicated sweet to make ahead and serve chilled.
Equipment
- Oven
- Mini Tart Pans
- Small stock pot
- Whisk
- Mixing Bowl
Ingredients
- 19 inch pie crust Provide a sturdy, pre-baked base for the pie and support the creamy filling; blind-bake until golden to prevent a soggy bottom and ensure crisp edges that contrast with the smooth lemon custard.
- 3/4 cup granulated sugar Sweeten the filling while balancing tart lemon flavors; dissolve with the cornstarch when heated to create a glossy, slightly firm custard that holds its shape when sliced.
- 3 tablespoons cornstarch Thicken the lemon custard by forming a smooth, stable gel when cooked with the sugar and milk; whisk thoroughly to avoid lumps and to ensure an even set.
- 3/4 cup milk Liquidize and dilute the custard mixture to reach the proper consistency; heat gently with sugar and cornstarch to activate thickening without scorching.
- 1/3 cup fresh lemon juice Provide bright acidity and lemon flavor that defines the pie; strain fresh juice to remove pulp and adjust to desired tartness before combining with the custard base.
- 2 large egg yolks Enrich and help set the custard by adding richness and protein; temper the yolks with hot milk slowly to prevent curdling and achieve a silky texture.
- 3 tablespoons salted butter Add creaminess and a buttery mouthfeel while enhancing richness; stir into the hot custard off the heat to melt smoothly and integrate flavor.
- 1 1/2 tablespoons lemon zest Concentrate and intensify lemon aroma and bright citrus notes; finely grate just the yellow part and fold into the custard to maintain fresh flavor without bitterness.
- 1/2 cup sour cream Contribute tangy creaminess that balances sweetness and adds depth; fold gently into the slightly cooled custard for a velvety, slightly tang-forward finish.
- 1 cup heavy whipping cream Create a light, airy whipped topping that complements the dense filling; whip until soft peaks form to provide volume and a creamy contrast to the tart custard.
- 3 tablespoons powdered sugar Sweeten and stabilize the whipped cream while enhancing mouthfeel; sift into cream gradually to avoid graininess and achieve a smooth, balanced topping.
- 1 teaspoon vanilla Infuse warm vanilla aroma into the whipped cream or custard to round flavors; add at the end of whipping to preserve fragrance and avoid overwhipping.
- lemon zest for garnish Provide a final bright, aromatic garnish that enhances presentation; sprinkle fresh zest over the finished pie to release essential oils and add visual appeal.
Instructions
- Divide pie dough into quarters. Roll each quarter of dough separately into a circle and place into mini tarts pans {Mine were 4 inches x 3/4 inch}.: The warm, faintly yeasty smell of dough gives way to a smooth, pliable texture as you handle it, and working in quarters keeps the dough relaxed so it rolls easily without springing back. Use even pressure as you roll to avoid tearing, and dust lightly with flour to prevent sticking. A common mistake is overworking the dough, which leads to a tough crust, so rest the dough if it resists stretching.
- Blind bake according to package directions. Remove from oven and wait to cool to room temp.: As you press the dough into the pans you'll notice the edges form a neat lip, and the visual cue of an even thickness signals consistent baking. The tiny hushed sound of the dough settling into the pan is reassuring, and it helps create uniform shells that bake evenly. Avoid stretching the dough up the sides, which can cause shrinking during blind baking, and trim any excess gently to keep the rims tidy.
- Place sugar and cornstarch into a small stock pot and whisk.: The oven sighs with warmth as the crusts brown, releasing a toasty, buttery aroma, and you'll see the edges take on a pale golden tone when they are ready. Lining with parchment and weights helps the shells hold shape while the center cooks through. Watch for deep browning which signals overbaking; underbaking can leave a soggy bottom, so follow the package cues and adjust time by oven behavior.
- Stir in milk and lemon juice and place over medium high heat. Bring to boil to thicken then reduce heat to low.: Cooling stops the crust from continuing to brown and allows the filling to rest on a stable base, which helps prevent splitting or sinking. Touch the shell gently to check that it feels room temperature, and you should notice a subtle change in firmness as it cools. Rushing to fill a hot shell can cause the custard to break or thin, so resist the urge to fill too soon.
- Temper egg yolks with thickened filling and then pour the entire mixture back into the pot.: The dry, powdery blend should look uniform, and whisking releases a faint sweet scent while ensuring the thickener will hydrate evenly when liquid is added. This step prevents grainy lumps and encourages a smooth finish when heated. Skipping a thorough whisk here can lead to clumps that resist dissolving during cooking.
- Let mixture bubble over medium heat for another 1 minute. Remove from heat and stir in butter, lemon zest and then finally sour cream.: As the mixture warms, the citrus scent brightens and the pot will begin to steam gently, offering a hint that flavors are melding. Stir constantly so the cornstarch can swell uniformly, and watch for the first delicate bubbles that signal thickening. If heat is too high, the mixture may scorch on the bottom, so reduce the temperature if you smell any caramelization.
- Divide between the baked shells evenly and smooth the tops.: When the filling reaches a full boil you will see it thicken and cling to the whisk with a glossy sheen, and the sound of a rolling bubble will become steady. Reducing to low allows the cornstarch to fully activate without breaking the custard, helping achieve that satiny texture. Overboiling can make the filling grainy, so once thickened, switch to a gentle simmer without delay.
- Refrigerate until you're ready to serve.: Tempering creates a warm, safe marriage between yolks and hot custard, and you may notice the yolks become silkier as you whisk them into a small amount of hot liquid. Once combined, pouring back into the pot yields a unified, glossy custard that smells rich and bright. Failing to temper slowly can scramble the yolks, producing small cooked bits that ruin the smooth texture.
- Let mixture bubble over medium heat for another 1 minute: A brief, controlled bubble further activates the thickener and ensures the custard will set properly when chilled, and the aroma will deepen into a warm, citrus cream scent. Stir continuously to maintain an even texture and prevent scorching, and you should see the filling coat your spoon evenly. The usual pitfall is letting it sit too long, which can cause overthickening or a starchy mouthfeel.
- Remove from heat and stir in butter, lemon zest and then finally sour cream: Adding butter off heat melts it into the custard for sheen and richness, and the burst of lemon zest releases fragrant oils that perfume the filling immediately. Folding in sour cream at the end keeps its tang bright and prevents curdling, creating a silky, slightly tangy finish. Add these quickly but gently; overheating while adding dairy can cause separation.
- Divide between the baked shells evenly and smooth the tops: As you spoon the warm filling into shells the glossy custard settles into place, and smoothing the surface with the back of a spoon creates an inviting finish that will set into a clean top. The contrast between the warm filling and the cooled crust is noticeable by touch and smell. Overfilling will make centers uneven, so portion carefully to keep presentation uniform.
- Refrigerate until you're ready to serve: Chilling allows the custard to firm to a sliceable consistency and the flavors to meld further, while the crust relaxes into a perfect bite. You'll notice the filling lose some shine as it cools, but the flavor deepens, and the tart scent of lemon becomes more integrated. Serving too soon yields a soft, unset center, so give it sufficient chill time for the best texture.
Notes
- Use a gluten free crust if you need to avoid gluten, choose a sturdy gluten free pie crust that holds up to the filling and blind bake it a touch longer to ensure crispness.
- Make a single large pie by using the same filling proportions and a 9 to 10 inch crust, watch the bake and chill times closely as a larger mass will need more time to set.
- Brighten with zest variations by adding a teaspoon of lime or orange zest mixed with the lemon zest for a layered citrus aroma without changing the cooking method.
- Stabilize your whipped cream by folding a teaspoon of cornstarch dissolved in a bit of the sugar into the whipped heavy whipping cream to help it hold peaks longer for display.
- Adjust sweetness by tasting the cooled custard before chilling, add a touch more powdered sugar to the whipped cream if you prefer a sweeter contrast.
- Make ahead assembly by baking shells and preparing custard a day in advance, keep the custard covered and chilled until you are ready to fill for easier service.