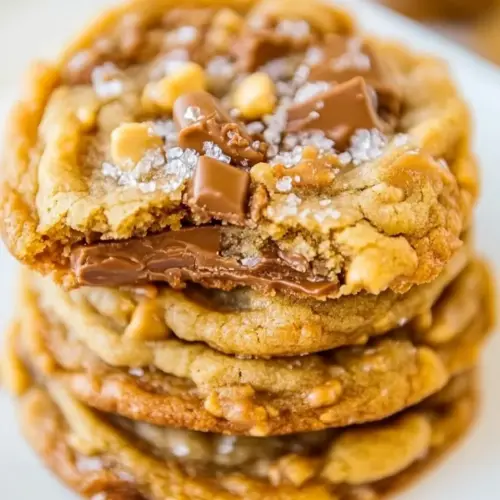
Soft and Chewy Toffee and Milk Chocolate Peanut Butter Cookies
Soft and Chewy Toffee and Milk Chocolate Peanut Butter Cookies combine creamy peanut butter, caramelized toffee bits, and melty milk chocolate into an irresistibly chewy cookie. These easy, pantry friendly cookies deliver a perfect mix of crunchy and soft textures, ideal for bake sales or an easy weeknight dessert. Make them to share and you will have a reliably crowd pleasing treat that freezes well for future indulgence.
Equipment
- Stand mixer
- Paddle attachment
- Electric Mixer
- Cookie Scoop
- Baking Sheet
- Silpat
- Cooling rack
Ingredients
- 1 cup creamy peanut butter, Do not use natural or homemade peanut butter, it’s too runny and can separate – see note below Provides creamy fat and rich peanut flavor while binding the dough; use stable, commercial creamy peanut butter to ensure proper texture and prevent separation. Adds moisture and tenderness that contribute to the soft, chewy interior of the cookies.
- 1 cup light brown sugar, packed Adds deep caramel-like sweetness and moisture while contributing to chewiness; pack light brown sugar to maintain consistent sugar content and texture. Balances flavor complexity and helps create a slightly sticky, fudgy crumb.
- 1 large egg Incorporates structure and stability by setting proteins during baking, which helps cookies hold their shape and develop a tender crumb. Also contributes a small amount of leavening and moisture that enhances chewiness.
- 1 tablespoon vanilla extract Infuses a warm, sweet aroma and enhances overall flavor complexity without adding moisture; use pure vanilla extract for the best aromatic depth. Helps round out the peanut and toffee notes for a more cohesive cookie profile.
- 1 teaspoon baking soda Provides leavening by releasing carbon dioxide when reacting with moisture and heat, lightening the cookie slightly while helping spread and texture. Use measured amount to achieve gentle lift without creating cakiness.
- one 8-ounce bag Heath Milk Chocolate Toffee Bits Offers crunchy, buttery toffee bits coated in milk chocolate that add texture, sweetness, and pockets of caramelized flavor throughout the cookie. Disperses through the dough to create bursts of chocolate-toffee contrast against the peanut butter base.
Instructions
- To the mixing bowl of a stand mixer fitted with the paddle attachment or using an electric mixer, combine peanut butter, brown sugar, egg, vanilla, and beat on medium-high speed until well-combined and the sugar is fully incorporated and is mixture is no longer gritty or granular, about 5 minutes, or as long as necessary (7 to 8 minutes).: The bowl will gradually quiet as the granules of light brown sugar dissolve into the peanut butter and egg , and you will feel the mixture change from grainy to smooth under the paddle. You should notice a glossy sheen and a homogeneous, slightly thick texture, with a nutty aroma lifting as air is incorporated. This aeration is important because it lightens the dough and helps create a tender interior once baked, while also ensuring the cookies do not end up too dense. A common mistake is underbeating, which leaves sugar grit and causes uneven texture, or overbeating, which can make the dough too loose. If using a hand mixer expect a longer time to reach the same result, and pause to scrape down the sides so everything mixes evenly. Listen for the motor to ease and look for the disappearance of visible sugar grains as your cue to stop.
- Add the baking soda and beat to incorporate, about 1 minute on medium-low speed.: As you fold the baking soda in, the dough will lighten subtly and become a bit more pliable. This brief mixing distributes the leavener evenly so that the cookies spread in a controlled way and develop a tender crumb. The smell is still dominated by the rich peanut butter but you may notice a slight lift in aroma as components blend. Overmixing at this stage can introduce too much air, which affects shape during baking, so keep the speed moderate. A typical pitfall is adding the leavener and then beating aggressively, which can change the texture; aim for a gentle, uniform incorporation. If you see streaks of powdery baking soda, scrape and mix just until they disappear.
- Add the toffee bits and beat to just incorporate; don’t overmix.: When the toffee bits go in, the dough will take on little flecks of caramelized color and the texture will look studded and inviting. Mix just enough to disperse them evenly so each scoop gets pockets of crunchy toffee and milk chocolate . Avoid overmixing because crushing the bits or melting the chocolate can change the texture and sweetness distribution. You'll want to stop while the bits are still distinct; otherwise they will bleed into the dough. A common error is to continue mixing because the dough seems uneven, but that usually means you need to scrape and fold gently rather than beat.
- Using a medium 2-inch cookie scoop, form heaping mounds of 2 to 3 tablespoon each.: A consistent scoop ensures even baking and uniform size, which is why I prefer a 2 inch scoop for these cookies. The mounds should be generous and slightly rounded, with visible toffee pieces on the surface. The dough will feel slightly tacky but hold its shape well. If you press too firmly you’ll compress air out and end up with denser cookies, so scoop and release gently. Watch for one common misstep which is inconsistent sizing causing staggered bake times; take a moment to level each scoop so all cookies are similar.
- Place mounds on a large plate, cover with plastic wrap, and refrigerate for at least 2 hours, or up to 5 days, before baking. Chilling is mandatory, do not bake with warm dough because cookies will spread and bake thinner and flatter.: Chilling firms the fat in the peanut butter and lets the proteins in the egg relax, which helps the cookies maintain height and achieve that chewy interior. You will notice the dough become more compact and easier to handle after refrigeration. If you skip this step, the dough will flatten and the cookies will lose that desirable thick center and glossy top. A frequent mistake is under chilling due to impatience, which results in thin, oily cookies, so plan ahead. If storing for several days, cover tightly to prevent drying and refrigerator odors from transferring.
- Preheat oven to 350 F, line a baking sheet with a Silpat or spray with cooking spray. Place mounds on baking sheet, spaced at least 2 inches apart (I bake 8 cookies per sheet).: As the oven warms, you should smell a faint warmth and that anticipatory oven scent; this heat is what activates the leavening and sets the cookie structure. Lining the sheet keeps bottoms from sticking and makes for even browning. The spacing matters because cookies will spread a bit during the first minutes of bake before the edges set. A common problem is overcrowding the pan which causes merging and uneven baking. Using a Silpat yields a slightly more browned bottom compared to parchment, and rotating the sheet halfway through a long bake can correct hot spots in older ovens.
- Bake for 8 to 9 minutes, or until edges are set and tops are barely set, even if slightly underbaked in the center. Cookies firm up as they cool, and baking too long results in cookies that become too crisp and hard. The cookies in the photos were baked for 8 minutes, and have chewy edges with soft centers.: When you open the oven, the aroma will be warm and nutty, with sweet toffee highlights. Look for edges that are matte and just pulling away from the pan, while the centers remain soft and slightly glossy. This underbaked center is intentional because carryover heat will finish the cook, yielding a chewy middle. Overbaking is the chief enemy here, leading to dry, crisp cookies, so err on the shorter side of the time window. If your oven runs hot, check at the early minute marker and adjust in small increments. A test cookie cooled briefly will tell you if you hit the right balance.
- Allow cookies to cool on the baking sheet for 5 to 10 minutes before removing and transferring to a rack to finish cooling.: The cooling time lets the structure set slowly so the cookie centers solidify without becoming hard. During this period you will notice the surface transform from slightly glossy to a more matte finish and the aroma will mellow into a comforting, candy like scent. Trying to remove the cookies too soon can cause them to fall apart, while leaving them too long on a very hot sheet can make the bottoms continue to brown. A common mistake is rushing this step because the cookies seem fragile; patience here preserves the ideal chewy texture. Use a thin spatula to lift them gently once they hold together, then let them finish cooling on a rack for even air circulation.
Notes
- Use stable creamy peanut butter to prevent spreading and ensure a thick, chewy cookie; natural or separated peanut butter can lead to flatter cookies.
- Beat until the sugar dissolves for a glossy, smooth dough which creates a tender interior and attractive surface after baking.
- Chill the dough for at least 2 hours to control spread and improve texture; longer chilling up to 5 days is fine and convenient for planning.
- Portion consistently using a 2 inch scoop so cookies bake evenly and come out uniform in size and texture.
- Pull early for softness when edges are set but centers are slightly underbaked; cookies firm up as they cool, giving you that ideal chew.