Smoked Mississippi Pot Roast
Smoked Mississippi Pot Roast is a tender, buttery pulled beef with tangy pepperoncini and deep smoky notes. This easy weeknight dinner or weekend centerpiece yields rich, shreddable meat that soaks up savory pan juices, perfect for sandwiches or plated mains. Make it for a crowd and enjoy simple pantry boosts that deliver big flavor.
Equipment
- Smoker
- Large plate
- Small Bowl
- Measuring Spoons
- Heatproof pan or Dutch oven
- Meat Thermometer
- Two forks
Ingredients
- 3 1/2 pound s (1.6 kg) chuck roast Trim and roast for rich, beefy flavor and tender shredding; choose well-marbled chuck for best moisture and texture during long, low-temperature smoking. Allow to come to room temperature before seasoning to ensure even cooking and apply a dry rub to all sides to build a flavorful crust. Rest after smoking to let juices redistribute, which preserves succulence when slicing or shredding.
- 2 teaspoons salt Season evenly to enhance the meat's natural taste and help form a savory crust during smoking; salt also helps proteins retain moisture through the cooking process. Use kosher or sea salt for clean flavor, and apply it generously but not excessively so the roast remains balanced. Combine with other dry seasonings to ensure depth across the whole roast.
- 1 1/2 teaspoons garlic powder Sprinkle to add a concentrated, aromatic garlic essence that complements the beef and other spices without overwhelming the dish. Use a measured amount to infuse savory undertones throughout the roast, especially effective in dry rub blends. Reapply slightly after smoking if a stronger garlic character is desired.
- 1 1/2 teaspoons onion powder Dust to provide sweet, savory aromatics that deepen the overall flavor profile and balance stronger spices like garlic and black pepper. Onion powder dissolves into the meat surface during low-temperature cooking, contributing to a rounded backbone in the seasoning mix. Pair with salt and garlic powder for classic savory seasoning.
- 1 1/2 teaspoons paprika Add smoky, slightly sweet notes that enhance the barbecue character and complement the smoking process; paprika also contributes color to the crust. Use within the rub to provide warmth and visual appeal without heat if using sweet paprika, or mild kick if using smoked paprika. Works well with cumin and chili powder for layered flavor.
- 1 teaspoon ground black pepper Grind to introduce sharp, piquant heat and complexity that brightens the roast's savory profile; black pepper also accentuates other spices. Apply freshly ground for more vibrant aroma and bite, helping to balance fattier elements of the chuck roast. Distribute evenly to keep the peppery heat consistent throughout.
- 1/2 teaspoon chili powder Sprinkle to provide gentle warmth and a subtle chili-derived flavor that accentuates the smoky profile without overpowering. Use sparingly to prevent overwhelming the other seasonings while contributing mild Southwestern notes. Blends especially well with cumin and paprika.
- 1/2 teaspoon ground cumin Add earthy, warm undertones and a slight nuttiness that complements both the paprika and chili powder for a cohesive spice blend. Cumin provides aromatic depth and helps cut through richness of the beef, enhancing the overall savory character. Use measured amounts to avoid overpowering the other spices.
- 1 ounce (28 g) envelope Au Jus gravy mix Sprinkle to introduce concentrated savory gravy flavor and a salty, beef-forward base that enhances juices and pan sauces during resting and serving. Au Jus mix dissolves into the melting butter and meat juices to create a quick, flavorful jus that pairs with shredded roast. Add directly to the cooking liquid or rub for integrated seasoning.
- 1 ounce (28 g) envelope ranch dressing mix Stir in to impart tangy, herby, and savory notes that mimic buttermilk dressing flavor while adding depth to the cooking juices and finished beef. Ranch mix melds with the Au Jus and butter to create a creamy, tangy sauce as the butter melts during smoking. Use to balance richness with herbaceous brightness.
- 1/2 cup (113 g) unsalted butter cut into 8 tablespoons Melt to provide rich, silky fat that bastes the roast and helps the seasoning adhere while creating a roux-like base for the cooking juices. Unsalted butter offers control over sodium and melts into a flavorful sauce with the dry mixes and meat drippings. Cut into tablespoons for even melting and distribution throughout the cook.
- 8 to 10 (170 g) pepperoncini peppers Pack to add bright, tangy, mildly pickled heat and a subtle vinegar flavor that cuts through the richness and contributes a zippy finish. Pepperoncini peppers release briny juices as they cook, infusing the roast and pan liquid with piquancy and moisture. Adjust quantity within the 8–10 range to control the intensity of tang and heat.
- 1/2 cup (80 ml) water Pour to add moisture that helps dissolve dry mixes and creates a thin braising liquid to keep the roast moist during smoking. Water combines with melted butter and seasoning packets to form a flavorful jus that prevents the meat from drying out. Use the specified amount to maintain the proper liquid balance without steaming the roast.
Instructions
- Place the chuck roast on a large plate.: The first thing you will notice is the cool weight of the chuck roast in your hands, a dense, slightly marbled piece of beef that promises gelatinous, tender meat after the long cook. Lay it on a clean large plate so juices do not contact other surfaces. This simple staging step helps keep the workspace tidy and gives you a stable base for applying the rub. A common mistake is starting the rub on a wet or damp roast, which prevents the spice mix from adhering evenly. Pat the surface dry with paper towels for better crust formation. The roast should feel slightly tacky once the rub is applied, and you may hear the faint sound of spice grains as you press them into the meat.
- Combine salt, garlic powder, onion powder, paprika, ground black pepper, chili powder, and cumin in a small bowl. Rub the spice mixture evenly over the roast.: Mixing the spices releases their aromas, and you should inhale a layered scent of warm paprika and toasted cumin as you stir. Use a small bowl to whisk them together, then work the blend into the roast with your palms, making sure to cover all sides thoroughly. Even distribution ensures each bite has balanced flavor, and the touch of salt aids in drawing surface proteins that promote browning. Avoid piling on too much rub in one spot, as this can create an overly salty or bitter patch after smoking. When properly applied, the surface should look matte, not wet, and the aroma will be more complex than any single spice.
- Loosely cover, and chill the seasoned roast in the fridge until ready to smoke.: Chilling the rubbed roast allows the seasoning to meld with the meat and firms the surface so the rub does not slide off when moved. I usually cover it loosely with plastic wrap or a plate and place it in the fridge for at least 30 minutes, but you can leave it longer for deeper flavor. The cold surface also helps the exterior set before smoking, which encourages a better bark later. A frequent error is skipping this rest; without it, the rub can clump or wash away during handling. You will notice the roast smell more integrated after chilling, and it will be easier to transfer to the smoker without losing rub.
- Preheat the smoker to 225 °F (107 °C).: A low steady temperature produces tender results, and as the smoker comes up to 225 °F you will begin to detect the first hints of wood smoke in the air. If you are using wood chips, mild fruitwoods like cherry or apple are ideal because they complement the buttery and tangy elements without overpowering them. Maintain consistent heat, and resist the urge to crank the temperature, because higher heat will shorten the melting window for collagen and produce a drier roast. Check your smoker gauge and let it stabilize before adding the meat. The smell should be faintly sweet and smoky, not acrid.
- Transfer the roast to the smoker grate, and smoke for 2 hours.: Placing the roast on the grate starts the long flavor development phase. You will hear a gentle sizzle as residual surface moisture evaporates and the rub begins to set into a crust. Over the first two hours the exterior will slowly deepen in color, developing a rich brown bark. Do not obsessively open the smoker door during this time, as losing heat and smoke will extend the cook and impede bark formation. A mistake I see often is moving the roast too frequently; treat this period as a patience exercise. The aroma will shift from raw beef to a savory, smoky perfume and you will notice juices starting to bead on the surface.
- Move the roast into a heatproof pan.: After the initial smoke, transferring to a heatproof pan traps the melting butter and juices, allowing flavors to mingle during the finish. The pan will catch the drippings and become the base for your sauce, which is what the shredded meat will be stirred into later. If you place the roast directly back on the grate you risk losing those concentrated pan juices. Be careful when moving the hot roast to avoid splashing; use tongs or a wide spatula. The pan will start to smell rich and buttery immediately, signaling the next phase.
- Sprinkle the Au Jus gravy mix and ranch dressing mix over the meat.: Sprinkling these mixes adds a concentrated savory and tangy foundation that dissolves into the pan juices. You should spoon them evenly so they form an even layer that will rehydrate and meld with the butter and water. These mixes are designed to enhance beef flavor, and they speed up building a complex sauce without long reductions. A common misstep is adding liquids too early, which can wash the rub off; here you want the dry mixes to sit on the meat briefly before adding moisture. The scent becomes immediately more savory and herby, promising depth once melted.
- Arrange the butter slices and pepperoncini around and on top of the roast.: Laying out the butter in pats ensures it melts gradually, basting the meat and enriching the pan. Nestle the pepperoncini peppers around and on top, so their briny juice mingles as they soften. As the butter melts you will hear a soft pop and see it pool and shine, carrying the spice mixes into the juices. The pepperoncini will release small bursts of tang that cut through the richness. Avoid piling all butter in one spot, which can cause uneven basting; aim for distribution so every side benefits.
- Pour the water into the pan.: Adding water creates steam and forms the base of the pan juices that will keep the roast moist while it finishes. The liquid level should be modest, just enough to cover the bottom so the gravy mixes dissolve and the butter can swirl into it. This step prevents the roast from sitting in dry heat, which could toughen the exterior. Stirring now is unnecessary, simply let the water mingle with the melting butter and mixes. If you add too much liquid you will dilute flavor, so keep it measured and controlled.
- Cover and continue smoking until the internal temperature reaches 205 °F (96 °C), about 2 to 2 1/2 hours.: This final stage is where the collagen breaks down and the beef becomes shred ready. You will notice the smoker air become more fragrant as the pan juices reduce and concentrate, and the roast will begin to yield slightly when pressed. Aim for an internal temp of 205 °F , which signals that the connective tissues have softened into silky strands. A common error is pulling the roast too early at lower temps; it may be tender but not shreddable. Keep a reliable meat thermometer in the thickest part to avoid guesswork. The sound in the smoker will be a quieter sizzle, and the crust will appear deeply colored and set.
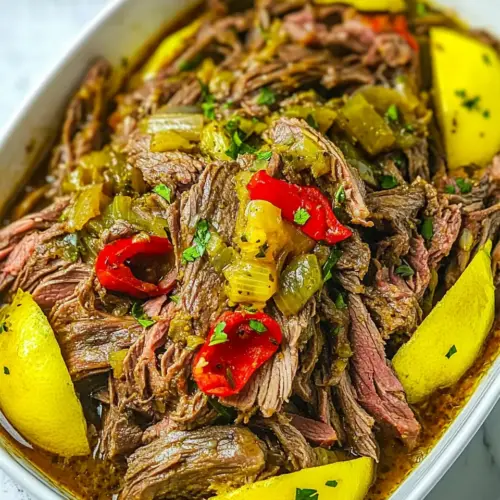
- Shred the beef with two forks and stir it into the pan juices. Serve immediately.: When you shred the roast, the meat should part with minimal resistance into long, tender strands that glisten with the pan juices. Use two forks to tease the meat apart and then fold it into the liquid so every shred soaks up the buttery, tangy sauce. The aroma will be rich and layered, with a slight tang from the pepperoncini peppers cutting the richness of the butter . Avoid shredding and leaving the meat to sit dry; serve promptly so it remains moist and glossy. A common oversight is not skimming any excess fat from the surface; if the pan seems too oily, let it rest briefly then spoon off a little fat before serving. The result should be tender, juicy, and intensely flavorful.
Notes
- Check the temperature often — Keep a meat thermometer handy and check the roast in the thickest part to avoid under or over cooking, because consistent internal heat is what turns tough collagen into silky strands.
- Distribute butter evenly — Cut the unsalted butter into several pats and place them around the roast to encourage even basting and prevent one side from becoming overly greasy.
- Choose mild smoker woods — Use cherry, apple, or maple for a subtle fruitwood aroma that complements the tangy pepperoncini peppers and does not overwhelm the seasoning profile.
- Monitor pan liquid — Keep the water level modest so the pan juices concentrate rather than dilute, ensuring the final shredded beef is richly flavored and glossy.
- Rest briefly before shredding — Allow the roast to sit for a few minutes in the covered pan so juices redistribute, which helps you achieve moister shreds when you pull the meat apart.
- Tweak salt carefully — If your ranch or Au Jus mixes are extra salty, reduce added salt slightly to keep the final dish balanced and avoid over seasoning.