Slow Cooker Korean Short Ribs
Slow Cooker Korean Short Ribs delivers deeply savory, glossy meat with sweet fruity notes and ginger brightening each bite. This easy weeknight dinner is rich yet approachable, ideal for family meals and small gatherings. The long, slow cook yields fork tender ribs that soak up a silky sauce, making it a crowd pleaser you will want to make again and again.
Equipment
- Broiler or oven
- Foil-lined rimmed baking sheet
- Slow Cooker
- Blender
- Fat separator or ladle
Ingredients
- 5 pounds bone-in English-style beef short ribs Season generously and help build a deeply savory base for the dish; browning the ribs briefly concentrates flavor and improves texture before slow cooking. Use kosher salt to amplify the meat's natural taste and to aid in creating a balanced braising liquid over long cooking times.
- Diamond Crystal kosher salt Enhance overall seasoning and provide subtle heat; freshly ground pepper brightens the rich flavors of the braise and complements the sweet and umami elements. Grind just before use to preserve aromatic oils and add a nuanced peppery finish to each bite.
- Freshly ground pepper Add aromatic bite and subtle heat while cutting through richness; freshly ground pepper contributes a warm, peppery lift that balances the savory-sweet sauce. Use moderate amounts to avoid overpowering the delicate marinade components.
- 1 medium Asian pear, pear, or Fuji apple peeled, cored, and chopped coarsely Contribute natural sweetness and tenderizing enzymes; a medium Asian pear or Fuji apple helps break down connective tissue and enhances caramelization in the sauce. Chop coarsely so it melds into the braising liquid and imparts fruity undertones without disintegrating completely.
- 6 garlic cloves peeled and roughly chopped Provide pungent garlic aroma and savory depth; roughly chopped cloves release robust flavor into the braising liquid during long, slow cooking. Use the specified amount to create a pronounced garlicky backbone without overwhelming the other aromatics.
- 3 scallions roughly chopped Introduce mild onion-like freshness and a bright herbal note; roughly chopped scallions tie together the savory and sweet elements and can be used in cooking and as part of a garnish. Add earlier for mellowed sweetness or reserve some for a fresher finish on serving.
- 1 piece fresh ginger about the size of your thumb, peeled and coarsely chopped Infuse warm, peppery, and slightly sweet ginger flavor while aiding digestion; coarsely chopped ginger releases aromatic oils into the braise and complements the Asian-inspired profile. Use a thumb-sized piece for a balanced, warming spice without excessive sharpness.
- 1/2 cup coconut aminos Provide rich, savory umami with a slightly sweet and salty profile; coconut aminos act as a soy sauce alternative that seasons the meat and contributes depth to the braising liquid. Measure carefully to balance salt and sweetness in the slow cooker.
- 1 tablespoon rice vinegar, coconut vinegar, or white balsamic vinegar Introduce mild acidity to balance richness; a tablespoon of rice, coconut, or white balsamic vinegar brightens the sauce and helps tenderize the meat during long cooking. Add towards the start of braising so the acid integrates without becoming sharp.
- 2 teaspoons Red Boat fish sauce Add concentrated umami and subtle briny complexity; Red Boat fish sauce enhances savory depth and enriches the sauce’s overall flavor profile with a small, potent amount. Use sparingly to avoid overpowering other seasonings while achieving authentic savory character.
- 1 cup bone broth or chicken broth Provide a savory, gelatinous braising medium and extra richness; bone or chicken broth supplies liquid for slow cooking and contributes layered flavor and mouthfeel. Pour enough to partially submerge the ribs so they become tender and infused with taste.
- 1/4 cup fresh cilantro coarsely chopped (optional garnish) Garnish with fresh herbal brightness and a pop of cilantro flavor if desired; coarsely chopped cilantro adds a fragrant, citrusy contrast to the rich short ribs when sprinkled just before serving. Use as an optional finish to lighten each serving and add color.
Instructions
- Heat your broiler with the rack 6 inches from the heating element.: You should notice an immediate glow and a dry, intense heat that will brown surfaces quickly, which is perfect for creating a flavorful crust on the ribs. Briefly preheating ensures even and fast caramelization, and you will smell a warm, toasty note as the oven heats. A common mistake is placing the rack too close, which can char instead of brown, so maintain the six inch distance and watch closely as things can color in minutes.
- Sprinkle the ribs liberally on all sides with salt and pepper. Whenever I season raw meat, I set aside a small ramekin with salt and ground pepper that I use only for the raw stuff.: As the seasoning hits the meat, you may smell the sharpness of pepper and the mineral tang of salt, which starts the flavoring process immediately. Seasoning at this stage helps build a seasoned crust when broiled, ensuring deeper flavor throughout. One slip to avoid is under seasoning, which can lead to a flat final dish; taste and adjust the seasoning of the sauce later to balance the meat.
- Place the ribs, bone-side up, in a single layer on a foil-lined rimmed baking sheet.: The bones facing up concentrate heat and allow the meat surface to brown without steaming. The foil makes cleanup easy and reflects heat for even coloring. If you overcrowd the sheet, the ribs will steam instead of browning, so keep them in a single layer to preserve texture.
- Broil the ribs for 5 minutes and then flip them over and broil for another 5 minutes or until nicely browned.: You will see the exterior turn a deep golden brown and smell a caramelized note, which signals the Maillard reaction creating savory complexity. Flip carefully to avoid splatters, and aim for even coloring on both sides. Broilers vary, so check early to prevent burning; if edges darken too fast, move the rack down slightly.
- Place the ribs in a single layer in the slow cooker. Lay them on their side to fit them all in the pot.: Laying the ribs in a single layer helps them cook evenly and allows the sauce to surround each piece. You will hear the soft clink of bones settling into the pot and notice the sizzling heat from the freshly browned surface meeting the cooler vessel. Avoid piling them; stacking can prevent uniform tenderness and lead to uneven cooking.
- Time to make the sauce! Toss the pear, garlic, scallions, ginger, coconut aminos, vinegar, and fish sauce in a blender. Blitz until smooth.: Toss the pear, garlic, scallions, ginger, coconut aminos, vinegar, and fish sauce in a blender. : As the blender spins, a fragrant steam of ginger and garlic will rise, and you will see the mixture emulsify into a silky, pale sauce. This blitz creates a cohesive flavor base that evenly coats the ribs during braising. A frequent error is under blending, which leaves chunks and uneven flavor; blend until smooth for best results.
- Pour the sauce evenly over the ribs and add the broth to the pot.: The texture should be velvety and homogeneous, releasing a bright, pungent aroma of ginger and garlic softened by the fruity sweetness. A smooth sauce integrates with the broth to create a glossy braising liquid that clings to the ribs. If your blender struggles, pulse and scrape down the sides to ensure an even puree rather than running it endlessly at one speed.
- Cover with the lid, set the slow cooker on low for 9 to 11 hours or on high for 5 to 6 hours. The ribs are done when they are fork tender and nearly fall off the bone.: As the sauce covers the ribs, you will notice the vivid color and a complex scent layering the meat. The broth dilutes and carries the concentrated flavors, filling gaps so every rib braises gently. Pour gently to avoid splashing; too little liquid can make the ribs dry and too much will dilute the sauce, so use the recommended cup as your guide.
- When it’s time to serve the ribs, remove the meat from the slow cooker and place them on a serving platter.: Over the long cook, the connective tissue transforms, rendering into silky gelatin and releasing savory juices, and you will smell a deep, savory perfume filling the kitchen. Low heat yields more time for flavor melding and a fall apart texture, while high shortens time but still produces tenderness. A common mistake is opening the lid frequently, which lets heat escape and extends cooking time, so resist peeking except to check near the end.
- Let the braising liquid settle for 5 minutes and then pour the sauce in a fat separator or ladle off the fat. Taste the sauce and adjust the seasoning with salt and pepper. Pour a cup of sauce over the ribs.: When ready, the meat will yield easily to a fork and the surface will glisten with sauce. The tactile test is the best indicator, and you may also notice the sauce has reduced and thickened slightly around the edges. Overcooking can dry the meat if cooking on high, so aim for that fork tender stage without letting the meat disintegrate into stringy pieces.
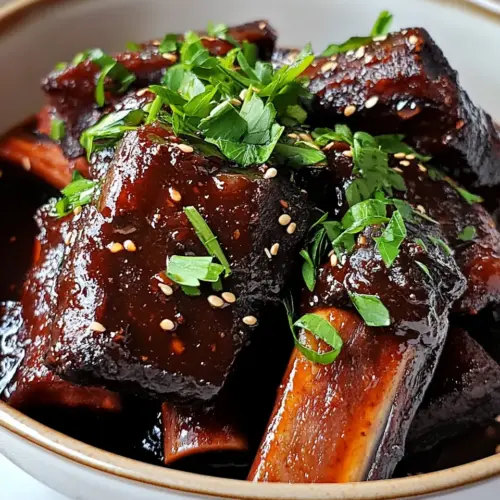
- Sprinkle on the chopped cilantro, if desired, and serve the remaining sauce on the side.: The scent at this point will be rich and layered, and the ribs will hold their shape while appearing glossy. Resting briefly on a platter lets juices settle and makes plating neater. Avoid cutting immediately into pieces that are too hot, which can cause the meat to lose more juices than necessary.
- Store leftovers in the fridge for up to 4 days and freeze for up to 3 months.: After settling you will see a clear separation between fat and savory liquid, making it simple to remove excess oil and leave a clean sauce. Tasting and adjusting seasoning after skimming ensures the balance is perfect. A common oversight is skipping the skimming step, which leaves the sauce greasy on the palate.
- Taste the sauce and adjust the seasoning with salt and pepper.: This is when the flavors open up and you can fine tune the brightness or saltiness. Add small amounts, tasting between additions, so you do not overcorrect. Over seasoning at the end is harder to reverse, so proceed gradually.
- Pour a cup of sauce over the ribs.: A generous spoonful of glossy sauce enhances every bite, and you will see it cling to the meat, catching highlights of scallion and ginger. Serving sauce on the side allows guests to control how saucy they want each portion. Avoid drowning the plate, which can mask textural contrasts.
- Sprinkle on the chopped cilantro, if desired, and serve the remaining sauce on the side.: The bright green cilantro adds fresh herbal contrast to the rich braise, and scattering it at the end preserves its vibrancy. Serve extra sauce warm so guests can add more as they like. If you omit the garnish, ensure you still offer sauce for those who want extra flavor.
- Store leftovers in the fridge for up to 4 days and freeze for up to 3 months.: As the ribs cool, the sauce will thicken and meld further, and reheating slowly preserves texture. Store in airtight containers and thaw in the fridge overnight before reheating gently. A common mistake is reheating too quickly at high heat, which can toughen the meat and separate the sauce.
Notes
- Adjust cook time by appliance: If your slow cooker runs hot, shorten the low setting time and start checking at eight hours to prevent overdone meat, which can dry out; erring on the side of tenderness is safer than letting it disintegrate.
- Use apple if pear is unavailable: Fuji apple is a lovely substitute that provides similar sweetness and tenderizing enzymes; chop coarsely before blending so it purees into the sauce smoothly without altering the recipe’s balance.
- Skim fat for cleaner sauce: After resting for five minutes, separate fat with a separator or ladle, which refines the sauce mouthfeel and highlights aromatics rather than oily richness.
- Double the sauce for leftovers: Make extra sauce if you plan to serve the ribs multiple times, it improves after a day and ensures each reheated portion is saucy and glossy without needing to reduce again.
- Try a quick broil alternative: If you prefer not to broil, sear the ribs in a hot skillet to get color and flavor; it will still create a savory crust though it may require slightly more hands on time.
- Modify vinegar to taste: Use rice vinegar for a gentle lift or white balsamic for a touch of sweetness; add in small increments then taste to keep the sauce balanced and bright rather than sharp.