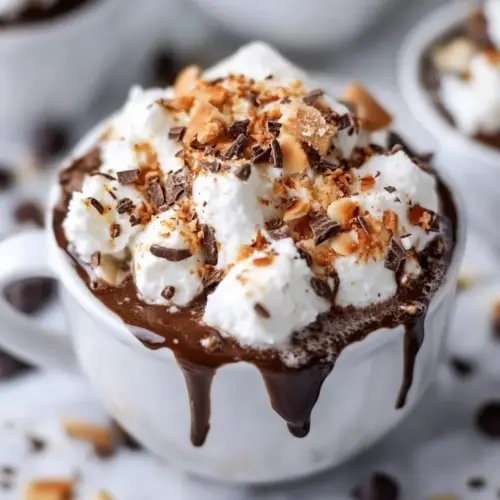
Slow Cooker Coconut Hot Chocolate
Slow Cooker Coconut Hot Chocolate is a creamy, indulgent winter drink with rich melted dark chocolate and a silky coconut base. This easy crowd friendly recipe yields a velvety, aromatic hot chocolate that pairs beautifully with toasted coconut rims and fluffy toppings. It’s perfect for cozy evenings or holiday gatherings and delivers comforting warmth and layered chocolate depth every time, so it’s worth making for guests or quiet nights in.
Equipment
- Crock Pot
- Whisk
- Small Saucepan
- Wooden Spoon
- Measuring Spoons
Ingredients
- 4 (13 oz) cans full-fat coconut milk Provide creamy, rich body and natural coconut flavor to the hot chocolate; combine with other liquids and heat slowly to prevent splitting and ensure a silky texture. Stir gently while warming to incorporate fats evenly and create a luscious mouthfeel that balances the sweetness of the condensed milk and chocolate.
- 2 (14 oz) cans sweetened condensed milk Add concentrated sweetness and a velvety, thick texture that helps create a decadent hot chocolate; whisk in gradually to dissolve completely and avoid graininess. Balance the recipe’s richness by controlling sweetness and ensuring the condensed milk blends smoothly with the coconut milk and melted chocolate.
- 8 ounces high-quality dark chocolate, chopped Contribute deep cocoa intensity and a smooth chocolate base when chopped and melted into the warm mixture; choose a high-quality dark chocolate for flavor complexity and less sugar. Chop finely so it melts evenly in the slow cooker, creating a glossy, cohesive chocolate matrix that enhances mouthfeel and aroma.
- 1/4 cup dutch process cocoa powder Intensify chocolate flavor and deepen color while providing a dry cocoa element that helps round out sweetness; sift or whisk in to avoid lumps. Use Dutch process cocoa for its mellow, less acidic profile that harmonizes with the coconut and dark chocolate flavors.
- 2 teaspoons vanilla extract Lift and round out the flavor profile with warm, familiar vanilla notes; add near the end of cooking to preserve aromatic nuance. Stir in gently after melting the chocolate to complement bitterness and sweetness without diminishing other delicate extracts.
- 2 teaspoons coconut extract Boost and emphasize tropical coconut aroma for a more pronounced coconut-forward hot chocolate; add sparingly to avoid overpowering. Combine with vanilla to layer fragrance and echo the coconut milk base for a cohesive, island-inspired flavor.
- 1/4 teaspoons salt Enhance overall taste by balancing sweetness and accentuating chocolate depth through subtle salinity; dissolve fully to avoid grainy spots. Use a small amount to prevent masking delicate coconut and chocolate notes while improving flavor complexity.
- 1/2 cup unsweetened flaked or shredded coconut Introduce textural contrast and toasty coconut flavor when toasted lightly; add during cooking or as a final garnish for crunch. Use unsweetened flakes or shredded coconut to avoid extra sweetness while reinforcing the coconut theme and adding pleasant mouthfeel.
- frosting to rim the mugs Create a decorative, sweet rim that complements the drink and adds visual appeal; press frosting onto mug rims before serving for an indulgent presentation. Choose a frosting that adheres well and pairs with chocolate and coconut flavors to elevate the serving experience.
- whipped cream or Provide a light, airy topping option that brings creaminess and soft texture to each serving; pipe or dollop on top just before serving to maintain volume. Select a lightly sweetened whipped cream to contrast the dense hot chocolate without overwhelming coconut notes.
- coconut whipped cream for topping Offer a dairy-free, coconut-based alternative topping that reinforces the coconut flavor while remaining lighter than traditional whipped cream; chill and whip to stable peaks for best structure. Spoon onto each cup just before serving to maintain a fresh appearance and coconut-forward profile.
- marshmallows for topping Add playful, sweet chewiness and nostalgic appeal as a garnish; scatter on top immediately before serving so they retain their shape. Choose standard-sized marshmallows or mini versions to complement texture and appearance without altering liquid consistency.
Instructions
- Add coconut milk, condensed milk and extracts to your crock pot, whisking to combine. Stir in salt, cocoa powder and chocolate, whisking again. Cover and cook on low for 2 hours. You want to stir and whisk every 15 minutes or so, making sure the chocolate melts nicely and is thoroughly distributed throughout the mixture. The best thing I can say here is to “know” your crockpot. I knew that mine could sit on low for a few hours while being mixed at least once every 30 minutes. After a while it began to thicken and bubble on the sides, so I left it on but removed the lid and whisked well. Just keep your eye on it and whisk everything together.: The aroma of canned coconut milk unfolds immediately, carrying a rich, slightly sweet scent that promises the final mouthfeel. Whisking at this stage ensures the condensed milk dissolves evenly into the base so you avoid dense pockets of sweetness later. You should hear a soft, steady rhythm as the whisk moves, and the mixture will look homogeneous and glossy. This step matters because an even base prevents scorching and uneven flavor concentration while cooking. A common mistake is pouring everything in hurriedly without mixing, which can result in separated fat or scorched chocolate later. Taste a small spoonful for sweetness balance before adding the chocolate, remembering you can always adjust later.
- Before serving, add coconut to a small saucepan and heat over low heat, stirring with a wooden spoon. Toast for 5-6 minutes until golden. Let cool, then add to a paper or ziplock bag and crush with your hands until small flakes remain.: As you add the Dutch process cocoa powder and chopped dark chocolate , the scent will deepen into dark, roasted cocoa notes that smell almost coffee like. Whisk until the dry powder disappears into the milky base and the chopped chocolate begins to soften at the edges. The visual cue is a glossy, slightly thickened mixture with no visible specks of powder. This combination builds the flavor foundation, giving the drink its complexity. If you skip thorough whisking here, you may end up with lumps or streaks of undissolved cocoa. Be careful to use a steady motion and scrape the bottom so nothing sticks.
- To serve, rim the edges of a mug with some frosting or glaze or something sticky, then dip the rims in the toasted coconut flakes, pressing gently to adhere. Pour hot chocolate in the mugs and garnish with whipped cream and marshmallows.: Low heat encourages slow, even melting and integration of flavors, and you will notice subtle bubbling around the edges that signals gentle simmering. The scent will become more concentrated, and the texture will gradually thicken as water evaporates and fats emulsify with chocolate. Slow cooking extracts deeper notes from the chocolate while preventing rapid separation. One key reason this works is that gentle heat encourages fat and cocoa solids to bond into a unified texture. A frequent error is setting the cooker too high, which risks curdling or scorching; always choose the low setting for consistent results.
- You want to stir and whisk every 15 minutes or so, making sure the chocolate melts nicely and is thoroughly distributed throughout the mixture: Frequent stirring keeps the mixture moving, preventing hot spots and ensuring a smooth, uniform finish. When you lift the lid, you will hear a soft bubbling and see the surface glimmer; that is the moment to whisk and reincorporate any thickened edges. This hands on attention develops a glossy sheen and prevents chocolate from settling and burning on the sides. The why here is practical, stirring distributes heat and avoids pockets where chocolate can overconcentrate. A common oversight is walking away for long stretches, which can lead to stubborn burnt patches that are hard to recover from.
- The best thing I can say here is to “know” your crockpot: Familiarity with your appliance pays off because each model runs a little differently, and recognizing its tendencies helps you manage texture. For some crocks, removing the lid occasionally will help regulate the temperature and let moisture escape, which thickens the drink just enough. You will notice a difference in how often you need to stir based on whether your cooker develops hot edges or maintains even heat. Understanding this prevents overcooking or undercooking, and it ensures consistent results each time. Avoid assuming all crockpots behave the same; misjudging your unit’s heat curve can change the final thickness and flavor concentration.
- I knew that mine could sit on low for a few hours while being mixed at least once every 30 minutes: Pay attention to visual cues, such as gentle bubbling along the rim and a gradual deepening of color; these tell you the drink is progressing well. When you whisk and feel slight resistance, the mixture is on its way to the ideal consistency. The practice of periodic mixing reduces the chance of a gritty texture and encourages a smooth melt. This step matters because it trains you to read the drink and respond rather than follow the clock exactly. A frequent mistake is over trusting time alone instead of observing texture, which can lead to underdeveloped flavor or unexpected thinning.
- After a while it began to thicken and bubble on the sides, so I left it on but removed the lid and whisked well: Once the edges show bubbling and the center holds a glossy ripple, removing the lid briefly helps moderate steam and encourages gentle reduction. The aroma will intensify, and your whisk will catch thicker ribbons, a visual sign the emulsion is forming properly. Leaving the lid off for short periods helps control consistency, but you must whisk frequently to maintain smoothness. This technique matters because it helps the hot chocolate reach a satisfying body without becoming gluey. One pitfall is leaving the lid off too long, which can over reduce and concentrate sweetness excessively.
- Just keep your eye on it and whisk everything together: Continuous attention brings rewards in texture and flavor, and the sensory feedback is immediate; you will hear slight thickness in the whisking sound and see the liquid cling more to the spoon. This is the stage where patience pays off, as the product will transition from a loose, milky liquid to a luscious, velvety drink. Understanding these cues prevents mistakes like under mixing or overheating, which can lead to separation or graininess. If you notice any scorched smell, reduce heat immediately and whisk vigorously to reincorporate the mixture.
- Before serving, add coconut to a small saucepan and heat over low heat, stirring with a wooden spoon: Toasting unsweetened coconut in a dry pan releases a warm, nutty aroma and transforms the flakes from bland to captivatingly fragrant. Stir continuously with a wooden spoon so pieces brown evenly and you can catch when they reach a golden hue. The sound is a quiet, toasty sizzle, and the visual cue is uniform deepening of color without blackened spots. Toasting amplifies the coconut’s complexity, which complements the drink’s sweet creaminess. A common error is to step away; coconut can go from golden to burnt in seconds, so stay present and attentive.
- Toast for 5 to 6 minutes until golden: In those minutes the kitchen will fill with crackling toasted notes and the coconut will crisp into small, crunchy flakes. Once cooled, crushing them slightly in a bag gives a pleasing texture for rimming mugs. This step enhances mouthfeel and adds a fresh roasted layer to each sip. If you under toast, the coconut will be bland and lack contrast; if you over toast, you risk bitterness, so aim for an even golden color and cool fully before pressing onto rims.
- Let cool, then add to a paper or ziplock bag and crush with your hands until small flakes remain: Crushing cooled toasted coconut releases that toasted aroma and makes it easy to adhere to frosting on the mug rims. The tactile process is satisfying, and the small shards provide consistent coverage. This finishing touch brings texture balance and a lovely presentation that signals care. Avoid crushing while still warm, because warm flakes can clump or stick together rather than coat rims evenly.
- To serve, rim the edges of a mug with some frosting or glaze or something sticky, then dip the rims in the toasted coconut flakes, pressing gently to adhere: Rimming the mugs adds a playful, crunchy welcome to each sip, and the frosting anchors the toasted flakes so they cling properly. Press gently to avoid large clumps that may fall into the drink; aim for an even, thin coat. A visual cue for success is a neat, even ring of golden coconut that complements the dark drink. If the frosting is too thin, flakes will not adhere, and if too thick, it can overwhelm the first sips, so strike a balance.
- Pour hot chocolate in the mugs and garnish with whipped cream and marshmallows: The final pour releases a warm chocolate steam that invites immediate comfort, and the visual of glossy dark liquid capped with white peaks is irresistibly cozy. Add a few marshmallows or a generous dollop of whipped cream or coconut whipped cream and watch them soften and melt into a pillowy finish. This step is where presentation and sensory pleasure meet, making the drink memorable. A simple mistake to avoid is serving too hot; let it cool slightly so toppings do not immediately collapse, and so the flavors can be tasted without scalding.
Notes
- Choose full fat canned coconut milk because its higher fat content creates the silky mouthfeel that defines this hot chocolate and helps the chocolate bloom properly.
- Whisk thoroughly when combining milks and cocoa to prevent lumps and ensure the powder and condensed milk disperse fully into the base, giving a smooth, even texture.
- Stir frequently while cooking to avoid hot spots and scorching, especially near the edges where chocolate tends to cling and burn first.
- Toast coconut on low heat and watch closely because even a few seconds too long will turn golden flakes to bitter, blackened pieces.
- Adjust chocolate amount to taste since chocolate bars vary in sweetness and intensity, so start with the recipe amount and tweak if you want a deeper or milder profile.
- Use a wooden spoon for toasting to avoid scratching pans and to give you a tactile sense of how the coconut is browning, which helps prevent burning.
- Finish with cool toppings like coconut whipped cream chilled for a firmer peak that contrasts nicely with the hot liquid and delayed melting.