Slow Cooker Chili
Slow Cooker Chili is a rich and savory bowl of comfort, with tender browned beef, hearty beans, and a tomato forward sauce that becomes more complex the next day. This easy weeknight dinner is perfect for feeding a crowd, offering bold spice, satisfying texture, and make ahead convenience for busy evenings. Make a big batch and enjoy leftovers that taste even better reheated.
Equipment
- Slow Cooker
- Large Heavy Skillet
- Slotted Spoon
Ingredients
- 3 pounds lean ground beef Brown and crumble to provide rich umami flavor and a hearty meat base that carries the chili. Season while cooking to render fat and develop browning which deepens overall flavor. Drain excess fat if desired to control richness. Combine with other meats and aromatics once fully cooked.
- 2 pounds ground turkey or just use all ground beef or more/all turkey, to equal 5 pounds of meat Mix or brown with the first meat to achieve a balanced texture and lean protein profile across the chili. Adjust amounts to reach a total of five pounds of meat, ensuring consistent cooking and flavor. Use to reduce overall fattiness if preferred. Incorporate with browned beef for even seasoning distribution.
- 5 large garlic cloves minced Mince finely and sauté or add directly to the slow cooker to impart pungent, savory depth and aromatic complexity. Release allicin when chopped, which brightens and amplifies other spices in the chili. Use measured quantity for balanced garlic presence that complements the meat. Add early for mellowed flavor or late for sharper garlic notes.
- 1 large yellow onion chopped Chop and cook until translucent to provide a sweet, aromatic foundation that supports the sauce and spices. Soften in a skillet or in the slow cooker to release natural sugars that balance acidity from tomatoes. Adjust chop size for textural preference. Combine with garlic to form the classic chili aromatic base.
- 3 cans 14.5 ounces each diced tomatoes, with juices Stir in with juices to supply bright tomato acidity, chunky texture, and extra liquid for the sauce. Use multiple cans to maintain a robust tomato presence throughout long cooking. Choose diced tomatoes for varied mouthfeel and to contrast smoother tomato sauce. Add early so flavors meld during slow cooking.
- 2 cans 14.5 ounces each tomato sauce Pour in to create a smooth, cohesive tomato backbone that thickens and intensifies the chili. Use measured cans for consistent sauce viscosity and tomato concentration. Combine with diced tomatoes and ketchup for layered tomato flavor. Simmer gently to allow flavors to integrate.
- 3/4 cup ketchup Add to boost sweetness and tomato concentration while enhancing body and gloss of the chili. Use measured amount to balance acidity from tomatoes and heat from spices. Stir in gradually and taste to reach desired sweetness level. Functions as both a flavoring and slight thickener.
- 2 cups low-sodium beef stock Pour in to provide savory depth, adjustable seasoning, and cooking liquid that prevents the chili from drying. Choose low-sodium to control overall salt levels and allow seasoning later. Use beef stock for meaty richness that complements ground meats. Add gradually to achieve desired consistency.
- 1 can 15 ounces black beans, drained and rinsed Drain and rinse before adding to contribute creamy texture, mild earthiness, and extra protein to the chili. Rinsing reduces excess sodium and can lessen metallic canned flavor. Add toward the end of cooking if beans are already cooked to avoid over-softening. Mix gently to preserve bean shape.
- 1 can 15 ounces kidney beans, drained and rinsed Drain and rinse before stirring into the pot to offer hearty bite, color contrast, and additional protein and fiber. Rinsing helps remove canning liquid and excess sodium. Add in the last hour of cooking if using pre-cooked canned beans to prevent mushiness. Adjust quantity for preferred bean-to-meat ratio.
- 1/3 cup yellow corn meal Measure and whisk in to serve as a natural thickener that helps bind the chili and absorb excess liquid. Yellow cornmeal also adds a faint corn flavor and slightly gritty texture when cooked. Sprinkle gradually while stirring to avoid clumping. Use to reach desired thickness without overcooking.
- 3 to 6 tablespoons medium chili powder to taste (will depend on the heat of your chili powder and your own heat preference) Season according to taste to deliver smoky, pungent heat that defines the chili’s character. Adjust between 3 and 6 tablespoons depending on chili powder potency and personal spice tolerance. Layer into the pot early so flavors fully infuse during slow cooking. Balance with sweetness and acidity as needed.
- 2 teaspoons dried Mexican oregano or regular dried oregano Sprinkle to contribute herbal, slightly citrusy notes that brighten the chili and complement cumin and oregano-forward profiles. Use Mexican oregano for more robust, peppery flavor or regular oregano as a milder substitute. Add dried herb early to allow rehydration and full flavor release. Adjust quantity to avoid overpowering other spices.
- 1 tablespoon ground cumin Stir in to impart warm, earthy, and slightly nutty undertones that are essential to classic chili flavor. Use measured tablespoon to ensure balanced spice without bitterness. Toast briefly if desired before adding to enhance aroma. Combine with chili powder and oregano for cohesive seasoning.
- 3 tablespoons brown sugar or to taste Mix in to introduce caramelized sweetness that counteracts acidity and balances heat. Adjust amount to taste, increasing or decreasing based on tomato acidity and personal preference. Dissolve into the sauce to create a more rounded flavor profile. Taste and modify later if additional sweetness is desired.
- kosher salt and freshly ground black pepper to taste (I like a good amount of black pepper!) Season generously to finish and balance all flavors, adjusting salt and pepper to taste throughout cooking. Add kosher salt for clean salinity while black pepper provides sharp, aromatic heat. Season gradually and taste periodically to avoid over-salting. Use pepper liberally if a noticeable peppery bite is preferred.
Instructions
- Brown beef and turkey in a slow cooker with a browning function. Drain fat. If you don't have a browning function on your slow cooker, then: In a large, heavy skillet over medium-high heat, brown the beef. Using a slotted spoon, transfer beef to a slow cooker. Drain fat. Add the ground turkey to the saute pan, brown it, and transfer it to the slow cooker with a slotted spoon.: As the meat sizzles and develops a deep brown crust, your kitchen will fill with a rich, toasty aroma that signals flavor concentration. Browning creates Maillard reaction notes that are essential for savory depth, and you should hear a steady sizzling rather than a quiet simmer, which means the pan is hot enough to sear. A common mistake is moving the meat too often, which prevents proper browning; allow it to sit so crusts form. When using a slow cooker browning function, aim for visible dark edges and a robust roasted scent. After browning, transfer the meat and use a slotted spoon to leave excess fat behind if needed, because too much grease will make the chili heavy. If your slow cooker lacks a browning feature, use a heavy skillet over medium high heat. Work in batches if needed to avoid crowding, which causes the meat to steam and lose that desirable caramelized flavor.
- While meat is browning, prepare and portion remaining ingredients. Add remaining ingredients to the slow cooker and stir to blend. Cover and cook on high for 6 hours, stirring briefly every couple hours.: When you drain the rendered fat you remove excess greasiness while retaining the concentrated browned bits that cling to the pan, which hold intense flavor. You should see clear fat pooling separate from the meat juices; pour it off carefully or blot with paper towels. Avoid rinsing the browned bits away because they contain concentrated goodness that enhances the sauce. A common slip up is discarding all juices; keep a little fond in the pot or pan to deglaze with a splash of beef stock later, scraping up browned bits for a flavor boost. Proper draining improves mouthfeel and prevents a slick, greasy finish.
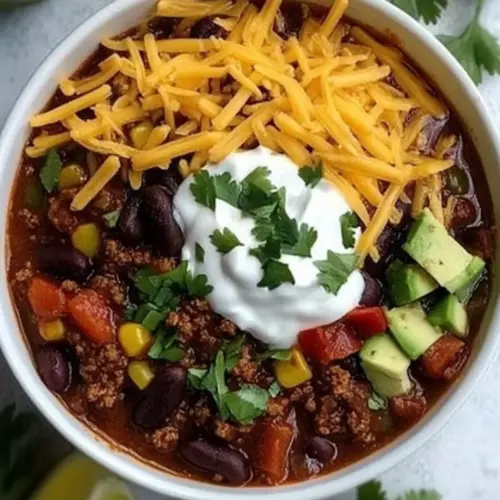
- To serve: Ladle chili into individual bowls and offer garnishes on the side, such as shredded cheese, sour cream, chopped onion, chopped cilantro, and sliced jalapenos. I also like to serve this chili with wedges of fresh lime, Fritos corn chips, and fabulous cornbread muffins. Pickled red onions would also be delicious!: In a large heavy skillet over medium high heat brown the beef : In a hot skillet the surface of the meat will darken and release nutty, roasted aromas, which is crucial for complexity. You should see bubbling and tight edges turning golden to deep brown, not an ashy gray. Browning in a skillet often produces more immediate caramelization than some slow cooker functions. Avoid overpacking the pan because meat needs contact with the hot surface to brown; if you crowd it, the pieces will steam and stay pale. For best results, let each batch sit undisturbed for a few minutes until it releases easily.
- Using a slotted spoon transfer beef to a slow cooker: The sound of the spoon scraping against the skillet is a satisfying cue that your browning step is complete, and transferring with a slotted spoon leaves behind excess fat. The aim is to move the concentrated, browned meat into the slow cooker while minimizing added grease. If you accidentally transfer too much fat, skim it off once cooking starts, because too much oil will mute the bright edges of the flavors. Arrange the meat evenly in the slow cooker so heat distribution during the long cook is uniform.
- Drain fat: After transferring meats, leaving the pan too greasy will make the sauce feel heavy, so drain leftover fat carefully and discard it. Hold the skillet at an angle and use a spoon to remove visible grease, or blot with paper towels. Be careful not to lose all flavorful browned bits stuck to the pan; instead, deglaze the pan with a little beef stock to capture that savor and add it to the slow cooker. A typical error is discarding the fond along with the fat, which wastes layered flavor.
- Add the ground turkey to the saute pan brown it and transfer it to the slow cooker with a slotted spoon: When cooking ground turkey , listen for a gentle bubbling and watch the meat turn from pink to opaque, releasing a lighter, cleaner aroma than beef. Turkey browns faster than beef and can dry out if overcooked, so aim for a just browned exterior with tender interior. Transfer it with a slotted spoon to keep excess liquid behind, ensuring the slow cooker contains mostly flavorful meat rather than unwanted juices. Avoid drying the turkey by not leaving it on high heat too long; it should be browned, not charred.
- While meat is browning prepare and portion remaining ingredients: The kitchen will smell of spices and fresh onion and garlic as you chop and measure. Preparing ingredients ahead keeps the rhythm steady, and it prevents overcooking anything while you search for a missing can. Arrange the tomatoes , tomato sauce , beans , and seasonings nearby so adding them becomes effortless. A common oversight is forgetting to rinse canned beans , which leaves excess sodium and starchy liquid that can cloud the final texture.
- Add remaining ingredients to the slow cooker and stir to blend: As you combine the browned meats with the tomatoes , tomato sauce , ketchup , beef stock , spices , and corn meal , you should see the mixture transform from separate elements into a cohesive stew like base. The aroma should lift immediately, with the spice notes opening and the tomato brightness balancing the savory meats. Stirring helps distribute heat and prevents pockets of dry corn meal; aim for an even, glossy texture. Avoid vigorous stirring that can break down beans; fold gently to keep their shape.
- Cover and cook on high for 6 hours stirring briefly every couple hours: During long, slow cooking the sauce will deepen in color and thicken, releasing a layered aroma that grows more complex with time. You should notice a gentle bubbling and a steady savory steam, and the surface will develop small, slow rising bubbles when it is on target. Stirring occasionally ensures even cooking and prevents sticking at the edges, but opening the lid too often prolongs the cook. A common mistake is setting the heat too high, which can toughen the meat and reduce liquid too quickly; follow the recommended setting for balanced tenderness.
- To serve Ladle chili into individual bowls and offer garnishes on the side such as shredded cheese sour cream chopped onion chopped cilantro and sliced jalapenos: The final bowl should be aromatic and visually appealing, with steam rising and a glossy surface. Garnishes add temperature contrast, textural brightness, and fresh herb lift, so offer them on the side to let people customize. I like the pop of fresh onion and the cooling creaminess of sour cream . Avoid adding too many toppings at once which can mask the chili's base flavors; let guests build their preferred bowl.
- I also like to serve this chili with wedges of fresh lime Fritos corn chips and fabulous cornbread muffins: These accompaniments introduce acidity, crunch, and a sweet corn counterpoint that complements the chili. The aroma of warm cornbread beside the chili is nostalgic and satisfying. A small caution is that salty chips and heavy sides can overpower the chili, so balance portions to keep the bowl enjoyable throughout the meal.
- Pickled red onions would also be delicious: Tart pickled onions cut through the richness and bring a bright, sharp note that refreshes the palate between bites. Their vinegar tang offers contrast and prevents flavor fatigue during a long meal. Prepare pickles ahead so they have time to develop acidity, and don't skip draining excess pickle liquid to avoid watering down the chili when served atop bowls.
Notes
- Adjust the protein ratio — Use all beef for a heartier texture or all turkey for a lighter finish. Each choice changes mouthfeel and richness, so balance with stock volume and seasoning.
- Control the heat — Start at the lower end of the chili powder range and add more after the chili has cooked, because perceived heat rises as flavors concentrate. Taste as you go and let friends spice their bowls individually.
- Play with sweetness — Increase or decrease the brown sugar to counter tomato brightness. A little more softens acidity, while less keeps the profile more savory.
- Enhance depth — A small splash of reserved pan juices or a deglaze with beef stock captures browned bits that deepen flavor, especially if you browned meat in a separate skillet.
- Texture tweaks — If you prefer a thicker chili, add an extra tablespoon of corn meal or mash a few beans against the side of the slow cooker to create body without altering flavor.