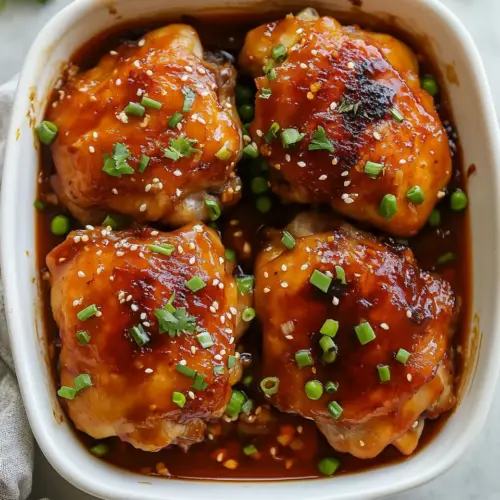
Slow Cooker Chicken Thighs
Slow Cooker Chicken Thighs deliver juicy, tender chicken in a glossy sweet savory sauce that is both easy and comforting. This easy weeknight dinner blends ketchup, honey, soy, and sesame for a sticky glaze that clings to each thigh, creating rich, aromatic bites. Make it for family dinners or meal prep because it reheats beautifully and keeps well.
Equipment
- Slow Cooker
- Mixing Bowl
- Medium Saucepan
- Whisk
Ingredients
- 8 boneless skinless chicken thighs, trimmed (about 2.5 lbs) Provide tender, juicy meat and substantial protein; sears or trims to remove excess fat and ensure even cooking in the slow cooker, yielding consistent texture across all thighs.
- 1/3 cup ketchup Add sweet-tangy depth and tomato-based body to the sauce; helps build a sticky glaze and balances savory flavors when combined with honey and soy sauce.
- 1/4 cup honey Contribute natural sweetness and glossy thickness to the sauce; helps caramelize during cooking and counterbalances salty and spicy notes.
- 1/4 cup soy sauce Deliver umami-rich saltiness and savory complexity; thins the sauce slightly while enhancing overall flavor and harmonizing the sweet and spicy elements.
- 1 tbsp sriracha (reduce for milder option) Introduce concentrated heat and bright chili flavor; adjusts spiciness level and adds a subtle fermented chili tang that complements the sauce.
- 2 tsp toasted sesame oil Impart aromatic, nutty richness in small amounts; provides a toasted background note that elevates the sauce without overpowering the other flavors.
- 1 tbsp minced garlic Supply pungent, aromatic sharpness and savory depth; helps brighten and freshen the sauce while contributing to the overall savory profile.
- 1 tbsp peeled and minced fresh ginger Bring warm, zesty, slightly sweet spice and fresh pungency; balances richness and supports the Asian-inspired flavor profile with bright ginger notes.
- 2 tsp rice vinegar Add mild acidity and a subtle tang to balance sweetness; helps brighten the sauce and cut through richness from the chicken and oils.
- 2 tbsp cornstarch + 2 tbsp water Thicken sauces to a glossy, clingy consistency when mixed and added; creates a smooth, stable glaze that coats the chicken during finishing.
- Sliced green onions and sesame seeds, for garnish (optional) Finish the dish with fresh, crunchy texture and visual appeal; add mild oniony heat and a nutty sesame crunch when sprinkled before serving (optional).
Instructions
- Place chicken thighs in a slow cooker (5 to 7 quart).: You will notice the raw chicken is chilled and slightly tacky to the touch, and arranging the pieces in a single layer helps them cook evenly. Give each piece a little space so heat circulates rather than stacking them tightly. A common mistake is overcrowding, which can lead to uneven cooking and longer times. If your slow cooker is smaller, overlap slightly but expect slight differences in doneness.
- In a mixing bowl whisk together ketchup, honey, soy sauce, sriracha, sesame oil, garlic and ginger. Pour mixture evenly over chicken thighs in slow cooker.: The sauce should be glossy and fragrant, with the aroma of garlic and ginger lifting from the bowl. Pouring it slowly lets the liquid settle around each thigh, ensuring all pieces are coated. If you dump too quickly you might miss pockets of dry meat. Whisk until smooth so the flavors marry before cooking.
- Cover and cook on low heat until cooked through and tender, about 3 to 4 hours (should register 165 °F in center).: As the slow cooker warms you will hear gentle bubbling and smell the sauce sweetening. The chicken should yield easily to a fork but still hold together, and an instant read thermometer in the thickest part should read at least 165 °F. Overcooking can make the texture fall apart, so start checking around three hours to prevent mushy results. Low and slow is forgiving, but timing matters for texture.
- Transfer chicken to a serving plate, cover with foil to keep warm.: The chicken will release juices that are full of flavor, so transfer carefully to retain moisture. Covering with foil traps steam and keeps the pieces tender while you finish the sauce. A frequent oversight is letting the meat cool uncovered, which dries the edges. Keep it tented and warm to maintain juiciness.
- Pour juices from slow cooker into a medium saucepan (you should have 2 cups liquid), add vinegar. Heat over medium heat and bring to a simmer.: As the liquid warms you will see fat rise and small bubbles form around the edges, releasing intensified aroma. Adding the rice vinegar balances sweetness and helps the sauce brighten. If you heat too quickly the flavors may become harsh, so bring to a gentle simmer rather than a rapid boil.
- Meanwhile in a small mixing bowl whisk together cornstarch with 2 tbsp water until well blended. Pour mixture into sauce in skillet.: The slurry should look smooth and slightly opaque, with no lumps. Adding it cold into the simmering sauce will thicken as it heats; whisk as you pour to integrate it evenly. A common error is skipping the cold water step which causes clumps. Stir constantly for a silky finish.
- Simmer sauce, whisking constantly for 1 minute.: During this brief simmer the sauce will change from thin to glossy and slightly viscous, clinging to the whisk. You should notice the aroma deepen and small steam plumes rising, signaling the cornstarch has activated. Over simmering can overthicken or dull aromatic notes, so watch closely and stop once it becomes glossy. If it becomes too thick, a splash of water will correct it.
- Pour sauce over chicken (or baste over chicken) and garnish with green onions and sesame seeds if desired.: The final act is sensory rich, with the hot glaze steaming as it hits the warm chicken , creating a shiny coating that glints in the light. Basting ensures every bite is saucy, while garnishes add crunch and freshness. Avoid garnishing too early, which can wilt the green onions. Serve immediately to enjoy the contrast of tender meat and glossy sauce.
Notes
- Choice of thighs Pick boneless skinless chicken thighs for even cooking and easy serving, they stay moist through the long cook.
- Adjusting spice Cut the sriracha in half for milder heat, but keep a little to preserve the complexity it brings to the sauce.
- Thickening the sauce If your sauce reduces too much, whisk in another teaspoon of cornstarch mixed with cold water to reach the ideal glaze consistency.
- Make ahead You can cook the chicken a day ahead and refrigerate, then rewarm gently and finish the sauce for an easy entertaining option.
- Serving temperature Reheat gently over low heat to avoid drying the chicken, stirring occasionally so the sauce reheats evenly.