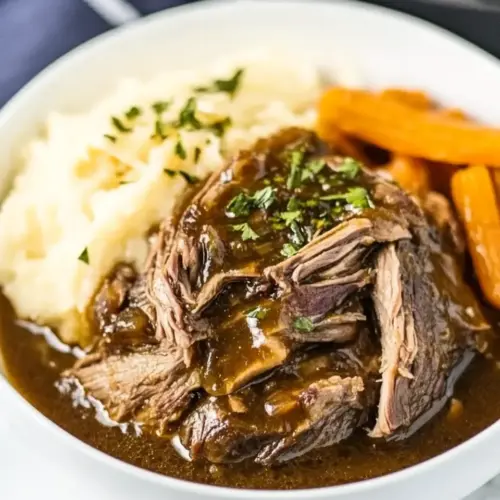
Slow Cooker 3 Packet Roast
Slow Cooker 3 Packet Roast delivers tender, fall apart beef with layered savory and herbaceous notes, perfect for an easy weeknight dinner or cozy winter meal. The three seasoning packets combine to create a rich gravy while the slow cooker does the heavy lifting, yielding a comforting, crowd pleasing entree you can rely on. Make it when you want low fuss and maximum flavor.
Equipment
- 6 quart slow cooker
Ingredients
- 1 (2 1/2 to 4-pound) chuck roast Season generously and provide the main flavorful, tender cut of beef that becomes the centerpiece of the slow-cooked meal; braise low and slow so connective tissue breaks down into gelatin for a succulent texture and rich mouthfeel.
- 1 packet brown gravy mix Thicken and deepen gravy flavors by releasing savory umami and glossy consistency when combined with cooking liquids; dissolve into the pot early to meld with meat drippings and create a cohesive sauce.
- 1 packet Ranch seasoning Add zesty, herb-infused tang and savory powdered buttermilk notes that emulate classic Ranch flavor; sprinkle over the roast to contribute complexity and a creamy, herbaceous backbone to the overall profile.
- 1 packet Italian dressing, (I use Good Seasons) Impart bright, herby, and slightly tangy Italian-seasoned flavor that complements beef and balances richness; shake over the roast to introduce aromatic herbs and a subtle acidic lift from the dressing mix.
- 1/2 teaspoon black pepper Season with mild heat and earthy spice to accentuate the beef’s flavor and balance richer elements; sprinkle evenly to provide a gentle peppery bite without overwhelming other seasonings.
- 1/2 teaspoon crushed red pepper flakes Provide concentrated heat and a touch of smoky fruitiness to lift flavors and add dimension; use sparingly to create a warm finish that contrasts with the savory and tangy components in the dish.
- 1 cup water Dilute and carry flavors while creating the cooking medium for braising; measure and add to the slow cooker so soluble seasonings dissolve and steam facilitates gentle, even cooking of the roast.
- 1 1/2 tablespoons cornstarch Thicken sauces and stabilize a glossy gravy when mixed with a small amount of cold liquid and added near the end of cooking; combine into a slurry to adjust sauce body to desired consistency.
Instructions
- Optional- Sear the roast first. Heat a pan over medium-high heat. Add 1 tablespoon of oil. Sear the roast until browned on both sides.: The pan will hiss as you place the roast into a heated surface, producing those brown, caramelized notes that smell deeply savory and nutty. Searing creates a thin crust that adds texture and an extra layer of flavor through Maillard reaction, which yields those roasted, almost sweet aromatics. When you brown the surface, you will notice small brown bits sticking to the pan, and that fond lifts into the gravy if you deglaze after searing. One common mistake is overcrowding the pan, which lowers the temperature and leads to steaming, not browning; sear in batches if needed. Touch the roast to check for a well browned surface, it should feel firm and slightly crisp at the edges, not pale or wet.
- Place roast in 6-quart slow cooker.: You will feel the weight of the roast as you nestle it into the slow cooker, and the roomy insert allows the hot air to circulate gently around the meat. This slow, enveloping heat gradually breaks down collagen so the center becomes tender without drying out the exterior. Avoid the error of trimming away too much fat before cooking, because that fat helps keep the meat moist and enriches the cooking liquid. Ensure the roast sits comfortably in the pot, not jammed against the lid, to ensure even, consistent cooking.
- Sprinkle gravy mix, ranch seasoning, and Italian dressing mix on top. Sprinkle with black pepper and crushed red pepper flakes. Pour water on top of roast.: As you sprinkle the packets, their powdered aromas will be faint but layered, like a promise of the finished sauce. The spices dissolve into the juices during cooking, creating a marinade like effect that seasons the meat from the outside in. After adding the pepper and crushed red pepper flakes, pour the water over the roast so the seasonings can start to bloom. A frequent misstep is stirring the powders into a paste before cooking, which can cause clumping; simply sprinkle and allow the slow heat to integrate them gently. Watch for even coverage so every side gets seasoned as it braises.
- Cover slow cooker and cook on LOW for 8 to 9 hours.: Over these long hours the kitchen will slowly fill with a savory perfume, and the sounds will be minimal, just the soft hum of the slow cooker working. The low steady heat is ideal for converting tough connective tissue into silky tenderness, and at the end the roast should shred or slice with minimal resistance. The biggest pitfall is lifting the lid frequently to peek, which releases heat and extends cooking time; trust the process and resist opening the cooker. Check near the end for a fork tender center, where the meat yields easily and juices run clear.
- Remove the roast and place on a serving platter. Tent with foil to keep warm. Whisk together cornstarch with cold water and whisk into liquid in slow cooker. Cover and cook on HIGH for 20 minutes to thicken. Note: To do this step faster, transfer to a pot and bring to a boil over high heat on the stove. Let simmer for 1 minute.: When you lift the roast out, it may feel delicate and fall apart slightly, which is a good sign. Tent it with foil to keep it warm, allowing juices to redistribute so the meat stays moist when sliced. While the roast rests, the cooking liquid will settle and concentrate, making the next step of thickening much easier. A common error is carving immediately, which causes the juices to gush out and the meat to dry; give it a short rest so the texture remains succulent. As you slice, note the sheen on the meat surface from the concentrated juices, that glossy look means you are doing it right.
- Whisk together cornstarch with cold water and whisk into liquid in slow cooker: The cornstarch slurry should be smooth and cool to the touch before you add it to the hot liquid, which prevents lumps and ensures a silky finish. As you whisk it in, you will hear a faint bubble as the liquid begins to respond, and the sauce will gradually thicken to a coat the back of a spoon texture. This technique matters because cornstarch needs heat and movement to activate and reach that glossy stage. If you pour cornstarch dry into the sauce you risk clumping; always pre mix with cold water. Watch the sauce for even thickening, and if it gets too thick you can thin it with a splash of water to reach the perfect consistency.
- Cover and cook on HIGH for 20 minutes to thicken: The higher heat quickly activates the starch, and you will see the sauce change from watery to silky and slightly glossy in the span of this short simmer. The aroma will intensify as the flavors concentrate, and small bubbles will rise steadily across the surface, signaling the sauce is reaching full body. One troubleshooting tip is to stir occasionally to prevent hot spots and ensure a uniform thickness. Avoid overcooking the slurry for too long, which can break down the starch and thin the sauce again, so trust the 20 minute window.
- Note To do this step faster transfer to a pot and bring to a boil over high heat on the stove: Transferring to a saucepan gives you direct control and speeds up the thickening process dramatically as the liquid hits a hard boil, and you will hear an assertive rolling simmer rather than the slow hum of the cooker. This is helpful when you are short on time, and the rapid heat will produce an instant visual cue the sauce is thick enough, as it clings more readily to the spoon. Be mindful that the sauce can bubble and spit when boiling, so stir to prevent scorching. Common mistakes include overheating which can cause the sauce to reduce too much; monitor closely and remove from heat once the desired thickness is reached.
- Let simmer for 1 minute: A quick simmer after the slurry is added fully activates the starch and polishes the sauce to a smooth finish, and you will notice a glossy sheen appear almost immediately. This brief final simmer integrates flavors and ensures the sauce will not taste raw or starchy. One error is skipping this minute, which can leave a faint starchy taste or an uneven texture. Listen for consistent gentle bubbles, and when they appear steadily, the sauce is ready to be spooned over the roast.
Notes
- Searing alternative If you do not want to sear, the roast will still become tender in the slow cooker, though you will miss the extra caramelized flavor; consider broiling the surface briefly after cooking for a touch of color.
- Seasoning adjustments The three packets are calibrated to work together, so if you prefer less sodium, try using reduced sodium versions if available and taste the sauce after thickening to decide if you need a pinch more pepper.
- Thickening choice Cornstarch gives a glossy finish, alternatively mix equal parts flour and cold water to make a roux like slurry, though you might need longer simmer time for a smooth texture.
- Liquid control If you prefer a more concentrated gravy, reduce the added water by a few tablespoons, remembering that less liquid will concentrate flavors but reduce the final sauce volume.
- Storage tip Store leftover roast and sauce separately if possible; the sauce will thicken in the fridge but loosens nicely when gently reheated with a splash of water.