Skinny Chicken Pot Pies
Skinny Chicken Pot Pies deliver creamy, savory comfort with a light touch. This easy weeknight dinner pairs tender chicken, mixed vegetables, and a silky, herb spiced sauce topped with golden reduced fat biscuits. It is quick to assemble and satisfying to eat, perfect when you want classic pot pie flavors without the heavy calories, so give it a try for an approachable family meal.
Equipment
- Medium Saucepan
- Whisk
- Ramekins
- Rolling Pin
- Oven
Ingredients
- 1 cup fat-free half and half Provide creaminess and a lighter-rich mouthfeel while reducing calories compared to whole cream; dissolves smoothly into the sauce and helps create a velvety base for the filling. Adds subtle dairy flavor and contributes to a cohesive, slightly thickened gravy when combined with flour and broth.
- 1 cup fat-free chicken broth Supply savory liquid and depth of chicken flavor to the filling while keeping fat content low; works with half and half to balance consistency. Enhances umami and helps deglaze the pan so seasonings distribute evenly throughout the pot pie.
- 3 tbsp . all-purpose flour Act as a thickening agent to turn liquids into a cohesive gravy by absorbing moisture and swelling when cooked; must be cooked briefly to remove raw flour taste. Binds the half and half and broth into a smooth sauce that clings to vegetables and chicken.
- 1 tsp . poultry seasoning Impart warm, mildly savory herbaceous notes with a blend of thyme, sage, and other spices typical of poultry blends; elevates overall roast-chicken flavor profile. Helps season the gravy and pairs well with thyme and chicken for familiar comfort-food seasoning.
- 1 tsp . thyme Add earthy, floral, and slightly minty aromatics that complement poultry and vegetables; supports layering of herb flavors without overpowering the dish. Releases essential oils when heated, enhancing the savory sauce and providing bright background notes.
- 2 cups roasted skinless chicken breast, cubed Provide lean protein and hearty texture from pre-roasted chicken breast cubes; contributes substance and authentic chicken flavor to the filling. Offers convenience and cooks quickly in the gravy, preventing dryness while absorbing seasonings.
- 110 oz package frozen mixed veggies Deliver a convenient mix of frozen carrots, peas, corn, and green beans to contribute color, nutrients, and varied textures; frozen state preserves freshness and speeds preparation. Release starches and moisture into the sauce, helping to thicken it slightly while providing vegetable bite.
- 4 green onions, chopped Introduce a sharp, mild onion flavor and fresh green color while adding a tender crunch when undercooked or soft bite when steamed; complements the creamy sauce and poultry seasoning. Provides aromatic brightness that lifts the richness of the filling.
- 1 tsp . salt Season the filling with essential salinity to enhance and balance flavors; helps draw out tastes from vegetables and chicken while preventing the dish from tasting flat. Use judiciously to avoid over-salting, especially if broth is already salted.
- 1/4 tsp . pepper Contribute subtle heat and flavor contrast that rounds out savory notes without overpowering; balances saltiness and herbs to create a more nuanced profile. Small quantity ensures gentle background pepperiness across the filling.
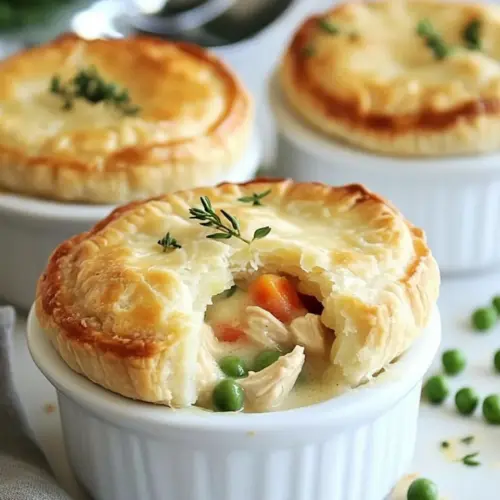
- 1 can, 7.5 oz refrigerated reduced-fat biscuits Supply a convenient buttery biscuit topping that browns and bakes into individual pot pie crusts; reduced-fat variety lowers overall calories while maintaining soft, flaky texture. Pressed over the filling before baking, they create a golden, tender top that completes the dish.
Instructions
- Preheat oven to 425 degrees F.: Your oven should smell warm and neutral as it reaches temperature, and you may hear a quiet fan or ambient hum. Setting the oven to 425 degrees F ensures the biscuit tops brown quickly while the filling bubbles, creating contrast between a crisp top and a silky interior. If you skip preheating the oven, the biscuits will take longer to brown and may absorb more moisture, becoming doughy instead of golden. A common mistake is not allowing the oven to fully reach temperature before baking, which changes baking time and texture. Give it the full preheat time to stabilize before the pies go in.
- In a medium saucepan, whisk together half and half, chicken broth, flour, poultry seasoning and thyme. Bring to a boil then reduce heat to a simmer, continuing to whisk for about 4 minutes. Once mixture has thickened, remove from heat and stir in chicken, mixed veggies, green onions, salt and pepper. Cover to keep warm and set aside.: As you whisk, the mixture should start smooth and pale, then become thicker and slightly glossy as the flour hydrates. The whisking action prevents any lumps and distributes the poultry seasoning and thyme evenly, producing steam that blends flavors. You want to hear a gentle simmer, not a violent boil, so adjust heat accordingly. Overlooking the whisking leads to a lumpy sauce, while under seasoning makes the filling flat. If your sauce sticks, lower the heat and add a splash of broth to loosen it.
- Coat 5 (6 oz) ramekins with nonstick cooking spray.: When the liquid reaches a boil you will see steady bubbling and smell a toasty, faintly browned aroma as the flour cooks. Reducing to a simmer and whisking for about 4 minutes finishes cooking the flour so the sauce loses any raw taste and gains a velvety texture. This step is critical for achieving the right body, so do not rush it. A common error is stopping the whisking too soon, leaving a pasty texture or starchy taste. If it thickens too much, stir in a tablespoon of broth at a time to reach the desired consistency.
- On a lightly floured surface, roll out 5 biscuits into 4-inch rounds. Evenly fill ramekins with chicken mixture and top each with a rolled out biscuit, pressing firmly around the sides of the ramekin to adhere. Pierce 4 holes in the top of the biscuits to vent and place in oven.: The pan will let off a savory steam that smells of herbs and broth. When you fold in the cubed chicken and vegetables, the filling will cool slightly and become glossy, with flecks of green from the onions. Stir gently to coat each piece so every bite is saucy. The reason you remove from heat now is to avoid overcooking the vegetables or drying the chicken . A frequent mistake is leaving it on heat too long, which can make the chicken tough and the vegetables mushy. If the filling seems thin after mixing, a brief return to low heat while stirring will help it tighten up.
- Bake pies for about 12 minutes, until filling is bubbly and biscuits are golden. Enjoy!: The filling will continue to hold heat and meld flavors while it rests, and you may smell the parsley like notes from the poultry seasoning intensify. Keeping it covered prevents a skin from forming and keeps moisture even. This resting time helps the filling stabilize so it fills the ramekins cleanly. A common misstep is letting it cool uncovered, which can dry out the surface and create an uneven texture. Keep it tented or covered until you are ready to assemble.
- Coat 5 (6 oz) ramekins with nonstick cooking spray: The ramekins should feel slick to the touch after spraying, which ensures the pies release cleanly and the biscuit edges do not stick. Using the right sized dish creates individual portions that bake evenly. If you skip spraying, the biscuits or filling may cling, making serving messy. Be thorough but brief when spraying, and wipe excess if pooling occurs, because pooled oil can lead to uneven browning.
- On a lightly floured surface, roll out 5 biscuits into 4-inch rounds: As you roll, you will feel the dough soften and spread beneath the pin, its surface becoming smoother and slightly tacky from the flour. Rolling the biscuits to a uniform size ensures even coverage and consistent browning across pies. This technique matters because thicker centers take longer to bake and thinner edges can overbrown. A common error is overflouring, which dries the dough; use just enough to prevent sticking and let the dough relax if it resists stretching.
- Evenly fill ramekins with chicken mixture and top each with a rolled out biscuit, pressing firmly around the sides of the ramekin to adhere: When you spoon in the filling, listen for a soft plop and see the glossy sauce nestle around the chicken and vegetables. Press the biscuit gently to form a seal so steam does not escape from the sides during baking. This seal helps the top brown and the filling to steam properly, creating that bubbling interior. If the biscuit is not pressed firmly, the edge may lift and the filling could bubble over. Avoid overfilling the ramekins to prevent spills during baking.
- Pierce 4 holes in the top of the biscuits to vent and place in oven: The small vents let steam escape and produce a crisper biscuit top while preventing the center from becoming soggy. You will see faint wisps of steam rising from these vents as the pies bake, and the scent will shift toward toasted biscuit and warmed herbs. Not venting can trap steam, leading to a soggy top and uneven bake. Use a knife or fork to make clean vents and avoid tearing the biscuit surface.
- Bake pies for about 12 minutes, until filling is bubbly and biscuits are golden: During baking you will hear a soft bubbling from the filling and see the biscuit tops change color, moving from pale to a warm golden brown. The bubbling is your cue that the filling is hot throughout and safe to eat. Baking for about 12 minutes at 425 degrees F crisps the tops without drying the interior. A common mistake is leaving them too long, which dries the biscuits, or not long enough, leaving uncooked dough. Rotate the tray halfway if your oven browns unevenly, and rely on the bubbling and color as your primary indicators of doneness.
- Enjoy!: The first bite should offer contrast between the crisp, golden biscuit and the warm, creamy filling studded with tender chicken and vegetables. Allow the pies to rest a few minutes so the filling settles and you avoid burning your mouth on hot gravy. Rushing to eat them right away can lead to scalding, and cutting into them too aggressively may cause the filling to spill. Let them sit briefly to set, then serve confidently and savor the layered textures.
Notes
- Heat control matters Start with medium heat to bring the sauce to a gentle boil, then immediately reduce to a simmer. This prevents scorching and gives you a glossy, smooth sauce. If the pan gets too hot, the flour can brown and impart a toasty but slightly bitter note, so watch closely.
- Whisking prevents lumps Continuous whisking while the sauce thickens yields a silky finish. If you stop whisking, streaks of flour can coagulate, making the sauce grainy. Use a balloon whisk and keep the motion steady for best results.
- Season gradually Add a portion of the salt and pepper early, then adjust at the end after combining the chicken and vegetables. Stocks vary in sodium, so taste at the end to avoid oversalting. It is easier to add than remove.
- Size matters for serving Use uniform ramekins so all pies bake evenly. Smaller dishes will cook faster and may need less time, while larger ones require a longer bake. Stick to the recommended 6 ounce size for consistent results.
- Texture from frozen vegetables Use frozen mixed vegetables straight from the bag, as they are blanched and freeze stable. Thawing can lead to water release and a thinner sauce, so keep them frozen until stirred into the warm sauce.
- Check biscuit color Visual cues trump strict timing, so remove the pies when the biscuits are a warm golden brown and the filling bubbles. Ovens vary, and relying on color and bubbling ensures perfect doneness rather than a timer alone.