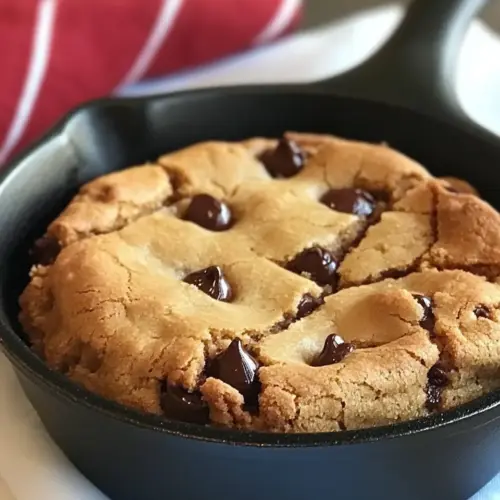
Skillet Chocolate Chip Cookie
Skillet Chocolate Chip Cookie is a warm, gooey dessert with a crisp edge and melted chocolate pockets, perfect for quick celebrations and easy weeknight treats. This skillet favorite is rich, comforting, and visually impressive, delivering a restaurant style finish with minimal fuss, making it a must make for sharing with family or friends.
Equipment
- Cast-Iron Skillet
- Microwave-safe Bowl
- Nonstick cooking spray
- Whisk
Ingredients
- 14 tablespoons butter Melted or softened to provide rich fat and structure, contributing to a tender, chewy cookie texture and helping dough spread evenly in the skillet. Adds flavor depth and helps dissolve sugars for even browning. Use room-temperature butter for proper creaming with sugars.
- 1/2 cup sugar Granulated to supply sweetness and aid in spreading and crisping of edges when creamed with butter. Helps create lift and contributes to a balanced sweetness against brown sugar's molasses notes. Dissolves into the fat phase for even texture.
- 3/4 cup brown sugar Moist and flavorful to add chewiness, deeper flavor, and moisture retention; provides caramel-like notes from molasses. Balances granulated sugar to produce a tender interior and slightly soft bite. Helps retain longer-lasting freshness in the baked cookie.
- 1 tablespoon vanilla Aromatic and sweet to enhance overall flavor and complement the chocolate; binds with other ingredients for a rounded taste profile. A small amount elevates perception of sweetness and brings out butter and chocolate nuances. Stir in with wet ingredients for even distribution.
- 1 egg Binder and leavening contributor to help create structure and moisture; white of the egg provides lift and sets during baking for a tender crumb. Adds protein that coagulates to stabilize the cookie while keeping it soft. Mix thoroughly with sugars and butter for uniform incorporation.
- 1 egg yolk Extra richness and emulsification to increase tenderness and contribute to a dense, fudgy center; yolk adds fat and lecithin for a smoother dough. Enhances mouthfeel and helps keep the cookie moist after baking. Fold in with the wet ingredients for best texture.
- 1 3/4 cups flour Dry base to form the cookie's structure and provide bulk; gluten development from flour creates chew and integrity in the baked cookie. Combines with liquids and fats to form the dough matrix that holds chocolate chips. Sift or whisk to remove lumps and ensure even mixing.
- 1/2 teaspoon baking soda Leavening agent in small quantity to provide gentle rise and lightness, reacting with acids and producing carbon dioxide for subtle lift. Helps control spread and texture so the cookie is neither too flat nor too dense. Measure precisely to avoid off flavors.
- 1 1/4 cups chocolate chips (use your favorite variety) Sweet mix-in to provide chocolate pockets and concentrated bursts of flavor throughout the cookie; chips contribute texture contrast and melting pools in the warm skillet. Choice of chocolate variety influences sweetness and flavor intensity. Fold in at the end to distribute evenly without overmixing.
Instructions
- Preheat oven to 375º. Lightly spray 4 5-inch cast iron skillets with nonstick cooking spray. Set aside.: The moment you begin, you will notice the kitchen temperature steady and the oven faintly humming as it warms, which sets the stage for even baking. A properly preheated oven ensures the edges start to set immediately, producing that desirable contrast between a crisp rim and a gooey center. If the oven is not hot enough, the cookie can spread too much and become dense, so always wait until the oven reads the temperature. A common mistake is placing the skillet in before full preheat, which results in uneven browning across the pan.
- In a large microwave-safe bowl, melt butter. Add sugar and brown sugar, and vanilla. Mix till combined. Add egg and egg yolk, whisk until mixture is smooth.: When you coat the pans, you will feel the faint tack of the spray and see a fine sheen that prevents sticking while encouraging even browning. This thin layer of fat also aids with easy removal and cleanup. Use enough coating to cover the surface but avoid pooling, which can cause excess oil spots during baking. One mistake to avoid is using too small or too large a skillet, which alters baking time and texture.
- Add flour, baking soda, and salt, and stir until combined. Mix in chocolate chips.: Let the prepared pans rest while you mix the dough, which gives you a moment to focus and keeps the workflow smooth. Having everything staged avoids rushed transfers that can disturb the dough. If you leave the skillet too long in a hot area, the nonstick spray might collect dust, so keep it covered or in a clean spot.
- Spread cookie dough into prepared pans. Bake for about 20 minutes or until golden brown. A 9-inch skillet could take 25-30 minutes.: As the butter melts, it fills the air with a nutty, creamy scent that signals richness. I prefer short bursts in the microwave, stirring between intervals so the butter melts evenly and avoids hot spots. The melted butter gives the dough a glossy, cohesive texture. Overheating can brown the butter too much and change the flavor, so watch it carefully and stop when mostly melted, stirring to finish. A common error is overheating and having browned solids float, which can impart a toasted note some may not want.
- Cool slightly before cutting or serving. Serve with vanilla ice cream and fudge sauce if desired.: Once combined, the sugar dissolves into the warm butter , creating a silky, amber mixture. Stir until the granulated sugar feels mostly dissolved, and the brown sugar has fully integrated, giving the batter a caramel hue. The added vanilla releases a perfume that brightens the blend. If the sugar remains gritty, keep stirring; undissolved sugar can create pockets of graininess in the finished cookie.
- Mix till combined: You will notice the mixture become glossy and uniform, signaling that the sugars have married with the butter . A smooth base ensures even texture in the baked cookie. Avoid overmixing which can incorporate too much air and change the final crumb.
- Add egg and egg yolk, whisk until mixture is smooth: As you whisk in the egg and extra egg yolk , the batter will lighten slightly and thicken, forming a cohesive, silky mass. The egg proteins help bind the dough, while the yolk contributes added silk and chew. Mix until there are no streaks of white, but stop before the batter becomes frothy. Overzealous whisking introduces air that can make the center cakier instead of gooey.
- Add flour, baking soda, and salt, and stir until combined: When the dry ingredients meet the wet, the dough will transition to a thicker, more substantial texture. You will sense a slight resistance as the dough pulls away from the bowl, indicating proper hydration. The flour provides structure while the baking soda gives gentle lift and helps with browning. Stir only until blended to preserve a tender interior. A frequent mistake is adding too much flour from packed measuring, which makes the cookie dry and dense.
- Mix in chocolate chips: Folding in the chocolate chips gives visual delight as bits of chocolate dot the dough, and you can already imagine pools of melted chocolate. Ensure chips are evenly distributed so every slice has pockets of richness. Do not overwork the dough here, as vigorous mixing can lead to more spread. If you use a heavy hand, the chips can sink and create uneven bites.
- Spread cookie dough into prepared pans: Pressing the dough into the skillets, you will notice its pliability and slight tackiness. Smooth the surface so the dough bakes evenly, leaving a little space at the edges for expansion. The dough should sit slightly domed in the pan, predicting a gooey center. If you press too thin, the cookie will over crisp and lose the desired chew.
- Bake for about 20 minutes or until golden brown: As the pan bakes, the kitchen will fill with a warm, toasty aroma and you will hear faint crackles as edges set. Look for a golden rim and a center that still jiggles slightly, indicating that molten interior. Baking about twenty minutes is ideal for the specified skillet size; if the edges become dark quickly, reduce oven temperature slightly. Avoid opening the oven too often, which causes temperature drops and uneven set.
- A 9-inch skillet could take 25 to 30 minutes: If you use a larger pan, expect a longer bake time as the dough sits thinner and needs extra oven minutes to develop color. Watch for a uniform golden top and a center with gentle wobble. Larger skillets will shift the balance between crispy edge and gooey center, so adjust time and test early to prevent overbaking. A common error is assuming the same timing fits all pan sizes, which leads to dryness in larger pans.
- Cool slightly before cutting or serving: After removing the skillet from the oven, allow the cookie to rest long enough for molten chocolate to set just a touch, which makes serving cleaner while keeping the interior sumptuous. You will notice the aroma intensify during this rest. Serving piping hot may cause the center to be too runny for neat slices, while waiting too long cools the molten appeal. A usual mistake is slicing immediately, which can result in a messy, less appealing presentation.
- Serve with vanilla ice cream and fudge sauce if desired: When you plate a warm slice with a scoop of ice cream, the contrast of temperature and texture elevates the experience, the ice cream melting into pockets and creating a luscious sauce. Drizzling fudge adds depth and a glossy finish. For the best presentation, place the skillet on a heatproof surface and garnish right before serving. Over topping can drown the cookie's flavor, so keep additions balanced.
Notes
- Choose the right skillet: A 5 inch cast iron skillet produces deep, gooey pockets and crisp edges. Make sure the skillet is well seasoned and at room temperature so the dough bakes evenly. Using a different material or size will change bake time and texture, so adjust accordingly.
- Moderate the oven temperature: If your oven runs hot, lower it by 10 to 15 degrees to prevent the edges from darkening before the center sets. Consistent oven heat ensures balanced browning and a tender interior.
- Distribute chocolate chips evenly: Stir them in gently so every slice gets pockets of melted chocolate. If chips clump, some pieces will be chipless, diminishing the textural contrast.
- Use a mix of sugars: The ratio of granulated to brown sugar controls chew and color, so follow the amounts closely to keep the center soft and the edges caramelized. Substituting sugars will alter the crumb noticeably.
- Let it rest briefly after baking: Cooling for five to ten minutes helps the center set slightly for cleaner slices but preserves that desired gooey quality. Slicing too soon creates a mess, while waiting too long loses the molten charm.