Shrimp Avocado Quinoa Bowls
Shrimp Avocado Quinoa Bowls are a creamy, bright, and easy weeknight dinner that combines nutty quinoa with perfectly seared shrimp and ripe avocado. This light but satisfying bowl is full of contrasting textures and fresh citrus notes, ideal for summer meals or simple meal prep. It comes together quickly, making it a go to when you want flavor without fuss.
Equipment
- Quinoa
- Skillet
- Serving bowls
Ingredients
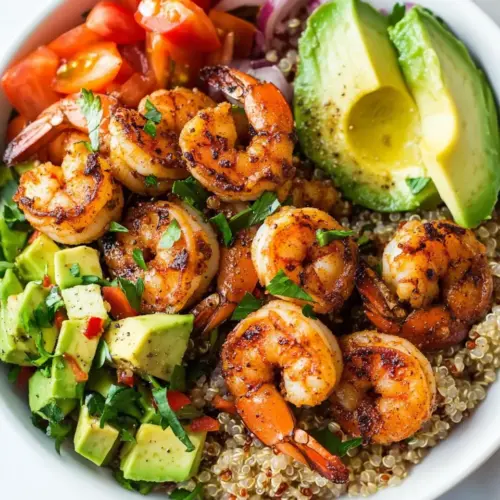
- 1 avocado, pitted and sliced Pitted and sliced to provide creamy texture and healthy fats, enhancing mouthfeel and balancing tangy or acidic dressings. Use ripeness to control firmness so slices hold shape in the bowl. Adds visual appeal and a cooling contrast to spiced shrimp.
- 2 cups chopped romaine lettuce or your favorite greens Chopped to form the fresh green base of the bowl, delivering crispness, fiber, and a mild, slightly bitter flavor that complements richer components. Choose romaine or substitute greens to vary nutrient profile and texture. Provides structure for layering other ingredients.
- 1/2 cup tomato, diced Diced to contribute bright acidity, juiciness, and color contrast that lifts the overall flavor of the bowl. Use ripe tomatoes to add natural sweetness and moisture that pairs well with avocado and shrimp. Acts as a refreshing counterpoint to savory elements.
- 1/4 cup onion, diced (optional) Diced as an optional aromatic to introduce sharpness and crisp texture, intensifying savory notes without overwhelming other flavors. Adjust quantity based on preference for pungency, and consider rinsing to mellow bite. Works well folded into the quinoa or sprinkled over the bowl.
- Lime for dressing Squeezed or zested to provide bright acidity that ties flavors together and acts as a simple dressing for the bowl. Use lime juice to brighten both quinoa and shrimp while balancing richness from avocado and oil. Can be combined with olive oil and seasonings for a quick vinaigrette.
- For the quinoa Prepared separately to describe the cooking method and timing necessary for the grain component of the bowl. Outline steps or seasonings to cook quinoa properly so it’s fluffy and well-seasoned. Serves as a header indicating the following items relate to quinoa preparation.
- 1/2 cup uncooked quinoa, any variety white or golden, red, or black Rinsed and cooked to form the protein-rich grain base of the bowl, providing a nutty flavor and chewy texture. Use any variety—white, golden, red, or black—to change color and bite; adjust water ratio as needed for desired tenderness. Supplies additional plant protein and fiber.
- 1 cup water Measured and boiled with quinoa to hydrate the grains and create a fluffy texture when absorbed, controlling doneness and consistency. Use a precise 1:2 ratio adjustments depending on quinoa variety and rinsing. Infuses the quinoa while cooking and prevents sticking.
- 1/4 teaspoons salt Added during cooking to season the quinoa, enhancing its subtle flavor without overpowering other components. Dissolve into the cooking water for even seasoning; taste and adjust after cooking. Helps bring out the grain’s natural nuttiness.
- For the Shrimp Prepared separately to indicate the shrimp component and its cooking instructions, clarifying seasoning and technique for the protein. Use this section to combine spices and oil before cooking, and to time shrimp so they stay tender. Serves as a header for shrimp ingredients.
- 1/2 pounds shrimp, shelled and deveined Shelled and deveined to provide the main protein of the bowl, offering a delicate, sweet flavor and quick cooking time. Use fresh or thawed shrimp and pat dry before seasoning to ensure proper browning. Supplies lean protein and pairs well with citrus and spices.
- 1 tablespoon olive oil Used to coat the shrimp for cooking and to help spices adhere, contributing richness and aiding in browning. Choose extra-virgin olive oil for flavor and a high smoke point if searing at higher heat. Balances acidity from lime and prevents sticking.
- 1 teaspoon paprika Sprinkled as a warm, smoky spice to give the shrimp depth and color, complementing other seasonings without overwhelming them. Adjust amount to taste for mild smokiness. Works well combined with paprika varieties like sweet or smoked.
- 1 clove garlic, crushed (or 1/2 teaspoon garlic powder) Crushed or substituted to infuse savory, pungent garlic flavor into the shrimp, enhancing umami and aromatic complexity. Use fresh crushed garlic for more vibrant taste or garlic powder for convenience and even distribution. Adds savory backbone to the seasoning mix.
- 1/4 teaspoon EACH salt, onion powder, thyme, oregano, black pepper, cayenne pepper Measured as a blended seasoning mix to evenly flavor the shrimp, providing saltiness, aromatics, herbs, and a touch of heat. Use the combined amounts to create a balanced savory profile; adjust cayenne for spiciness. Ensures consistent seasoning across all shrimp pieces.
Instructions
- To cook quinoa: Start by boiling water for the quinoa. Bring 1 cup of water to boil in a large saucepan. Rinse quinoa under cold water and drain well. Stir in salt and quinoa. Lower heat and cook, covered, for 15 minutes. Turn off heat and let rest, covered, for 5 minutes.: Start by boiling water for the quinoa : The moment you hear the water simmer and see a few vigorous bubbles, that is your cue the pot is ready. Rinsing the quinoa under cold water until the rinse runs clear removes the natural coating that can make it taste bitter, and draining well prevents excess moisture. When you stir in the quinoa and the measured salt , the grains will sink then begin to swell as they absorb the hot water . Lower the heat to a gentle simmer and cover so steam cooks the grains evenly. You should hear a quiet, steady simmer and see tiny bubbles at the edges rather than a wild boil, which can agitate the grains and make them foam. After the timed cook, turning off the heat and letting the pot rest, covered, for five minutes allows the steam to finish cooking the inner core of each grain, producing a light, fluffy texture. A common mistake is lifting the lid too early, which releases steam and yields undercooked or chewy quinoa .
- To Cook the shrimp: While the quinoa is cooking, in a medium bowl, combine the shrimp, garlic, oil, and spices. Heat a large heavy-duty non-stick pan over medium-high heat for 2 minutes. Once the pan is hot, coat the pan with a light drizzle of oil (if using a non-stick pan) and cook the shrimp in batches for 2 minutes per side or until charred and cooked through. Do not over-crowd the pan.: The rinse will remove the outer saponin layer so the cooked quinoa tastes clean and nutty. Use a fine-mesh sieve and run cool water through the grains while gently rubbing them with your fingers; you will notice the water start cloudy and then clear. After draining, the quinoa should look matte and slightly translucent. Proper draining prevents excess steam and sogginess during the cook. If you skip this step, the finished quinoa can be slightly bitter and clump together.
- Divide lettuce (or greens) into two large serving bowls. Top each bowl with half the quinoa, shrimp, avocado, tomato, and onion. Drizzle with lime, sour cream, or your favorite dressing or try our healthy avocado dressing!: Adding the measured salt into the boiling water before the quinoa allows the seasoning to penetrate the grains rather than sit on the surface. Stir briefly so the quinoa is evenly distributed, then cover to trap the steam. You will notice the grains swelling and becoming more translucent within minutes, and the aroma will shift from raw to toasty. Too vigorous stirring while cooking can break the grains and create a mushy texture, so keep interference minimal.
- Lower heat and cook, covered, for 15 minutes: A gentle simmer is key here, you want small steady bubbles around the edges and not a rolling boil. As the quinoa cooks, you will smell a subtle nuttiness and see the grains expand. Keep the lid on so steam does the work, and resist opening it to check early, because each lift drops the temperature and extends the cook. If you find the pot is boiling too hard, reduce the heat slightly to maintain those gentle bubbles; too-high heat can scorch the bottom or evaporate water unevenly.
- Turn off heat and let rest, covered, for 5 minutes: Resting is where texture finalizes, the steam finishing the interior without overcooking the exterior. After five minutes you can fluff the quinoa with a fork to separate the grains and release excess steam. You should notice a light, airy texture and individual grains that are distinct rather than clumped. Skipping this rest will often lead to clumpy quinoa that feels gummy when served.
- To Cook the shrimp: While the quinoa is cooking, in a medium bowl, combine the shrimp, garlic, oil, and spices : Mixing the shrimp with the crushed garlic , measured olive oil , paprika , and the spice blend allows the flavors to adhere and season the protein evenly. You will notice the shrimp develop a glossy coating from the oil and spices, and the aroma of raw garlic and paprika will be prominent. Letting the seasoned shrimp sit briefly helps the flavors meld, but avoid long marination which can change the texture. Over-seasoning at this stage will make the finished shrimp too salty or spicy.
- Heat a large heavy-duty non-stick pan over medium-high heat for 2 minutes: The pan must be hot so the shrimp sears immediately on contact, producing those desirable browned edges and a slightly caramelized exterior. You will hear a faint sizzle as the oil hits the surface, and a properly heated pan prevents sticking and promotes color. Heat for the full two minutes so the metal reaches an even temperature. If the pan is not hot enough, the shrimp will steam and release moisture rather than sear, resulting in a rubbery texture.
- Once the pan is hot, coat the pan with a light drizzle of oil and cook the shrimp in batches for 2 minutes per side or until charred and cooked through: When you add the first batch, listen for an immediate sizzle, that sound signals the Maillard reaction creating savory color and flavor. Cook each side until you see a pink exterior and opaque center, with slight charring at the edges. Working in batches avoids overcrowding, which lowers the pan temperature and prevents browning. The internal texture should be firm yet tender. Overcooking shrimp causes them to curl tightly and become chewy, so watch closely and remove them promptly when done.
- Do not over-crowd the pan: Leaving space between pieces ensures hot air circulates and each shrimp can develop a crisp edge. You will notice that crowded pans produce more steam and less of the satisfying sizzle and browning. If the pan steams instead of sears, work in smaller batches and keep a warm plate in the oven to hold cooked shrimp . A common mistake is rushing and crowding the pan, which sacrifices texture for speed.
- Divide lettuce into two large serving bowls: Start the assembly with a crisp bed of chopped romaine lettuce so each bowl has a refreshing base. The cool lettuce offsets the warm components and adds a crunchy mouthfeel. Arrange the leaves evenly so toppings are balanced across both bowls. If you mound everything in one corner, some bites will be all starch or all protein, missing the intended balance.
- Top each bowl with half the quinoa, shrimp, avocado, tomato, and onion: Layer the warm quinoa first so it warms the bowl, then arrange the sliced avocado where it will remain intact and visible. Scatter the seared shrimp and diced tomato for color contrast, and add the optional diced onion sparingly to prevent overpowering the other flavors. The visual appeal matters; when each ingredient is placed thoughtfully you get harmonious bites. A frequent error is mixing everything too early, which can soften the romaine lettuce and dull the textures.
- Drizzle with lime, sour cream, or your favorite dressing: Finishing with a squeeze of fresh lime brightens the bowl and balances the avocado richness and the seasoned shrimp . If using a creamy element like sour cream or a dressing, add it sparingly so it complements rather than overwhelms. Taste and adjust at the end; acidity and salt will elevate the overall profile. Using bottled dressings can mask nuanced flavors, so I often prefer a simple fresh squeeze of lime .
Notes
- Rinse the quinoa thoroughly before cooking, this removes the natural bitterness and helps the grains separate.
- Dry the shrimp well with paper towels so they sear instead of steaming, which gives better texture and color.
- Preheat the pan properly for two minutes on medium high so the shrimp get an immediate sizzle and develop caramelized edges.
- Let the quinoa rest covered for five minutes after cooking to finish via steam, resulting in light, fluffy grains.
- Slice avocado last and add it to each bowl right before serving to avoid browning and preserve creaminess.
- Measure spices precisely to keep the balance between heat and savory notes, especially with cayenne and salt.