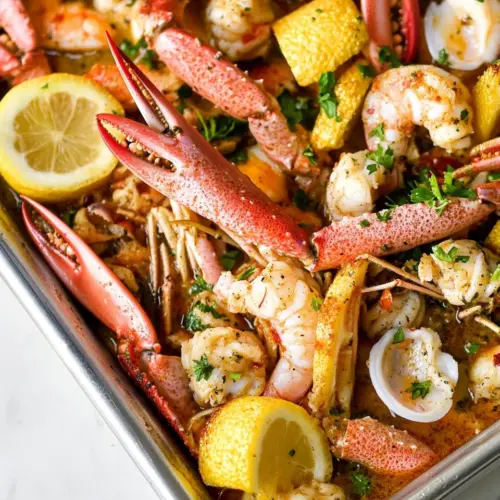
Sheet Pan Seafood Boil
Sheet Pan Seafood Boil brings together juicy shrimp, snowy crab legs, smoky kielbasa, and roasted potatoes with sweet corn in a buttery, citrusy finish. This easy crowd pleasing summer meal is crispy at the edges and bright with lemon and Old Bay seasoning, perfect for an easy weeknight dinner or a laid back gathering. Make it when you want bold flavor with minimal fuss.
Equipment
- Large rimmed baking sheet
- Parchment Paper
- Oven
- Tongs
Ingredients
- 1 1/2 pounds jumbo raw shrimp fresh or thawed Peel and devein shrimp, providing the primary seafood protein and tender texture; cook briefly to avoid toughness and retain sweetness. Season lightly prior to roasting and arrange on the pan so juices mingle with other components. Shrimp absorb flavors quickly and finish cooking faster than other items, so add later if components need longer roasting.
- 1 1/2 pounds snow crab legs fresh or thawed Split or crack snow crab legs to expose meat and contribute a sweet, briny shellfish flavor and substantial, easy-to-eat portions. Arrange legs around other ingredients so their natural juices enhance the overall dish. Crab adds a delicate seafood contrast that pairs well with butter and citrus.
- 1 pound kielbasa sausage beef or turkey Slice kielbasa into thick rounds to add smoky, savory richness and a meaty component that holds up to high heat. Browning during roasting develops caramelized edges and deep flavor, complementing the seafood and vegetables. Sausage fat renders and seasons the pan, helping to create a cohesive flavor profile.
- 1 pound baby potatoes 1-2 inches Halve or leave baby potatoes whole depending on size; provide a starchy, filling base that soaks up seasonings and pan juices. Roast until tender with a crisp exterior, ensuring even cooking by choosing uniform sizes. Potatoes balance the seafood and sausage while carrying the dish's savory flavors.
- 4 ears corn on the cob Cut corn into thirds or halves to contribute sweet, crisp kernels and an attractive, summery element to the sheet pan. Roast until slightly charred to concentrate sweetness and add texture contrast. Corn juices mingle with butter and seasoning, brightening each bite.
- 1 onion Peel and quarter the onion to add aromatic depth and savory sweetness as it caramelizes on the sheet pan. Slices help build a flavorful base and release moisture that mingles with other ingredients. Onions also provide textural variation and help balance richer components.
- 1 tablespoon olive oil Drizzle olive oil over components to facilitate even roasting and promote browning while preventing sticking. Oil carries seasonings and helps coat vegetables and proteins for uniform flavor development. Use sparingly to avoid excess grease while ensuring crisp edges.
- 1 tablespoon Old Bay seasoning Sprinkle Old Bay seasoning to introduce a classic blend of savory, spicy, and aromatic notes that enhance seafood without overpowering it. Dust liberally over the pan so each component picks up the characteristic flavor. Old Bay ties together shrimp, crab, and sausage with a cohesive seasoning profile.
- 2 lemons halved Squeeze lemon halves over the finished dish to add bright acidity that cuts through richness and elevates seafood flavors. Roast the lemon halves alongside or serve fresh for maximum juice and aroma. Lemon juice balances butter and sausage fat while refreshing the palate.
- 3 tablespoons melted butter Brush melted butter over the assembled ingredients to add rich, silky flavor and help carry seasonings across the pan. Butter melds with seafood juices and enhances the indulgent mouthfeel of the dish. Use melted butter as a finishing touch or baste during roasting for added gloss.
- 1 tablespoon chopped parsley Sprinkle chopped parsley as a fresh, herbaceous garnish that adds color, mild bitterness, and a clean finish to the rich seafood boil. Scatter just before serving to preserve vibrant green appearance and fresh aroma. Parsley brightens flavors and provides a pleasant contrast to heavier elements.
- Salt and pepper Season with salt and pepper to adjust and elevate all flavors, ensuring balanced seasoning across proteins and vegetables. Add gradually and taste as you go to prevent oversalting, especially with pre-seasoned components like Old Bay or sausage. Pepper provides subtle heat while salt enhances overall taste.
Instructions
- Preheat the oven to 450 degrees F. Line a large rimmed baking sheet with parchment paper. Place the potatoes on the baking sheet and drizzle with oil. Salt and pepper, then roast in the oven for 20 minutes. (If the potatoes are larger than the shrimp, cut them in half before roasting.): You will notice the warm blast of the oven when you open it, and a high temperature is crucial for developing golden edges on the potatoes and charring the corn . The hot environment helps the kielbasa sausage render and brown, which adds depth. A common mistake is under preheating, which causes soggy textures, so wait until the oven reaches temperature. If your oven runs hot, watch the potatoes early to prevent burning.
- Meanwhile, cut the sausage into 1/2-inch slices. Slice the onion into 1/2-inch wedges. Cut each ear of corn into 4 pieces.: The parchment limits sticking and makes cleanup simple, while the rim catches juices so the oven stays clean. You should hear a faint crackle as juices hit hot metal, which helps caramelization. Avoid overcrowding the pan, or ingredients will steam instead of roast, which reduces flavor complexity.
- After the potatoes have roasted, add the sausage, onions, and corn to the sheet pan. Sprinkle with Old Bay seasoning and place back in the oven for 10 minutes.: You will want the potatoes to sizzle slightly when they hit the hot sheet, that initial sound indicates good contact for browning. The oil distributes heat and promotes a crisp skin, creating a contrast with the soft interior. If you skip oil the potatoes can dry out and stick, making them hard to turn later.
- Move the sausage and veggies to the sides of the sheet pan. Spread the shrimp across the middle of the pan in a single layer. Sprinkle with Old Bay Seasoning. Then lay the crab legs across the shrimp. Place the sheet pan back in the oven for approximately 5 minutes, or until the shrimp are pink.: Proper seasoning of the potatoes at this stage builds layers of flavor that carry through the dish. Sprinkle evenly so each bite tastes seasoned, and taste a roasted piece near the end to adjust if needed. Over salting is the usual error when you season everything the same, so err on the lighter side and finish at the end if necessary.
- Remove from the oven. Drizzle the entire pan with the juice of half a lemon and melted butter. Toss to coat. Then garnish with parsley and extra lemon.: During this time the potatoes will soften inside and begin to form a golden crust on the outside, producing a toasty aroma that fills the kitchen. Use a fork to test tenderness at about 18 minutes, you want them tender but not falling apart. If potatoes vary in size, cut the larger ones so they cook evenly, otherwise you will end up with some undercooked pieces.
- Cut the sausage into 1/2-inch slices: As you slice the kielbasa sausage , notice the fat exposed on each round which will render and baste nearby ingredients, adding savory richness. Even slices ensure uniform cooking and attractive presentation. Cutting them too thick can leave them undercooked in the center, while too thin can make them dry out.
- Slice the onion into 1/2-inch wedges: The onion wedges will soften and caramelize at the edges, giving sweet, savory pockets of flavor amid the pan. The wedge shape keeps the pieces intact so they can be scooped up with the seafood. Thin slices will disintegrate and lose their pleasant structure, so keep the wedges chunky.
- Cut each ear of corn into 4 pieces: When you cut the corn on the cob into segments the edges expose kernels that char and release an earthy sweetness under high heat. Those browned bits pair beautifully with buttery shellfish. Avoid cutting them too small or they will dry out quickly and become starchy rather than juicy.
- After the potatoes have roasted, add the sausage, onions, and corn to the sheet pan: You should hear a renewed sizzle as the new items contact the hot pan, and the sausage fat will mingle with the pan juices to coat the vegetables. This step layers flavor, ensuring everything picks up some of the roast and seasoning. If you crowd the pan now, you will steam rather than roast, losing those caramelized edges.
- Sprinkle with Old Bay seasoning and place back in the oven for 10 minutes: The aroma of Old Bay seasoning will become more pronounced as it toasts slightly, infusing the sausage and vegetables. Ten minutes warms and browns these items so they will match the final seafood cook time. A typical error is under seasoning at this stage, which results in a flat final dish, so be confident but moderate with the spice.
- Move the sausage and veggies to the sides of the sheet pan: Creating a central space for the shrimp allows them to cook evenly in a single layer, ensuring even pinking and slight caramelization. The sausage and veggies at the edges will continue to brown without overcooking the delicate shellfish. If you leave everything piled together, the shrimp will steam and lose their texture.
- Spread the shrimp across the middle of the pan in a single layer: When the shrimp hit the hot surface you will hear a light sizzle, and they will begin to turn from gray to translucent to pink quickly. A single layer prevents crowding and ensures each shrimp gets direct heat, yielding a firm, springy bite. Overlapping causes uneven cooking and rubbery texture, which is the most common mistake here.
- Sprinkle with Old Bay Seasoning: Dusting the shrimp with seasoning right before they go back in the oven gives them a concentrated crust of flavor. The seasoning toasts quickly against the hot metal, releasing aroma and creating contrast with the buttery finish. If you oversalt earlier, this step can make the pan too salty, so always taste a small piece if unsure.
- Then lay the crab legs across the shrimp: The snow crab legs sit on top to warm through and pick up butter and seasoning without needing long heat. Their shells will glisten as they heat, and the meat inside will reheat gently. Leaving them too long in intense heat can dry the meat, so coordinate timing with the shrimp .
- Place the sheet pan back in the oven for approximately 5 minutes, or until the shrimp are pink: The final few minutes are sensory gold, watch for the shrimp to turn uniformly pink and curl slightly, and for the butter to bubble at the edges. That visual cue tells you they are done; undercooked shrimp feel limp, overcooked shrimp feel tough. Because ovens vary, check at four minutes to avoid overshooting.
- Remove from the oven: Bringing the pan out releases an irresistible steam of lemon and spice, and the immediate visual of glistening seafood signals readiness. Resting for a minute lets juices settle and prevents people from burning their fingers. Removing too late risks drying the delicate shellfish, so act promptly.
- Drizzle the entire pan with the juice of half a lemon and melted butter: The acidity of the lemons brightens the rich, buttery coating, balancing savory notes and lifting the dish. The melted butter seals in gloss and carries the seasoning across every component. Too much acid can overpower, so start with half a lemon and add more to taste.
- Toss to coat: Tossing distributes the juices and butter so each bite has a mix of textures and flavors, and you will see a shiny glaze on the seafood and vegetables. Use tongs or a spatula to gently turn pieces without breaking delicate crab legs. Vigorous tossing can damage the crab shells and shred the vegetables, so be gentle.
- Then garnish with parsley and extra lemon: A sprinkle of chopped parsley refreshes the palette and adds color, while additional lemon wedges invite guests to add brightness as they like. Serve immediately so the textures remain vivid, and the warmth is at its best. Skipping fresh garnish will make the presentation less vibrant, and the dish can feel a touch heavy.
Notes
- Preheat properly Allow the oven to reach 450 degrees F before placing the pan inside, this ensures the potatoes start browning immediately and the final sear on the shrimp is crisp.
- Dry the shrimp Pat the shrimp with paper towels so seasoning and butter cling, preventing them from steaming and ensuring a snappy texture.
- Stage ingredients Roast the potatoes first because they need the longest time, then add sausage, corn, and onion, and finish with the seafood to sync doneness.
- Use parchment Line a rimmed sheet with parchment to make cleanup fast and to prevent small pieces from sticking and burning.
- Taste for seasoning at the end After the butter and lemon finish the pan, taste a small piece to adjust salt, pepper, or additional lemon for balance.
- Serve immediately This dish is best hot from the oven when textures are vibrant and the butter is glossy, delay will soften and dilute flavors.