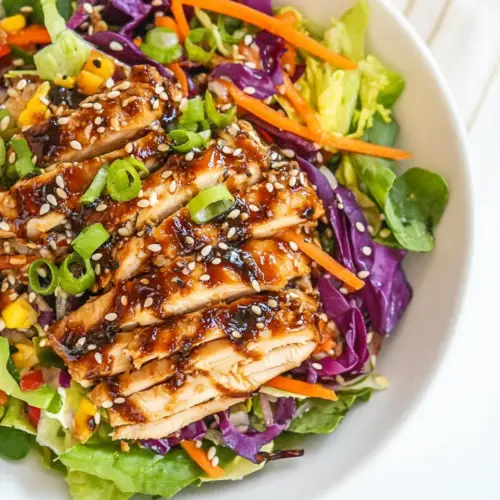
Sesame Ginger Chicken Salad
Sesame Ginger Chicken Salad is a crunchy, savory bowl featuring tender chicken, crisp cabbage, and a creamy sesame ginger dressing. This easy weeknight dinner blends nutty toasted sesame, bright rice vinegar, and a touch of maple for balanced flavor, making it both satisfying and refreshing. Make it to bring bold, fresh tastes to your table with minimal fuss.
Equipment
- Oven
- Baking Sheet
- Blender
- Mixing Bowl
- Zip-lock bag
- Cutting Board
Ingredients
- 1 lb boneless skinless chicken thighs Provide tender, juicy protein that forms the salad's hearty base; marinate and sear or grill to develop savory caramelization and depth of flavor suitable for shredding or chopping into bite-sized pieces.
- 2 tbsp avocado oil Offer a neutral, high-heat fat for cooking the chicken without imparting strong flavors; use to sear thighs evenly and to help carry marinade and dressing flavors throughout the dish.
- 2 tsp sesame oil Contribute robust sesame aroma and a toasty finish; add in small amounts to boost umami and complement Asian-inspired dressings and marinades.
- 1 tbsp fish sauce Impart deep, savory umami and a salty complexity that enhances the chicken and dressing; use sparingly to layer flavor and balance sweetness and acidity in the sauce.
- 5 cloves garlic minced Deliver pungent, aromatic heat and savory depth when minced; incorporate into the marinade and dressing for bright, garlicky notes that meld with other bold flavors.
- 2 tbsp pure maple syrup Add natural sweetness and gentle caramelized richness; balance salty and acidic elements in both marinade and dressing while lending a sticky glaze to cooked chicken.
- 1/4 cup coconut aminos or soy sauce Provide a savory, slightly sweet salty element as a soy alternative; use to season the chicken and dressing while offering a gluten-free option if coconut aminos are chosen.
- 2 tsp sriracha optional Introduce concentrated chili heat and tangy spice when desired; stir into marinades or dressings to give the salad a defined kick and lift other flavors.
- 3 tbsp rice vinegar Bring bright acidity and mild sweetness to balance oils and sweeteners; use in the dressing to brighten flavors and help tenderize the chicken if included in the marinade.
- 1 tsp ground ginger Offer warm, slightly peppery spice that reinforces ginger flavors; integrate into the marinade or dressing for consistent aromatic warmth throughout the salad.
- 1/4 tsp sea salt to taste Season and enhance overall taste, helping to amplify other ingredients; add to the chicken, marinade, and dressing judiciously to achieve balanced seasoning to taste.
- 4 cups green cabbage thinly sliced Provide crisp, refreshing crunch and mild vegetal flavor as the primary salad bulk; thinly sliced to create texture contrast against tender chicken and creamy dressing.
- 3 cups purple cabbage thinly sliced Offer colorful, slightly peppery crunch and visual interest; thin slicing keeps texture delicate while contributing to the salad's overall structure and mouthfeel.
- 2 cups baby spinach or spring greens, romaine lettuce, or greens of choice, chopped Contribute leafy freshness and a tender base for tossing; chop to manageable pieces and combine with sturdier vegetables to add a soft green component and nutritional value.
- 2 cups grated carrot Add natural sweetness, moisture, and crisp texture when grated; contribute to visual appeal and help meld other ingredients together with their fine strands.
- 1 red bell pepper cut into matchsticks Provide sweet, crisp snap and bright color with crunchy matchstick texture; add a refreshing contrast to softer greens and protein elements.
- 5 green onions chopped Infuse sharp, oniony bite and fresh herbal aroma when chopped; distribute throughout the salad to add pops of pungent flavor in each bite.
- 1 cup roasted cashews Deliver rich, buttery crunch and savory-sweet notes as a crunchy topping; roast to enhance flavor and provide satisfying texture contrast to tender ingredients.
- 1/2 cup dried cranberries Introduce chewy bursts of sweet-tart flavor for contrast; scatter sparingly to balance savory and nutty elements while adding color and chew.
- 1/4 cup avocado oil or olive oil Serve as a neutral-flavored base oil for dressings or finishing; use to emulsify vinaigrettes and gently coat salad components without overpowering other flavors.
- 2 tbsp toasted sesame oil Provide toasted, deeply aromatic sesame flavor and sesame oil’s characteristic nuttiness; incorporate into the dressing to emphasize Asian-inspired flavor profiles.
- 2 tbsp peanut butter almond butter, tahini, or sunflower seed butter Act as a creamy, nutty-thickening agent that adds body and depth to dressings; blend into vinaigrettes to create a smooth, rich texture and pronounced nut flavor.
- 3 tbsp liquid aminos or soy sauce Offer salty, umami seasoning to replace or complement soy sauce; use in the dressing to heighten savory notes and balance sweetness and acidity.
- 1/4 cup rice vinegar Bring mild acidity and subtle tang to the dressing; help emulsify oils and brighten flavors while adding a clean, rice-vinegar character.
- 2 tbsp pure maple syrup Contribute gentle sweetness and viscosity to balance salty and acidic components; use to round out the dressing and harmonize overall flavor.
- 1 small clove garlic peeled Add fresh pungency and aromatic bite when peeled and minced; incorporate into the dressing to deliver crisp garlic heat that complements the other savory ingredients.
- 2 tsp fresh ginger peeled and grated Provide bright, zesty warmth and sharp ginger aroma when freshly grated; use to enliven the dressing and reinforce the sesame-ginger flavor theme.
Instructions
- Combine all of the ingredients for the dressing in a blender (such as a Magic Bullet or Nutribullet) or food processor and blend until smooth.: The moment you engage the blender you should notice the fragrance of fresh ginger and garlic bloom, followed by the nutty perfume of toasted sesame oil . The goal here is a velvety emulsion where the oils and vinegars have fully integrated into a glossy dressing. If the dressing seems separated, pulse and scrape down the sides until smooth. A common mistake is over diluting with too much vinegar, which makes the dressing sharp, so add vinegar gradually. Visually you want a ribboning consistency, and on the palate it should feel balanced between tang, sweet, and savory. The blender noise will change from a higher pitch to a steady hum as the components homogenize, and the scent will become more cohesive.
- Store in an airtight jar or container in the refrigerator until ready to use. Dressing stays fresh for up to 1 week.: Chilling the dressing lets the flavors marry, mellowing raw edges while preserving brightness. Place it in a sealed jar and refrigerate, and you will notice the aroma deepen over a few hours. Avoid keeping it at room temperature for extended periods to maintain food safety. If the oil solidifies slightly in cooler refrigerators, let it sit at room temperature for a few minutes and shake well before using to restore pourability. Label the jar with the date, and you will keep track of freshness easily.
- Add all of the ingredients for the marinade (everything but the chicken) to a small bowl and whisk until well-combined. You can also use a small blender for this step.: As you whisk the marinade, aromas of maple syrup and sesame oil should rise, indicating the balance of sweet and savory is aligning. The whisking action helps dissolve the maple and distributes the aromatics evenly, ensuring every piece of chicken will pick up flavor. Avoid vigorous heating or microwaving the marinade, which can alter delicate tastes. A typical misstep is not stirring until the maple fully dissolves, leaving streaks of sweetness concentrated in spots. Aim for a glossy mixture that clings slightly to a spoon.
- Transfer the boneless chicken thighs to a zip lock bag or a small container along with the marinade. Seal it and move everything around until the chicken is coated in marinade. Refrigerate for at least 20 minutes, ideally several hours (up to 24 hours).: When you move the chicken into the bag, press out extra air and massage the marinade over each piece so it adheres evenly. The tactile process helps the flavors penetrate surface proteins, and you may feel the marinade coat the chicken in a thin film. Refrigerate for at least 20 minutes, ideally several hours up to 24 hours, to let the salt and acids work. A frequent error is under marinating which yields less flavored meat, while over marinating in acid heavy blends can alter texture, so stick within recommended windows.
- When you’re ready to bake the chicken thighs, preheat the oven to 420 degrees F. Transfer the chicken, including the marinade to a large casserole dish or large rimmed baking sheet or baking dish. Bake the chicken thighs for 15 minutes.: A very hot oven jump starts browning and crisping on the surface, creating the caramelized notes we love. Allow the oven to reach temperature fully so the initial blast of heat sears the exterior of the chicken . If you place the chicken in too cool an oven, it will steam rather than brown, producing a paler, less flavorful crust. The visual cue of golden edges after the first stage signals readiness for the next step.
- Remove the chicken from the oven and baste it thoroughly by spooning the juices over top of the breasts. Adjust the oven to the High Broil setting and broil the chicken for 5 to 8 minutes, or until it is golden brown and the juices have begun to caramelize. Spoon the juices over the chicken again.: The baking phase gently cooks through while converting sugars to golden color, and you should hear a faint sizzle as juices begin to release. This is the stage where the inside comes up to safe temperature and the outside begins to build a caramel layer. Avoid crowding the pan, which traps steam and prevents proper browning. Check that juices run clear and the surface has taken on a warm amber tone before moving on.
- Transfer the chicken thighs to a cutting board and allow them to cool for at least 10 minutes. Use a sharp knife to cut the thighs into strips. Note: you can serve the chicken hot or transfer it to an airtight container and refrigerate it until chilled if you prefer your chicken cold.: Basting redistributes flavorful juices and keeps the surface moist, enhancing the eventual glaze. As you spoon, the aroma intensifies and you will see glossy, caramelized spots form. This step prevents dryness and helps the final broil create a lacquered finish. Mistakes include skipping the basting which yields a drier exterior. After basting, adjust the oven to the High Broil setting for the next stage.
- Thinly slice the green cabbage and red cabbage, chop the spinach, bell pepper, and green onion, and grate the carrots. Add all of the chopped veggies to a large mixing bowl along with the dried cranberries and cashews.: Under the intense broil the sugars in the marinade will bubble and darken, producing crackling edges and a deep toasted aroma. Keep the oven door slightly ajar if your oven design allows better observation, and watch closely to avoid burning. The sound will change to occasional popping as caramelized bits form. Over broiling is the main pitfall here, so err on the shorter side and check frequently. Once you see a glossy, browned finish, remove and spoon juices over the chicken again for extra shine.
- Pour all of the dressing over the salad ingredients (or use the amount that you want). Toss the salad until everything is coated in dressing.: Resting lets internal juices redistribute, keeping the chicken moist when sliced. You will notice less juice escaping when you cut, and the texture will be juicier. Cutting too soon causes an immediate rush of juices and a dryer mouthfeel. After 10 minutes, use a sharp knife to slice into strips, noting the even color and slightly glossy interior as indicators of proper doneness.
- Serve the salad with sliced Asian chicken thighs on top with a sprinkle of sesame seeds.: As you assemble the vegetables, the bowl will begin to smell fresh and green, with sweet cranberry notes and nutty cashew aroma. Tossing the components together ensures even distribution so every forkful includes crunchy, soft, sweet, and savory elements. Be mindful to slice thinly so the salad is easy to eat, and avoid piling too much dressing too soon which can make the cabbage limp. A uniform cut improves presentation and mouthfeel.
- Pour all of the dressing over the salad ingredients or use the amount that you want and toss the salad until everything is coated in dressing: The visual cue you want is an even sheen on the cabbage and greens, not puddles at the bottom. Toss gently until each strand of cabbage and leaf has a light coating. The first inhalation should be of bright ginger and sesame aromatics, and the texture should be crisp with a hint of gloss. Overdressing will weigh the salad down, so start with less and add more as needed.
- Serve the salad with sliced Asian chicken thighs on top with a sprinkle of sesame seeds: Arrange sliced chicken over the dressed salad and finish with sesame seeds for a final nutty pop. The contrast of warm or chilled chicken against crunchy vegetables and creamy dressing creates a satisfying plate. A common serving mistake is mixing the sliced chicken in too early which can make it soggy; present it on top for best texture. Enjoy the layered aromas and the bite of toasted seeds as the finishing flourish.
Notes
- Make the dressing ahead to let flavors meld overnight, which deepens the ginger and sesame notes and saves time on the day you plan to serve.
- Pat the chicken dry before marinating so the marinade clings evenly and the surface browns more effectively when baked and broiled.
- Slice cabbages very thin so they remain tender to the bite and toss easily with the dressing, preventing any overly fibrous mouthfeel.
- Reserve some cashews to add on top at the end for extra crunch and visual appeal, rather than mixing them in where they can soften.
- Use a high sided baking sheet when baking the chicken to catch drips and allow easy basting without making a mess.
- Adjust sweetness gradually in the dressing, tasting as you go so the maple syrup complements but does not overpower the savory elements.