Serbian Easter Bread Uskršnja Pogača
Serbian Easter Bread Uskršnja Pogača is a tender, slightly tangy enriched loaf with a glossy finish and delicate braids and roses. The dough blends yogurt and butter for a soft crumb and pleasant aroma, making it perfect for holiday tables or cozy breakfasts. Make it for its showstopping appearance and comforting flavor, an easy centerpiece that invites sharing.
Equipment
- Springform pan 26 cm
- Mixing Bowl
- Pastry Brush
- Oven
- Cooling rack
Ingredients
- 200 ml warm milk Warm and slightly milky liquid that activates yeast and helps dissolve sugar; contributes to a tender crumb and aids in dough fermentation when mixed with flour.
- 1/2 cube fresh yeast Fresh compressed yeast that provides natural leavening through fermentation; crumbled into warm milk to proof and create carbon dioxide for dough rise.
- 4 – 5 tablespoons sugar about 80 g or to taste Sweet granular ingredient that feeds the yeast during proofing and adds balanced sweetness; adjust quantity to taste to influence browning and flavor.
- 500 g flour type 550 Versatile wheat flour with moderate protein content that forms the dough structure; develops gluten when hydrated and kneaded to provide elasticity and chewiness.
- 1 sachet baking powder Dry chemical leavening agent that offers additional lift and lightness; used alongside yeast to ensure reliable rising and slightly tender texture.
- 1 pinch of salt Mineral enhancer that strengthens flavor balance and regulates yeast activity; added sparingly to control dough behavior and enhance overall taste.
- 100 g yogurt Cultured dairy product that adds moisture, slight acidity, and tenderness; contributes to softness, richer flavor, and improved shelf life of the bread.
- 80 g soft butter Soft dairy fat that enriches dough, increases tenderness, and improves crumb softness; incorporated to produce a richer mouthfeel and enhanced browning.
- 1 egg yolk use egg white for coating Separated egg component rich in fats and emulsifiers that enriches dough, adds color, and contributes to structure while egg white is reserved for glazing.
- 1 tsp sesame/poppy seeds for garnish, optional Crunchy garnish option providing visual contrast and subtle nutty or toasted flavor; sprinkled on top before baking for decorative finish and texture.
Instructions
- Line a springform pan (26 cm/ ~10 inches diameter) with baking paper and lightly grease the sides.: The pan preparation creates a nonstick base and vertical support for the shaped loaf, which helps the braid and surrounding rolls keep their form while baking. You should hear a faint rustle as the paper settles and feel the gentle drag when greasing, which ensures the dough will release cleanly. I prefer to press the paper into the bottom with my fingers so it sits flat, then use a pastry brush or a paper towel to coat the sides with a thin film of butter or oil. A common mistake is leaving the paper wrinkled or not greasing the sides enough, which can cause the sides to stick or distort when you remove the ring. If your pan is slightly larger, the shapes will spread more, so aim for a 26 cm size for the intended presentation.
- Dissolve the yeast and sugar in the milk. Add the remaining ingredients and knead for 4-5 minutes until smooth. Cover and let rise for about 15 minutes.: When the yeast and sugar meet the warm milk , you should see tiny bubbles or foam forming within a few minutes, a visual cue that the yeast is alive. After adding the rest of the ingredients including flour , yogurt , butter , egg yolk , baking powder and salt, knead the dough so it develops a smooth, elastic surface that springs back when pressed. The tactile sensation matters here, you will feel the dough change from shaggy to cohesive as gluten develops. Covering it and letting it rest in a warm corner for about 15 minutes creates a short, controlled rise that relaxes the dough for easier shaping. One pitfall is overworking the dough at this stage, which can result in a tight crumb, so aim for confident but not aggressive kneading. If the dough feels too sticky, add a little flour spoon by spoon, but avoid making it dry.
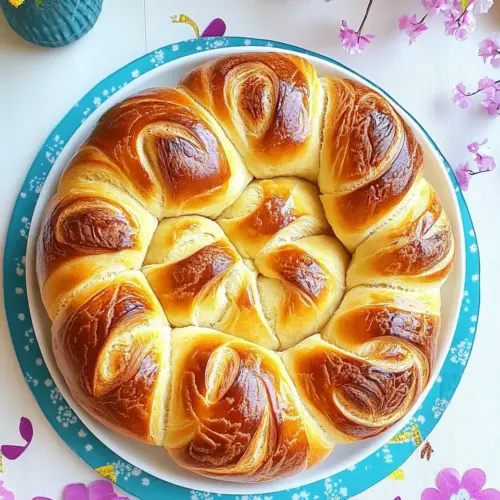
- Divide the dough into 3 balls. One of them should be a little smaller, which will be the middle one for the braid, so that it doesn't rise so much. Divide the middle ball into 3 parts, form them into 3 strands of equal length and braid them into a pigtail and press them together a bit. Place in the center of the springform pan and brush with the egg white.: As you portion the dough, you should notice differences in elasticity; the slightly smaller middle ball will result in a braid that sits lower, creating a pleasing central crown. Roll the middle ball into three equal strands, feeling their smoothness as you even out thickness so the braid bakes uniformly. The sound of the strands sliding under your hands is quiet and satisfying. After braiding, press the ends together firmly so they do not unravel during the second rise. Placing the braid in the center of the pan gives you a visual anchor for arranging the surrounding pieces. Brushing the braid with egg white before arranging other elements helps seeds adhere later and gives a gentle gloss once baked. Avoid making strands of very different thickness, otherwise the thinner parts can overbake while the thicker parts remain underdone.
- Roll out 1 more ball and cut out 12 circles, overlap each 4 circles slightly and roll up. Cut in the middle – now you have 2 roses, shape the roses a bit by bending the leaves a bit. Add the remaining dough to the last ball, form 16 balls, and place them all around the springform pan. Put roses on the braid and brush everything with egg white. Cover and let rise in a warm place for 15 minutes.: Working with the next ball, roll it to a gentle thickness and use a round cutter or glass to cut 12 equal circles. Overlapping four circles and rolling them creates petal layers that, when cut in the middle, open into two rose shapes. Shape each rose by curling the outer edges slightly so they look like unfolding petals, which gives visual depth after baking. With the final ball, forming 16 small rounds and arranging them around the pan frames the braid and gives a pleasing wreath of rolls. After positioning everything, brush once more with egg white to ensure a uniform sheen and seed adhesion. Letting the assembled loaf rise in a warm place for another 15 minutes allows the shapes to puff gently and attain loft. A common error is rushing this second rise; if you skip it, the final loaf can be dense and the shapes may not separate as intended. Pay attention to gentle expansion rather than a full explosion of volume.
- Sprinkle with poppy and sesame seeds, if like.: The simple act of sprinkling seeds changes the loaf’s profile, offering a contrast in texture and a toasty note after baking. Gently tap a pinch of poppy seeds or sesame seeds over the egg white coated surface, watching how they catch on the glossy layer. The seeds will toast in the heat of the oven and add a pleasing aroma that becomes noticeable as the loaf nears readiness. One tip is to avoid overloading any single area with seeds, which can mask the golden crust beneath. If you have small hands, use them to distribute seeds for even coverage.
- Bake the Easter bread in a preheated oven at 180°C (356°F) top/bottom heat for about 20-25 minutes until golden and let it cool on a cooling rack.: As the bread bakes, aromas of butter and warm grain will fill your kitchen and the crust will develop a rich golden color. You may hear faint crackling as the crust sets, which is a good sign of proper baking. Test for doneness by looking for an even golden top and a hollow sound when you gently tap the bottom once removed from the pan. Using 180°C 356°F with top and bottom heat ensures even browning; convection ovens may require a slightly lower temperature or shorter time. A common mistake is opening the oven frequently to peek, which can knock heat and affect rise, so limit checks and use the visual cues instead.
- After you remove from the oven, let sit in the pan for 15 minutes.: Allowing the bread to sit briefly helps the crumb set and prevents the loaf from collapsing as the internal steam redistributes. You will notice a softening of the immediate heat and a gentler release of aroma as it rests. This short wait also makes it safer to remove the springform ring without deforming the shapes. If you rush this step and force removal while too hot, the loaf can squish or lose its edges, so be patient and use oven mitts for safe handling.
- Remove the sides of the pan. Brush with butter on top and on the sides. Cover with a towel and allow to cool completely.: Removing the pan sides reveals the final silhouette, and brushing with warm butter adds sheen, flavor, and a slight softness to the crust. Use a pastry brush and glide the butter over the top and sides while the bread is still slightly warm so it absorbs nicely. Covering with a clean towel during cooling traps gentle moisture and prevents an overly hard crust while preserving a tender crumb. A mistake to avoid is leaving the bread uncovered to cool in a dry draft, which can toughen the crust unnecessarily.
Notes
- Proof the yeast correctly Test the yeast in warm milk with a pinch of sugar first so you know it is active, watching for foaming within a few minutes.
- Measure flour by weight If possible, weigh the flour to achieve consistent dough hydration and avoid a too dry or too wet mixture that affects shaping.
- Keep butter soft not melted Soft butter incorporates evenly into the dough and creates a tender crumb, whereas melted butter can change the dough’s structure.
- Gentle second rise Allow the assembled loaf a modest rise in a warm draft free spot so the shapes puff without overproofing and losing definition.
- Use egg white for sheen Brushing with egg white provides a subtle gloss that enhances seed adhesion and the final presentation of the loaf.
- Cool under a towel After brushing with warm butter, cover the loaf with a towel to keep the crust tender while it finishes cooling.