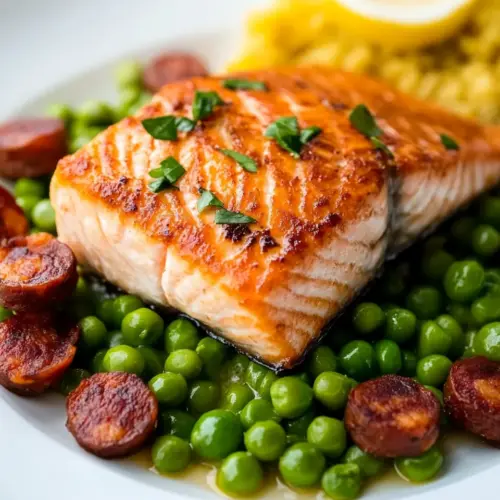
Seared Salmon with Peas and Chorizo
Seared Salmon with Peas and Chorizo is a quick, flavorful weeknight dinner featuring crisp skinned salmon, smoky chorizo sausage, and bright peas. The dish combines crisp textures and savory oils for a satisfying meal that is elegant yet easy. Perfect for an easy weeknight dinner or casual entertaining, it delivers big taste with minimal fuss.
Equipment
- Large heavy based fry pan
- Slotted Spoon
- Saucepan
Ingredients
- 3 cups frozen peas Frozen and ready-to-use, adds bright sweetness and pops of color to balance richer components; steam or simmer briefly to retain texture and vibrant green. Incorporate at the end of cooking to prevent overcooking and preserve nutrients and fresh flavor.
- 4 oz chorizo sausage Crisp and richly spiced, provides smoky, savory fat that flavors the entire pan while adding a robust meaty bite; crumble or thinly slice before cooking to render its oils. Use its rendered fat to sauté aromatics and finish the dish with concentrated chorizo flavor.
- 4 skin on salmon fillets (6 oz/170 g each) Skin-on and portioned for searing, supplies tender flaky flesh and the skin crisps to deliver contrasting texture and visual appeal; choose even-thickness fillets for uniform cooking. Pat dry and sear skin-side down to render fat and achieve a golden, crisp exterior.
- 1 shallot Finely minced or thinly sliced, offers a delicate onion-like sweetness and mild pungency that complements both peas and chorizo without overpowering them; sweat gently to develop sweetness. Add early in the pan to soften and release flavor into the cooking fat.
- 1 teaspoon olive oil Light-bodied and fruit-forward, provides a neutral frying medium to prevent sticking while helping aromas meld; measure sparingly to avoid excessive oiliness. Warm the oil briefly before adding seafood or chorizo to promote even browning.
- salt Essential seasoning to enhance natural flavors and balance richness; use sparingly and taste as you go to avoid over-salting, especially when cured meats are present. Sprinkle at finishing for bright seasoning or during cooking for deeper integration.
- ground white pepper Subtle and aromatic, elevates delicate flavors with a gentle heat that complements rather than overwhelms; grind fresh for the best fragrance. Use a light dusting to accent the salmon and peas without masking their natural tastes.
- 1 lemon Zesty and acidic, brightens and balances the dish by cutting through fat and adding fresh citrus notes; juice or cut into wedges to serve alongside. Squeeze over the finished plate to bring lift and harmony to the flavors.
Instructions
- Add the peas to boiling water and cook for 5 minutes.: As the peas hit the pot, you will hear a gentle return to the boil and see the water foam slightly, signaling active cooking. The smell is subtly vegetal and sweet, and after five minutes the peas will be tender but still hold shape. This short bath preserves their bright green color while softening them enough to be gently crushed later. If you overcook them, they will turn dull and become mushy, so set a timer and test one for tender bite.
- Drain and set aside.: Draining stops the cooking and preserves texture, and the steam rising will smell fresh and green. I often spread the peas on a plate to cool quickly, which keeps them from continuing to cook in residual heat. If you leave them in a colander over hot water, they may get soggy, so move them to a cool container or plate promptly.
- Chop the chorizo into small dice and place in a cold large heavy based fry pan.: Placing the diced chorizo sausage into a cool pan lets it warm gradually and render its fat evenly, reducing the chance of burning the edges before the center crisps. As it warms you will smell the deep paprika and spice aromas that define Spanish style chorizo sausage . Uniform dice ensures consistent crisping; uneven pieces will brown at different rates and can produce both burnt bits and underdone centers.
- Place the pan over a medium heat, stir occasionally and cook until it is crispy and has released its oils.: The pan will start to sizzle softly as the fat renders, and the chorizo sausage edges will darken and curl slightly, producing crunchy bits. That released oil becomes a flavor reservoir for the dish, so watch carefully and stir to promote even browning. A common misstep is cooking too hot, which can char the surface and leave the interior soft, so maintain medium heat for steady rendering.
- Remove the chorizo from the pan with a slotted spoon, leaving the oil behind.: Lifting the crisped chorizo sausage out with a slotted spoon preserves the flavorful oil in the pan while transferring the crunchy pieces to a bowl. The scent left in the pan will be deep and smoky, a great base for the rest of the dish. If you scrape and remove too much oil, you lose that seasoning power, while leaving burnt bits behind will make later steps bitter, so be selective when skimming.
- Season the salmon with salt and pepper.: Seasoning the surface of the salmon draws natural flavors forward and helps form a savory crust during searing. Use salt sparingly and a light dust of ground white pepper for a gentle peppery note. The skin side should be patted dry before seasoning, because moisture will create steam and prevent crisping. Over seasoning can mask the fish's natural flavor, so adjust carefully.
- Turn the heat up to high and cook the salmon skin side down for 2 minutes until the skin is crispy.: When the pan is hot you will hear a lively sizzle as the salmon hits the surface, and the skin will go from dull to glossy to deeply crisp within a couple of minutes. The aroma becomes savory and toasted, and you should see the edges change color as the flesh cooks through from the bottom. Press gently with a spatula to ensure full contact with the pan. If the pan is not hot enough, the skin will stick instead of crisping, so let the pan preheat properly.
- Flip the salmon and cook for a further 4 minutes.: After flipping, the flesh will release a fragrant, warm aroma and the surface will blister slightly. This second sear seals juices and brings the center to a tender, flaky finish. Cooking time can vary with thickness, so look for a translucent band near the top that shrinks toward the center as it finishes. Common mistakes are overcooking until the fish becomes dry, so test for flake with a fork near the end of the interval.
- Transfer salmon to a warmed plate, tent it with foil and set aside.: Resting the salmon under a loose tent lets carryover heat finish the internal cooking while keeping the fillet warm. The skin stays crisper when not stacked, and the juices settle evenly, resulting in moist flakes. Leaving it too long under foil may soften the skin from trapped steam, so serve within a short window after resting.
- Peel and finely chop the shallot, add it to the fry pan along with the olive oil and cook for 2 minutes until translucent.: The quick sauté of the minced shallot in the reserved chorizo sausage oil and the small amount of olive oil releases a sweet, aromatic fragrance and forms the fragrant backbone of the pea mixture. You will see the bits soften and turn glassy, and the smell becomes mellow and slightly sweet. Cook just until translucent so the shallot retains brightness, overcooking will produce a flat, caramelized tone that competes with the peas .
- Add the chorizo and peas to the pan and stir to heat through.: Returning the crisp chorizo sausage and the blanched peas to the pan blends their textures and flavors, and the heat coaxes the oils to coat the veg so every bite tastes unified. The peas will steam briefly and pick up the spicy notes in the pan, and the sizzle should be gentle rather than aggressive. Avoid vigorous stirring which can mash the peas , instead fold gently to warm through.
- Take a fork and lightly crush the peas with a fork.: Lightly crushing some of the peas creates a textured, saucy bed that clings to the salmon , with bursts of whole peas for contrast. The aroma will be sweet and savory combined, and the mouthfeel more interesting than leaving them whole. Overly mashing them creates a uniform paste, so aim for a rustic, slightly chunky finish.
- Serve the seared salmon on a bed of peas and garnish with a wedge of lemon.: The final plate is a marriage of textures, the crisped skin against the tender salmon flesh and the sweet peas studded with crunchy chorizo sausage . A squeeze of fresh lemon just before eating brightens the entire dish and cuts through the richness. Serve promptly so the contrasts remain distinct, as prolonged waiting softens the skin and blunts the fresh citrus lift.
Notes
- Make ahead the peas and chorizo — Prepare the peas and crisp the chorizo sausage earlier in the day and refrigerate them separately. When ready to serve, reheat gently in the pan to revive the oils and warmth. This saves active time and keeps the final assembly quick.
- Use room temperature salmon — Let the salmon sit at room temperature for 15 minutes before searing so it cooks more evenly. Cold fillets can seize the pan and cook unevenly, so this step improves texture.
- Finish with lemon at the table — Provide wedges of lemon so guests can add brightness themselves. A quick squeeze right before eating preserves acidity and freshness.
- Reserve chorizo oil — Always pour off and reserve the rendered chorizo sausage oil after crisping, this flavorful fat is the best medium for searing the salmon and cooking the shallot.
- Gently crush some peas — Only lightly crush a portion of the peas so you get both a saucy texture and whole bursts of sweetness, adding pleasant mouthfeel contrast.
- Use a heavy based pan — A thick bottomed frying pan distributes heat evenly, preventing hot spots that can burn the chorizo sausage or cause the salmon skin to stick. It also helps maintain steady medium to high heat for those critical searing moments.