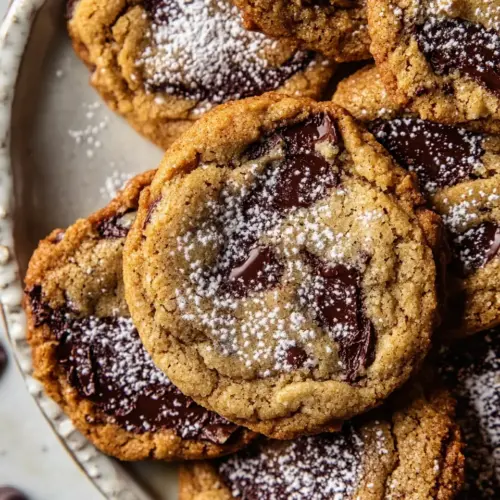
Salted Tahini Butter Chocolate Chip Cookies
Salted Tahini Butter Chocolate Chip Cookies combine creamy butter and toasted tahini with melty chocolate chips for a chewy, slightly crisp cookie that is both nutty and sweet. This easy, pantry friendly treat offers caramel notes from brown sugar and honey, with a final pop of flaky sea salt. A perfect bake for unexpected guests or an indulgent snack.
Equipment
- Mixing Bowl
- Baking Sheet
- Parchment Paper
- Mixer or wooden spoon
- Measuring Cups
- Spoon or scoop
Ingredients
- 1 stick (1/2 cup) salted butter, at room temperature Soften and cream to provide a rich, tender base that contributes fat and structure while promoting even spreading and a golden edge when baked.
- 1/4 cup dark or light brown sugar Add depth and molasses-like sweetness while helping retain moisture; use to balance the cookie's sweetness and contribute a slight chewiness to the crumb.
- 1/4 cup honey Incorporate for natural sweetness and sticky moisture that helps bind ingredients, adds a subtle floral note, and keeps the cookies soft.
- 1/3 cup tahini Stir in for a nutty, slightly bitter richness that replaces some butter flavor, adds a silky mouthfeel, and supports browning and overall flavor complexity.
- 1 large egg, at room temperature Whisk in to provide structure and lift; egg adds moisture, helps emulsify fats and dry ingredients, and creates a tender, cohesive crumb.
- 1 teaspoon vanilla extract Fold in to impart aromatic sweetness and enhance overall flavor; vanilla deepens perceived sweetness and rounds out the cookie profile.
- 1 cup almond flour (see note for alternative) Combine to add bulk and a tender, slightly grainy texture while providing a neutral nutty flavor; almond flour contributes protein and helps create a soft, gluten-free crumb.
- 1/3 cup coconut flour (or additional almond flour) Measure and blend as a highly absorbent flour that firms up the dough, adds structure, and helps prevent overly spread cookies; can be swapped for additional almond flour if needed.
- 3/4 teaspoon baking soda Mix in to react with acidic components and create lift; baking soda provides subtle leavening and helps cookies spread while contributing to browning.
- 1/4 teaspoon cinnamon (optional) Sprinkle optionally to add warm spice and aromatic complexity that complements the nutty tahini and chocolate flavors.
- 1/4 teaspoon kosher salt Stir in to maintain savory balance and enhance all flavors; kosher salt sharpens sweetness and elevates the overall taste of the cookies.
- 1 cup semi-sweet or dark chocolate chips, or chunks Fold in to provide pockets of rich chocolate in every bite; chips or chunks melt partially to create gooey texture and intense chocolate flavor.
- flaky sea salt, for sprinkling Finish with a light sprinkle to create bright, crunchy bursts of salinity that contrast the cookie's sweetness and amplify chocolate notes.
Instructions
- Preheat the oven to 350° F. Line a baking sheet with parchment paper. In a mixing bowl, beat together the butter, brown sugar, honey, and tahini until combined. Beat in the egg and vanilla, beating until creamy. Add the almond flour, coconut flour, baking soda, cinnamon (if using), and salt. Fold in the chocolate chips/chunks. Scoop the dough out into rounded 1 tablespoon size balls, the dough will be a little wet. Place 2 inches apart on the prepared baking sheet. Bake 5 minutes. Remove the pan from the oven and tap the baking sheet on the counter 2 times to flatten them down. The cookies will have brown edges at this point, that is OK. Return to the oven and bake another 2-3 minutes, the cookies will be browning, but still doughy in the center. Remove from the oven and gently tap the baking sheet on the counter 1-2 times to flatten them down again. Let the cookies cool on the baking sheet. They're going to look weird, but as they cool, they'll set nicely. They will continue to cook slightly as they sit on the baking sheet. Sprinkle with flaky salt. Eat warm (highly recommended) or let cool and store in an airtight container for up to 4 days.: As you preheat you will notice the kitchen beginning to warm and take on a faint toasty scent, which primes you for baking. This temperature promotes quick edge browning while allowing the center to remain slightly doughy, which is essential for the tender interior. A common mistake is not allowing the oven to fully reach temperature, leading to uneven spread and underbaked centers. If your oven runs hot or cold, an oven thermometer will help ensure accuracy.
- Line a baking sheet with parchment paper: Lining the sheet prevents sticking and encourages even base browning, while the parchment also makes cleanup effortless. You should feel a bit of resistance when pressing the paper down, no air bubbles under the dough. Avoid greasing the paper, which can make the bottoms brown too quickly and become greasy.
- In a mixing bowl, beat together the butter, brown sugar, honey, and tahini until combined: As you beat these together, you will notice the mixture become creamier and slightly glossy, with the sugar dissolving into the fats. The aroma will shift toward caramel and toasted sesame. Proper creaming helps incorporate air for a lighter bite, whereas undercreaming can produce dense cookies. Scrape the bowl sides to ensure even mixing and avoid pockets of tahini or sugar.
- Beat in the egg and vanilla, beating until creamy: Adding the room temperature egg and vanilla should yield a smooth, homogeneous batter with a slightly aerated texture. The mixture will thicken and become silkier, and you may see a ribbon form briefly when the beater is lifted. If the ingredients are cold, the batter may break or look curdled, so ensure room temperature for best emulsion.
- Add the almond flour, coconut flour, baking soda, cinnamon (if using), and salt: When you fold in the dry ingredients, the dough will tighten and become more manageable. You should see a shift from glossy wet batter to a cohesive dough that still feels a touch tacky. This step develops the structure; overmixing will activate too much texture change, leading to dense cookies, so stop once incorporated.
- Fold in the chocolate chips/chunks: Incorporating the chocolate chips by folding will distribute melty pockets throughout without breaking them down. You will hear gentle clinks as chips tumble through the dough and see dark flecks appear. Overworking at this stage can crush chunks and create streaks of melted chocolate, so fold just until mixed for best texture.
- Scoop the dough out into rounded 1 tablespoon size balls, the dough will be a little wet: The dough should feel slightly tacky and yield under gentle pressure without falling apart. Using a spoon or scoop ensures uniform size for even baking. If you make them too large they will need longer baking, and if too small they may dry out quickly, so aim for consistent tablespoon portions.
- Place 2 inches apart on the prepared baking sheet: Leave space so the cookies can spread without touching, which encourages even browning at the edges and attraction between cookie rims. As the tray fills the oven heat will circulate; overcrowding creates uneven bake and can produce a sheet of merged cookies. If your sheet is dark and absorbs heat, increase spacing slightly to avoid overbrowning.
- Bake 5 minutes: After five minutes you will notice the edges begin to color and the centers still appear soft. This short initial bake jumpstarts structure and browning while keeping interiors tender. A frequent error is baking the full time at once; this two stage bake prevents over crisping and preserves a chewy center. Keep an eye through the oven window to catch the first signs of browning.
- Remove the pan from the oven and tap the baking sheet on the counter 2 times to flatten them down: The tapping helps the cookies spread uniformly and creates a pleasing, slightly flattened profile. You may hear a soft thud and see the cookies relax into a wider shape, with browned edges intact, which is expected. Be careful not to press or poke them, which can deflate them too much and ruin texture.
- Return to the oven and bake another 2 to 3 minutes, the cookies will be browning, but still doughy in the center: This quick return finish allows the centers to set lightly while still remaining tender. The smell will intensify to caramel and toasted sesame with chocolate notes, and the tops may darken slightly. If you bake longer than suggested the cookies will lose that desirable soft center, so time it closely.
- Remove from the oven and gently tap the baking sheet on the counter 1 to 2 times to flatten them down again: Another gentle tap ensures a uniform final shape while they are still pliable. This step helps them set into that classic cookie silhouette. Avoid aggressive tapping that could crack or splinter the cookies.
- Let the cookies cool on the baking sheet: Cooling on the sheet allows residual heat to finish the bake without drying the centers, and the cookies will firm up as they rest. You will notice an initial wobble that transitions to a clean edge as they cool, indicating readiness. Moving them too soon can cause them to fall apart, while leaving them too long on a hot sheet can overcook the bottoms.
- They're going to look weird, but as they cool, they'll set nicely: Expect slightly irregular shapes right out of the oven, which will become charming and consistent once cooled. The texture will shift from glossy and soft to tender and set, and the aroma will mellow into a toasty chocolate note. Patience is rewarded here, so resist the urge to judge them while still warm.
- They will continue to cook slightly as they sit on the baking sheet: Carryover heat finishes the interior without further browning, so leave them undisturbed to achieve the perfect chew. This subtle residual cooking ensures a safe internal texture and consistent mouthfeel. If you remove them too soon to a hot surface they may overbake from retained heat.
- Sprinkle with flaky salt: Adding flaky sea salt while cookies are warm helps it adhere and creates small bursts of savory contrast. The salt makes the chocolate taste more vivid and complements the sesame notes. Avoid heavy hand with salt, a light sprinkle is enough to brighten the overall flavor.
- Eat warm (highly recommended) or let cool and store in an airtight container for up to 4 days: Warm cookies offer melty chocolate and a softer crumb, while cooled ones are easier to pack and transport. Store in an airtight container to keep them moist; adding a slice of bread can help maintain softness. Leaving them uncovered will dry them out quickly, so ensure proper storage.
Notes
- All purpose flour swap Use 1 1/3 cups all purpose flour in place of the almond and coconut flours for a thicker, more traditional cookie texture, noting the dough will handle differently and may require a slightly longer bake.
- Chocolate variety Substitute dark chocolate chunks for chips to create larger pockets of molten chocolate and more dramatic contrast against the tahini.
- No honey option Replace the honey with equal brown sugar if you prefer a simpler pantry sweetener, which will produce a slightly different chew and less floral note.
- Freeze dough balls Freeze scooped dough balls for up to 3 months and bake from frozen, adding a minute or two to the bake time for convenience and always-fresh cookies on demand.
- Adjust salt level Increase or decrease the flaky sea salt on top to tune the sweet savory balance; a light sprinkle brightens flavors while too much can overpower the tahini.