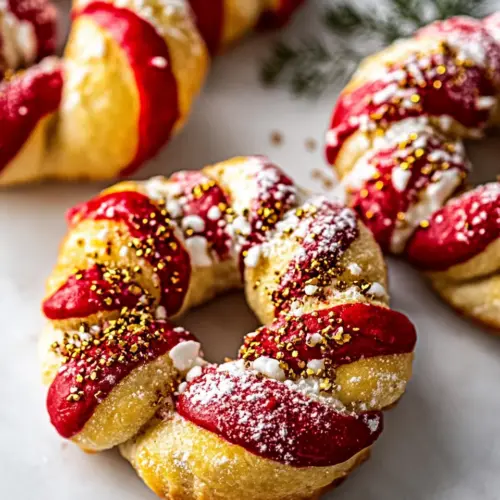
Salted Butter Candy Cane Bagels
Salted Butter Candy Cane Bagels are festive, chewy bagels with a subtle honeyed crumb and a savory browned butter finish. The candy cane twist adds a playful visual, while the salted butter and coarse salt create a craveable contrast. Perfect for holiday brunches or gifting, these bagels are a fun easy weekend bake that rewards patience with rich aroma and satisfying texture.
Equipment
- Stand mixer
- Dough Hook
- Large Pot
- Slotted Spoon
- Baking Sheets
- Parchment Paper
- Small skillet
Ingredients
- 2 cups warm water Provide warm liquid to activate yeast and create a pliable dough; temperature should be around 105–115°F to avoid killing yeast. Contribute hydration that affects gluten development and final bagel chewiness.
- 2 1/4 teaspoons active dry yeast (1 packet) Activate fermentation to leaven the dough and develop flavor; sprinkle into warm water and let proof until foamy. Add predictable rise and slight yeasty aroma essential for bagel structure.
- 2 tablespoons honey Sweeten and feed the yeast to encourage a steady fermentation; dissolve into the warm water for even distribution. Impart subtle sweetness that balances savory butter and salt notes.
- 5 1/2 cups all-purpose flour Build the bulk of the dough, supplying structure and gluten-forming proteins; sift or spoon into the measuring cup for accurate quantity. Determine final texture and density, critical for classic bagel chew.
- 1 teaspoon kosher salt Season the dough to enhance overall flavor and regulate yeast activity; dissolve thoroughly into the flour mixture. Provide a savory backbone that contrasts the candy cane theme and balances richness.
- 15 -20 drops red food coloring Introduce color for a festive striped appearance; add in small increments to control intensity and achieve desired red hue. Have no significant impact on flavor but are vital for visual appeal.
- 6 tablespoons salted butter Add richness and tenderize the crumb while contributing a buttery flavor; incorporate at room temperature so it blends evenly. Influence mouthfeel and help create a richer bagel variant.
- 1 large egg, beaten Create an egg wash to promote browning and shine on the bagel surface; whisk thoroughly and brush before or after boiling as directed. Also helps toppings adhere and gives a glossy finish.
- 1/4 cup baking soda for boiling Alkalize the boiling water to create a chewy, glossy crust typical of bagels; dissolve fully and bring water to a gentle boil before adding bagels. Enhance crust formation and contribute to that classic bagel bite.
- pretzel salt or flaky sea salt for sprinkling Provide a crunchy, salty finishing touch when sprinkled on top after boiling or egg wash; choose coarse pretzel or flaky sea salt for texture. Elevate savory contrast to the slightly sweet dough and decorative coloring.
- 6 tablespoons salted butter Add additional buttery richness for a compound butter or finishing spread; soften before mixing with garlic and herbs for easy incorporation. Reinforce savory flavor and create a spreadable topping for warm bagels.
- 2 -3 cloves garlic, finely chopped or grated Infuse pungent, aromatic savory notes when combined with butter; finely chop or grate to distribute evenly and prevent large raw pieces. Complement salt and thyme to make a flavorful garlic butter spread for serving.
- 1 tablespoon fresh thyme leaves Contribute bright, herbaceous flavor to the compound butter or dough; strip leaves and chop if necessary for even distribution. Balance richness and garlic with a fresh, slightly floral savory note ideal for finishing.
Instructions
- In the bowl of a stand mixer fitted with the dough hook, combine the water, yeast, and honey. Let sit 5-10 minutes, until bubbly on top. Add 5 cups flour, the salt, and 2 tablespoons of softened butter. Knead until the dough comes together, about 1-2 minutes, adding the additional 1/2 cup flour as needed. Divide the dough in half and place one half of the dough in a large bowl. Cover and set aside. Return the other half of the dough to the mixing bowl and add the red food coloring. Knead the dough until the red is mixed throughout and there are no streaks. Cover and let both dough balls sit in a warm place for 1-2 hours, until doubled in size. Preheat the oven to 425°. Line two baking sheets with parchment paper. Once the dough has doubled, punch it down and place it on your counter, using a little more flour if needed to prevent from sticking. Divide each dough into 16 pieces, about 1 ounce each if using a kitchen scale. Roll both the red and white dough into ropes, about 8 inches long. Take one white and one red rope and twist them around each other. Shape the twists into a candy cane and place on the prepared baking sheet. Repeat with the remaining ropes. Cover the baking sheets with a damp kitchen towel and let the bagels rise 15-30 minutes. Bring a large pot of water to a boil and add the baking soda. Lower 2-3 bagels at a time into the water. Boil for 3 minutes then flip to the other side and boil for 1-2 additional minutes. Using a slotted spoon, remove the bagels from the pot letting the water drain. Transfer to a parchment-lined baking sheet. Repeat until you've boiled all of the bagels. If needed, reshape the bagels back into candy canes. Brush each bagel with the beaten egg. Make sure there is no water piled up next to the bagels. Transfer to the oven and bake 10 minutes. Remove from the oven and brush the remaining 4 tablespoons melted butter over each of the bagels. Generously sprinkle each bagel with salt. Return to the oven for another 10-15 minutes, or until the bagels are golden brown. Slice, toast, eat whole, slathered with butter, cream cheese or garlic butter (below)! To make the garlic butter, heat the butter and the garlic in a small skillet over medium heat and cook the butter until it begins turn very light brown and the garlic is fragrant, about 2-3 minutes. Remove from the heat and add the thyme. Drizzle or dip the rolls with garlic butter. Enjoy warm!: Warm water should feel pleasantly warm to your wrist, not hot. When you mix in the yeast and honey , watch for tiny bubbles or a frothy surface within 5 to 10 minutes, which signals active fermentation. You may smell a faint yeasty, sweet scent as activity begins. This proofing step is essential because it confirms the yeast is alive; skipping it risks a dense dough. If foam does not form, replace the yeast and try again, as inactive yeast is the most common reason dough fails to rise.
- Let sit 5 to 10 minutes, until bubbly on top: You will notice the surface develop a gentle froth and a slightly yeasty aroma, which feels reassuring. This period gives the yeast its first feed from the honey , producing carbon dioxide for lift. Keep the bowl in a warm draft free spot to encourage activity. A common mistake is using water that is too hot, which kills the yeast and prevents bubbling, so always test the temperature beforehand.
- Add 5 cups flour, the salt, and 2 tablespoons of softened butter: When you add the initial flour, the mixture will transform from soupy to shaggy. Sprinkle in the salt away from the direct yeast contact to avoid stunting its activity. The softened butter enriches the dough and tenderizes the crumb, producing a silkier texture. Knead briefly until ingredients start to bind, watching for a dough that clears the bowl sides.
- Knead until the dough comes together, about 1 to 2 minutes, adding the additional 1/2 cup flour as needed: As you knead with the dough hook, listen for a soft thump and watch the dough gather into a smooth ball. It will feel slightly tacky but should not stick excessively to your fingers. The extra 1/2 cup of flour should be added gradually to reach elasticity. Overflouring can make the final bagels heavy, so stop adding at the first sign of a cohesive, supple dough.
- Divide the dough in half and place one half of the dough in a large bowl: The dough will feel pillowy and slightly springy when pressed. I like to dust the surface lightly with flour so it does not cling. Cover one half to rest while you work the other, preserving its moisture. A common misstep is letting dough dry out while shaping, which leads to cracked exteriors; keep a damp towel over the resting portions.
- Cover and set aside: Resting encourages gluten relaxation and allows flavor to develop. The dough should feel relaxed and easier to roll after resting. Keep it in a warm place to maintain consistent rising; cold environments slow fermentation, producing denser bagels. If you find the dough is not softening, give it a few extra minutes in a slightly warmer spot.
- Return the other half of the dough to the mixing bowl and add the red food coloring: Add the drops of red food coloring sparingly, then knead until the color is evenly distributed and there are no streaks. You will see the dough take on a bright hue and the surface become smooth. Too much coloring may slightly change the dough hydration and can stain hands, so protect surfaces and add the color gradually.
- Knead the dough until the red is mixed throughout and there are no streaks: This stage produces uniform color and a consistent chew. The dough will feel cohesive and uniform, and the visual cue of no streaks tells you the coloring is fully incorporated. If you see patches, continue folding and turning the dough until uniform to avoid uneven color bands in the final twists.
- Cover and let both dough balls sit in a warm place for 1 to 2 hours, until doubled in size: You should notice a significant increase in volume and a soft, airy feel when gently pressed. The interior should show gas pockets when you tear a piece. This doubling is critical for a light crumb. If the dough does not double, warm the environment slightly, as underproofing results in tight, gummy interior textures.
- Preheat the oven to 425 degrees: Preheating ensures immediate oven spring and proper crust formation. The oven should feel consistently hot when you open it briefly to check a rack. Baking into a properly heated oven helps set the crust quickly and promotes a chewy exterior. A too cool oven leads to pale, dense bagels.
- Line two baking sheets with parchment paper: Parchment prevents sticking and makes transfer from the boiling step seamless. When you transfer boiled bagels onto the sheets, the paper will hold up to moisture and the shine from the egg wash. Skipping parchment risks sticking and tearing the crust when you lift bagels.
- Once the dough has doubled, punch it down and place it on your counter, using a little more flour if needed to prevent from sticking: The dough deflates gently and releases a warm, wheaty aroma. Lightly pressing removes large gas pockets and makes shaping consistent. Too aggressive punching can eliminate all aeration, so deflate gently to maintain internal structure.
- Divide each dough into 16 pieces, about 1 ounce each if using a kitchen scale: Even portions ensure uniform baking and consistent texture. The pieces should feel soft and slightly tacky. If pieces are uneven, some bagels will bake faster than others, causing inconsistent color and chew, so weigh them or eyeball carefully for similar sizes.
- Roll both the red and white dough into ropes, about 8 inches long: Rolling creates even strands for twisting. You will feel the dough stretch and resist slightly as gluten aligns. Aim for consistent thickness so the twist holds shape. If ropes are too thin they may dry out in the rest period, so keep them covered while you work.
- Take one white and one red rope and twist them around each other: The twist should feel snug but not tight, preserving air in the ropes. Visually, you will see the candy cane pattern form. If twisted too tightly, the bagel may not rise evenly and shape can distort during boiling, so keep a relaxed turn.
- Shape the twists into a candy cane and place on the prepared baking sheet: Form a gentle curve to mimic a candy cane and press the ends lightly so they hold. The shape will relax during the second rise and after boiling, so make the hook pronounced enough to remain noticeable. If the ends separate, moisten slightly to adhere before the rise.
- Repeat with the remaining ropes: Continue pairing and shaping, keeping finished pieces covered to prevent drying. The surface should remain smooth and slightly glossy under the towel. Avoid crowding the sheets so bagels have room to rise and maintain their shape in the next stage.
- Cover the baking sheets with a damp kitchen towel and let the bagels rise 15 to 30 minutes: During this brief rise, you will see the dough puff slightly and air pockets become more defined. The towel prevents a skin from forming. Underestimating this step can produce bagels that are tight and lacking in oven spring, so allow adequate time for that final bloom.
- Bring a large pot of water to a boil and add the baking soda: The boiling water should be at a vigorous bubble before adding bagels. The baking soda changes the surface chemistry, encouraging deep golden color and chew. You will notice a faint alkaline scent when the baking soda dissolves. Be careful when adding baking soda as it can foam, so keep a close watch to avoid boil overs.
- Lower 2 to 3 bagels at a time into the water: The water should gently cradle the bagels and you may hear a soft plop as they enter. Boil in small batches to maintain consistent temperature. Overcrowding cools the water and yields uneven texture, so keep the batches modest.
- Boil for 3 minutes then flip to the other side and boil for 1 to 2 additional minutes: You will see the bagels puff and the surface become slightly tacky and shiny. This timing gives a balanced chew and promotes deep color during baking. Flipping ensures even cooking on both sides. A common issue is underboiling which results in pale, soft crusts, so adhere to the timing.
- Using a slotted spoon, remove the bagels from the pot letting the water drain: The slotted spoon will drain excess water, and the bagels should hold their shape. Transfer to parchment quickly so they do not absorb too much moisture. Leaving bagels in water too long will make them sodden and heavy.
- Transfer to a parchment-lined baking sheet: Place each drained bagel spaced comfortably apart. The parchment protects the bottoms and makes cleanup easy. If any bagel loses its shape, gently reshape it while still warm; once cooled, reshaping becomes difficult.
- Repeat until you've boiled all of the bagels: Keep the process rhythmic, and monitor the boiling water temperature between batches to maintain consistent results. If the water cools too much, raise the heat back to a steady boil for uniform texture across the batch.
- If needed, reshape the bagels back into candy canes: After boiling some shapes relax, so gently reform the hook to preserve the candy cane silhouette. This is easiest when the dough is still warm. Avoid aggressive reshaping that deflates the structure.
- Brush each bagel with the beaten egg: The surface will take on a glossy sheen and will brown attractively in the oven. Use a light hand to avoid pooling egg around the base. If excess egg pools, it can burn and create bitter spots, so brush evenly and lightly.
- Make sure there is no water piled up next to the bagels: Excess water can prevent browning and create soggy spots. Dab any puddles gently with a paper towel before baking to ensure even color. Baking with water nearby can compromise crust development.
- Transfer to the oven and bake 10 minutes: During this initial bake, you will smell a toasty, warm aroma as crust sets. The surface will start to firm and develop color. This stage helps establish structure before final finishing; underbaking can lead to pale, chewy results.
- Remove from the oven and brush the remaining 4 tablespoons melted butter over each of the bagels: The warm butter soaks into the crust and adds richness and a glossy finish. The aroma will deepen instantly with nutty, buttery notes. Work carefully so the butter is evenly distributed and does not pool in crevices.
- Generously sprinkle each bagel with salt: The coarse salt adds a bright counterpoint to the rich butter . Press lightly so the salt adheres. Over-salting can overwhelm the palate, so use a generous but balanced hand.
- Return to the oven for another 10 to 15 minutes, or until the bagels are golden brown: Watch for a deep, even golden color and a firm crust. The smell will be rich and toasty, and the bagels should sound hollow when tapped lightly on the bottom. Leaving them beyond this point risks overbrowning and a drier interior.
- Slice, toast, eat whole, slathered with butter, cream cheese or garlic butter below: Fresh out of the oven the crumb will be warm and slightly tender. Toasting brings out more caramelization and crisp edges. If planning to store, cool completely before sealing to avoid condensation that makes crusts limp.
- To make the garlic butter, heat the butter and the garlic in a small skillet over medium heat and cook the butter until it begins turn very light brown and the garlic is fragrant, about 2 to 3 minutes: The butter will foam and then settle, releasing a nutty aroma as it browns. The garlic will become fragrant and golden, but watch closely to avoid burning which creates bitterness. Remove promptly when you see a light amber hue.
- Remove from the heat and add the thyme: The residual heat will bloom the thyme and preserve its bright herbal notes. Stir briefly and let the flavors meld for a minute before serving. If you add thyme too early, it can lose its fresh aroma.
- Drizzle or dip the rolls with garlic butter: The warm butter will cling to the crust, adding moisture and savory complexity. The fragrant combination of browned butter , garlic , and thyme elevates each bite into a more layered experience. Serve warm for the best flavor impact.
- Enjoy warm: The final product should be glossy, golden, and aromatic, with a satisfying chew and savory finish from the butter and salt . Share with friends or savor slowly with a cup of coffee or tea.
Notes
- Use instant yeast if needed I sometimes swap instant yeast by mixing it directly into the flour and proceeding without a separate proofing step. This speeds things up, but keep an eye on rise times since they can be shorter.
- Adjust food coloring sparingly Add the red food coloring a few drops at a time to reach the desired hue. Excessive coloring can stain hands and slightly affect dough hydration, so err on the lighter side for a natural look.
- Brown the butter for depth Browning the finishing butter adds nutty complexity that lifts the bagel, just watch closely to avoid burning the garlic which turns bitter quickly.
- Weigh portions for uniformity Using a kitchen scale to portion each dough piece to about 1 ounce ensures consistent baking and a uniform final size across the batch.
- Freeze fully cooled bagels To preserve texture, cool bagels completely before sealing in freezer bags. Toast from frozen to revive a crisp exterior and warm interior.