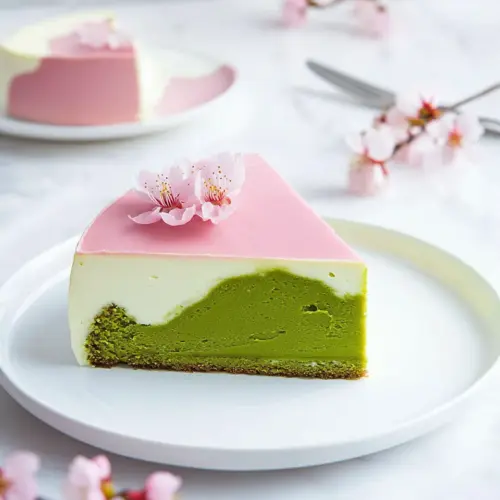
Sakura Matcha Mousse Cake
Sakura Matcha Mousse Cake is a creamy and airy dessert combining earthy matcha and floral sakura with a tender sponge and silky mascarpone mousse. This elegant springtime cake is both visually striking and light to eat, perfect for an easy special occasion or an indulgent afternoon tea. Try it for a showstopping, yet approachable dessert that will delight guests and make any gathering feel memorable.
Equipment
- Mixing Bowls
- Electric Mixer
- 8-by-8-inch baking pan
- Parchment Paper
- Cake ring or 6 inch round cutter
- Acetate
- Wire Rack
- Rubber spatula
Ingredients
- 2 large eggs, separated Separate eggs and use yolks for richness and whites for aeration; beaten yolks lend structure while whipped whites create a light sponge or mousse base when folded gently.
- 3 tablespoons granulated sugar Sweeten both the sponge and mousse with granulated sugar; dissolve sugar into mixtures to stabilize whipped egg whites and balance matcha bitterness in the final cake.
- 1 tablespoon vegetable oil Add moisture and a neutral fat with vegetable oil; incorporate into batter to keep the sponge tender without interfering with delicate flavors.
- 2 teaspoons matcha powder Provide concentrated green tea flavor and color with matcha powder; sift and mix into batter or mousse to ensure even distribution and a vibrant, aromatic profile.
- 1 teaspoon sakura leaf powder Impart a subtle floral, salty-sweet sakura aroma using sakura leaf powder; blend into batters or creams to introduce traditional cherry blossom notes that complement matcha.
- 3 tablespoons whole milk Contribute liquid and mild dairy flavor with whole milk; use in the sponge or mousse to create a smooth consistency and help dissolve dry ingredients.
- 3/8 cup (1.5 oz / 40 grams) cake flour, sifted Supply structure and a tender crumb with sifted cake flour; its lower protein content ensures a soft, fine-textured sponge when gently mixed.
- 1/4 teaspoon fine sea salt Enhance flavor and strengthen whipped proteins with fine sea salt; a small amount heightens sweetness and balances the overall taste profile.
- 2 1/2 sheets gelatin (substitute 1 packet powdered gelatin) Set the mousse by hydrating and melting gelatin sheets or powdered equivalent; bloom gelatin then dissolve to stabilize and give the mousse a sliceable yet creamy firmness.
- 1/4 cup whole milk Add additional dairy and adjust mousse consistency with whole milk; warm milk can be used to dissolve gelatin and temper other ingredients for a smooth texture.
- 1/2 cup mascarpone cheese, at room temperature Introduce rich creaminess and slight tang with mascarpone cheese at room temperature; fold into whipped cream or custard to provide body and luxurious mouthfeel.
- 1/3 cup granulated sugar Provide sweetness and assist in stabilizing the mascarpone mixture with granulated sugar; dissolve into cheese or cream to balance tartness and control texture.
- 3/4 cup heavy whipping cream Whip heavy cream to soft peaks to create lightness and volume; folding whipped cream into mascarpone and gelatin mixtures produces an airy, mousse-like texture.
- 1 teaspoon vanilla extract Contribute warm aromatic depth with vanilla extract; add to creams or sponges to subtly enhance and round out the overall flavor profile.
- 2 -3 tablespoons strained cherry purée (you can also use food coloring if you prefer) Introduce a concentrated cherry flavor and pale pink color with strained cherry purée or food coloring; swirl into layers or use as a thin glaze to evoke sakura tones and fruitiness.
Instructions
- Preheat oven to 350 degrees F. Lightly oil an 8-by-8-inch square baking pan; line with parchment paper (leaving a parchment overhang on two of the edges) and lightly oil parchment.: You should notice the oven air warming and the pan feeling slightly slick when oiled, which prevents sticking and helps the cake release. Lining with parchment provides clean edges and the overhang becomes handles to lift the cake, reducing stress on a fragile sponge. If the parchment shifts during pouring the batter, press it into corners before filling. A common mistake is skipping the oil on parchment which can cause the cake to tear when removed.
- Whisk egg yolks with half of granulated sugar until smooth and barely lightened in color. While whisking, slowly drizzle in oil until evenly incorporated.: The yolk mixture will become glossy and slightly thickened, smelling rich and eggy but not sweet. Incorporating vegetable oil slowly helps the emulsion form, ensuring the batter stays tender. If you add oil too quickly it may separate, leaving greasy pockets and affecting crumb; whisk steadily and scrape the bowl sides to keep everything cohesive.
- Combine matcha and sakura powders in a small bowl. Drizzle in about 1 tablespoon milk and whisk to dissolve powder. Slowly add more milk, slowly whisking until smooth. Add to egg yolk mixture and mix until smooth. Sift over cake flour and salt and fold until completely incorporated.: The powders should bloom into a fragrant paste with bright green flecks and a faint floral perfume, and whisking them into milk prevents gritty lumps. Once mixed into the yolks the batter will take on a pale green hue with a delicate sakura scent. Sifting the cake flour over the batter lightens it and prevents clumps, and folding gently preserves air. Overfolding here will knock out the aeration and yield a dense sponge.
- In a mixing bowl, whip egg whites using an electric mixer until frothy. Add remaining granulated sugar and continue to beat until whites hold very soft peaks.: You will hear a steady whir and see glossy clouds form; at first the whites look foamy, then they tighten as sugar dissolves into them. The glossy sheen indicates the sugar has integrated, and very soft peaks should bend slightly at the tip. Underwhipped whites will not give volume, while overwhipped whites look dry and granular and will not fold in smoothly, so stop at the right moment.
- Spoon about 1/3 of whipped egg whites into batter and stir to lighten. Add batter to bowl with the remaining egg whites and fold until incorporated, scraping the bottom and sides of the bowl with a large rubber spatula to ensure there are no stray streaks of egg white.: The initial addition eases the full incorporation and prevents deflating the rest of the whites. You will see the batter loosen and lighten in texture, becoming airy and ribboning off the spatula. Folding with a spatula should be patient and deliberate, using wide strokes and a turning motion; rushing will burst the air bubbles. A common issue is leaving streaks of white which creates uneven baking, so check all around the bowl.
- Pour batter into prepared baking pan, spreading into an even layer. Drop the pan a few times a few inches from the counter to get rid of any large air bubbles and to level out the top.: As you spread the batter it should be smooth and slightly glossy, and the gentle thump of dropping the pan forces large air pockets to the surface where they escape. This simple action helps avoid big holes in the sponge and ensures even rise. Be careful not to slam the pan as that can splatter batter or deflate too much air.
- Bake for 13 to 15 minutes or until a toothpick inserted near the center comes out clean. Remove from oven, then use the parchment overhang as handles to lift the entire cake out of the baking pan and place on a wire rack. Peel back parchment from edges and let cool completely.: In the oven you will notice a subtle aroma and a pale golden edge; the center should spring back lightly when pressed. The toothpick test verifies doneness without overbaking which dries the sponge. Using the parchment overhang preserves the cake surface when transferring, and cooling on a rack prevents sweating. Cutting too soon traps steam and softens the crumb, so cool fully for best results.
- Cut out a 6-inch round of cake to fit your cake ring (you can also use the cake ring basically as a giant cookie cutter). With cake nestled inside cake ring, line the inside of the ring with acetate. If your cake ring is at least 3″ tall you can technically skip the acetate, although it does make removing the cake much easier.: The trimmed round should have even edges and a springy texture. Acetate creates a smooth release and pristine sides for the mousse; without it you risk smudged edges or tearing. If your ring is tall and snug you can omit acetate but warm the ring slightly later to help release. Using a dull knife or pressing too hard while cutting can compress the sponge, so use a gentle sawing motion.
- To make the mousse layer, cut gelatin into strips and place in cool water to soften. If using powdered gelatin, sprinkle over 1 tablespoon cool water and allow to bloom.: You will see the gelatin absorb water and soften or bloom into a gelatinous mound when powdered. Proper softening ensures it dissolves cleanly into warm milk without clumps. If gelatin is not fully softened it will form lumps in the mousse, so give it the recommended time in cool water.
- Heat milk in the microwave until steaming. Grab the softened gelatin with your hands and wring out any excess water. Add to hot milk and whisk until completely dissolved. For powdered gelatin, add bloomed gelatin to hot milk and whisk until melted.: The steam rising from the milk signals the right temperature; it should be hot but not boiling so it dissolves gelatin without cooking the dairy. Whisking creates a glossy, clear mixture free of gel flakes. If gelatin is not fully melted you may detect small jelly bits in the mousse, so whisk thoroughly and check for clarity.
- Place room temperature mascarpone in a mixing bowl. Add warm milk-gelatin mixture and sugar and whisk until smooth and no chunks are visible and sugar is dissolved. Mix in vanilla.: At this stage the bowl will feel slightly warm and the mascarpone cheese will combine into a silky, glossy cream with no lumps. The sugar should dissolve fully into the warm liquid, leaving a smooth base. If mascarpone is too cold you risk small curdled bits, so ensure it is at room temperature before mixing.
- In a mixing bowl, whip cream with an electric mixer until the top shows texture, but it doesn’t yet hold soft peaks. Add about 1/3 of whipped cream to mascarpone mixture and stir to lighten, then add back to bowl with remaining whipped cream. Just like you did for the cake, fold to fully incorporate the whipped cream, scraping the bottom and sides of bowl as needed.: The whipped heavy whipping cream should feel cool and billowy with soft ridges. Adding a portion first lightens the dense mascarpone base so it accepts the rest without deflating. Folding should be gentle and thorough, preserving air while eliminating streaks. Overmixing will flatten the mousse and make it dense, so stop once homogenous and airy.
- Transfer half of the whipped cream mixture to another bowl, and mix in cherry purée or food coloring as desired.: The pink mixture will take on a gentle rose hue and a fruity scent if using pur e9e, while food coloring provides color without flavor. Taste and adjust sweetness if using pur e9e, as fruit can vary. If the pur e9e is too watery, the mousse may become loose, so strain thoroughly before folding in.
- To achieve the striped effect, scoop about 1/3 cup (I used two large cookie scoops worth) of white mousse onto the center of the cake in the cake ring. Then drop 1/3 cup of the pink mousse into the center of the white batter. Repeat, dropping scoops of alternating colored batters onto the center of the previous scoop, essentially making a bullseye of concentric circles. After 4 or 5 scoops, reduce the quantity of batter per scoop to about 3 tablespoons or half of a third cup, one large cookie scoop (the stripes towards the center of the cake require less batter per stripe).: You will see concentric rings build up like a layered painting, and the mousse should spread gently as each scoop lands, creating clean stripes. Reducing scoop size toward the center helps maintain proportion and keeps the bullseye tidy. Pressing or smoothing at this stage can blur the stripes, so resist that urge; if layers shift, refrigerate briefly to firm before continuing.
- Refrigerate cake until set, at least 3 hours or overnight.: As it chills the mousse firms, gelatin tightening the texture so slices hold shape; the aroma will be cool and creamy rather than warm. Overnight chilling yields the best clean cuts and fully settled flavors. A common pitfall is slicing too soon when the mousse is still soft, which leads to collapsed layers.
- Prior to serving, place cake on a serving plate and remove cake ring and acetate (if you skip the acetate, it might help to warm the outside of the cake ring with a hair dryer to help release the mousse). Slice using a hot knife for perfect, clean slices. Keep refrigerated for up to 3 days.: When you remove the ring the sides should be smooth and the stripes distinct; use a warm knife for each cut to glide through the mousse without tearing. Warming the ring slightly loosens the set mousse for easier release. Do not leave the cake at room temperature for extended periods, as the mousse will soften and lose definition.
Notes
- Room temperature dairy Always bring mascarpone cheese and eggs to room temperature before mixing to avoid lumps and ensure smooth incorporation into the mousse.
- Bloom gelatin properly If using powdered gelatin, sprinkle it over cold water and let it sit until it forms a jelly like blob; this ensures it dissolves completely when added to warm milk.
- Choose quality matcha Higher grade matcha will taste brighter and less bitter; adjust quantity to suit the intensity of your powder to avoid overpowering the sakura note.
- Control sweetness Taste the mascarpone mixture before folding with whipped cream and adjust sugar slightly if your cherry pur�e9e adds extra sweetness.
- Use gel food coloring If you prefer color over cherry pur�e9e, gel coloring gives vivid shades without thinning the mousse and without altering flavor.
- Warm the knife between slices Run a thin, hot knife under warm water and dry it before each cut to achieve spotless slices through the mousse.
- Store covered Keep the cake refrigerated in an airtight container or under a cake dome to preserve moisture and prevent flavors from absorbing from the fridge.