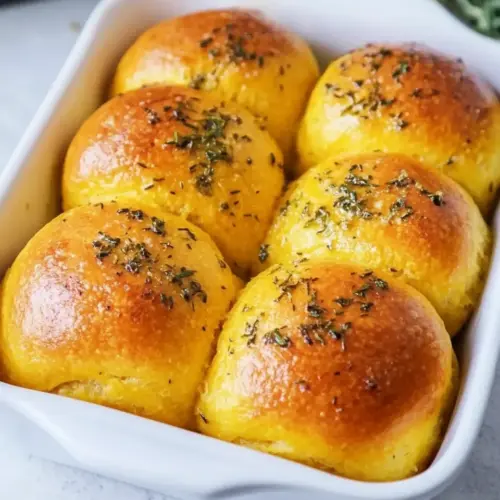
Rosemary Pumpkin Rolls
Rosemary Pumpkin Rolls are soft, slightly sweet, and herb forward, combining creamy pumpkin and fragrant rosemary in an easy weekend bake. These rolls produce a tender crumb and golden crust, making them perfect for an easy weeknight side or a cozy holiday table. Make them to enjoy warm, aromatic bread that impresses without fuss.
Equipment
- 9 inch cake pan
Ingredients
- 1 tablespoon instant yeast Activate yeast quickly by dissolving in warm liquid to leaven the dough and create airy rolls; use instant yeast for faster rise and reliable fermentation. Monitor temperature carefully so the yeast blooms without killing it, ensuring good texture and volume in the final rolls.
- 1/4 cup warm milk Provide gentle warmth and moisture to hydrate dry ingredients and help dissolve sugar and yeast; warm milk contributes richness and tenderness to the dough. Use milk at a comfortably warm temperature to encourage yeast activity without overheating.
- 1 large egg Enrich dough with protein and fat to improve structure, color, and moisture, helping create a tender crumb and golden crust. Beat the egg before adding so it distributes evenly and aids in binding the ingredients together for consistent rolls.
- 3/4 cup pumpkin puree Contribute moisture, subtle sweetness, and dense texture while adding pumpkin flavor and color; pumpkin puree also tenderizes the dough and keeps rolls soft. Measure puree accurately to maintain dough consistency and balance with flour to avoid excess wetness.
- 1 tablespoon vegetable oil Add fat to the dough to increase tenderness, improve crumb softness, and aid in richness and pliability when rolling; vegetable oil keeps rolls moist without altering flavor strongly. Mix oil uniformly to ensure even distribution throughout the dough.
- 3 -1/4 cup all purpose flour Provide bulk, structure, and gluten-forming proteins that give the rolls their chew and shape; all purpose flour balances strength and tenderness for enriched doughs. Spoon and level the flour when measuring to avoid packing and adjust slightly if dough feels too sticky.
- 1/4 cup packed brown sugar Contribute sweetness and depth of flavor while promoting browning on the crust; packed brown sugar brings molasses notes that complement pumpkin and rosemary. Dissolve sugar properly into the wet ingredients to ensure even sweetness and yeast food availability.
- 1 -1/4 teaspoon kosher salt Season dough to enhance and balance flavors while controlling fermentation; kosher salt strengthens gluten and highlights the sweetness of pumpkin and brown sugar. Distribute salt evenly and keep it away from direct contact with yeast when mixing to avoid inhibiting rise.
- 1 tablespoon minced fresh rosemary Infuse bright, aromatic herbal notes and a savory contrast to sweet pumpkin, adding complexity and a distinctive piney fragrance to the rolls. Mince rosemary finely so it disperses through the dough and releases flavor without large, chewy pieces.
Instructions
- Place all of the ingredients into a large mixing bowl or the bowl of an electric mixer.: As you combine the ingredients, you will notice the flour dust cloud settle and the pumpkin streak through the dry mix, creating a patchwork of color. The initial texture will feel shaggy, with dry pockets of flour and glossy wet patches where milk and oil meet. This step matters because even distribution sets the stage for an even rise, and missing a dry pocket can mean uneven hydration. Watch for any clumps of brown sugar, and break them up with your fingers. A common mistake is adding all the flour at once when a portion should be reserved for adjusting the final dough consistency.
- If kneading by hand mix together the ingredients and knead by hand until a smooth soft dough is achieved. If using an electric mixer, fit it with the dough hook and knead until a smooth soft dough is achieved. I used an electric mixer with a dough hook and this took about 10 minutes.: The scent will shift as you knead, the pumpkin scent mellowing and the rosemary brightening. With your hands, you will feel the dough transform from shaggy to elastic, and it will become less sticky as the gluten develops. With a mixer, you will hear a steady low hum and the dough will climb the hook slightly when ready. This development creates the structure that traps gas and yields a tender crumb. Avoid under kneading which produces a dense crumb, and over kneading which can make the rolls tough and dry. If the dough clings excessively, lightly dust your work surface; if it feels tight, let it rest for five minutes before resuming.
- Light grease a large mixing bowl and add the dough.: When you oil the bowl, you will notice a sheen that prevents sticking, and the dough will slide comfortably as it expands. This helps the dough rise upwards rather than sticking to the sides, ensuring a uniform shape. Light greasing also eases removal later. A common slip is using too much flour to prevent sticking, which dries the dough surface and impedes proper rising.
- Cover and let rise until doubled, about 60-75 minutes.: During the rise the dough softens and expands, and the room will fill with a faint yeasty aroma. The surface should feel pillowy and spring back slowly when pressed. This phase matters because it creates the gas pockets that make the rolls tender. If rising too fast, your dough can overproof and collapse later; too slow, and it will remain dense. Aim for a warm, draft free spot to keep the temperature steady. If your kitchen is cool, expect the longer end of the time range.
- Lightly oil your work surface.: The oiled surface will prevent sticking while you shape, and the dough will glide instead of tearing. As you press the dough out later, you will appreciate the suppleness that oil affords. This small step reduces frustration and preserves the dough s surface tension which helps rolls hold their shape. A frequent mistake is skipping this and then overworking the dough to remove tears, which can tighten the crumb.
- Gently deflate your dough and turn it out on the oiled work surface.: Deflating is tactile, you will feel the dough relax and small gas pockets collapse, leaving a soft, slightly tacky surface. Turning it out will let you see if the dough is evenly hydrated and whether it requires a touch more flour to handle. This handling controls the final crumb structure by redistributing gas pockets. Be careful not to overwork, which can remove too much air and make the rolls dense.
- Shape the dough into 12-16 equally sized rolls.: As you portion and shape, the dough should feel pillowy and slightly tacky, forming smooth rounds that hold surface tension. This tension encourages a tight crumb and rounded top as they bake. Use a bench scraper or a sharp knife for clean cuts, and slightly tuck the edges under to create a smooth surface. A common error is making uneven sizes, which results in inconsistent baking times; measure or eyeball carefully to keep sizes uniform.
- Lightly grease 2 8-inch cake pans or 1 9×13 dish.: Greasing the pans will help achieve a golden bottom and simplify removal. When pans are prepared, the rolls will sit evenly and brown uniformly. If you place rolls too close together they may fuse into one another while rising. Too much oil in the pan can cause excessive browning on the bottom, so use only a light coating.
- Add rolls to the prepared pans. I was able to fit 8 large rolls in 1 8-inch cake pan.: Laying rolls in the pan, you will notice their soft surfaces press slightly against each other, promising pull apart ease once baked. They should be snug but not compressed, allowing room to expand. This arrangement impacts final crumb and crust so leave small gaps for expansion. Avoid overfilling the pan which will cause uneven baking and potential spillover.
- Cover the pans and let the rolls rise until almost doubled, about 45 minutes.: During this second rise the rolls will puff, smoothing into soft domes. The aroma will become rounder and more developed. This rest allows internal gases to redistribute, creating an even crumb. If you skip this, the rolls will be tight and dense after baking. Keep them covered to prevent a dry skin from forming, which interferes with proper oven spring.
- Toward the end of the rising time preheat the oven to 350 degrees F.: As the oven warms, the rolls will be ready to transform. A hot oven encourages immediate oven spring and proper crust development. You want the oven to be stable at 350 degrees F when the rolls go in, so preheating toward the end of the rise ensures a consistent bake. Avoid opening the oven repeatedly during preheat which can cause temperature fluctuations.
- Bake the bread for 20 minutes, or until its crust is a deep golden brown, and a digital thermometer inserted into the center registers about 190°F.: Baking will fill the kitchen with toasty notes of browned flour and herbal rosemary . Look for an even deep golden color and a hollow sound when tapped on the bottom. The thermometer check ensures the interior has set properly; underbaked rolls will be gummy and collapsed. A common oversight is relying only on color, which can mislead if oven hotspots exist, so use an internal temperature check when possible.
- If desired, brush rolls with melted butter and a sprinkle of kosher salt.: Brushing with melted butter gives a glossy sheen and a soft, rich finish, while a light sprinkle of kosher salt heightens flavor contrast. The butter will melt into the crust, releasing aroma and sealing moisture. Don t overdo the salt which can overpower the delicate pumpkin note; a light touch is best.
- Remove the rolls from the oven, and turn them out onto a rack to cool. Store completely cool bread at room temperature for up to 5 days.: When you transfer the rolls to a rack, the steam will escape and the crust will set, keeping the interior tender. Cooling on a rack prevents a soggy bottom by allowing air circulation. Store completely cooled rolls in an airtight container to maintain softness. Putting warm rolls away can trap steam and make them limp, so wait until fully cool before storing.
Notes
- Check yeast freshness: If your yeast is old the dough will struggle to rise, so perform a quick proof test in warm milk if you are unsure.
- Adjust flour gradually: Humidity affects how much flour the dough needs, so add in small increments to avoid a dry, tough result.
- Control rise environment: A warm, draft free spot yields reliable rising times; I often use the oven with just the light on as a makeshift proofing box.
- Even rolling makes uniform baking: When shaping the rolls, try to keep pieces similar in size so they bake at the same rate and finish together.
- Use a thermometer: An instant read thermometer removes guesswork, ensuring the interior reaches 190 degrees F without overbaking.