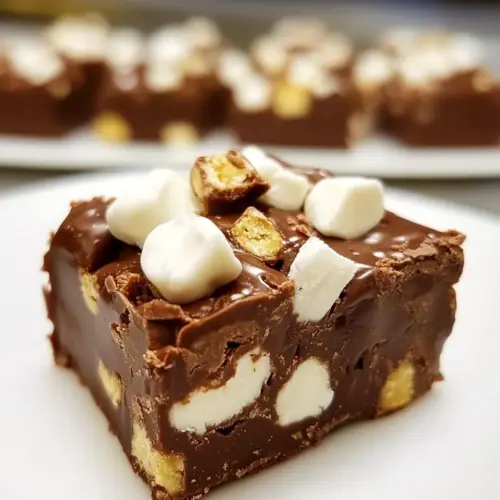
Rocky Road Fudge
Rocky Road Fudge is a creamy, rich chocolate treat studded with crunchy almonds and pillowy marshmallows. This easy, nostalgic dessert comes together quickly and makes a perfect crowd pleasing sweet for holidays and gatherings. The contrast of smooth chocolate and chewy pockets keeps everyone coming back for another square, making it worth making for your next celebration.
Equipment
- 9×13-inch pan
- Medium Saucepan
Ingredients
- 2 3/4 cups sugar Sweeten and create the candy base by dissolving granulated sugar into the heated mixture, providing structure and texture to the fudge. Caramelization potential adds depth of flavor and contributes to the final firmness when cooked to the correct temperature. Measure precisely to ensure proper sugar-to-liquid ratio for successful crystallization control.
- 6 tablespoons butter Add richness and smooth mouthfeel by melting butter into the hot sugar mixture, contributing fat that rounds flavors and improves texture. Encourage a glossy finish and prevent graininess by incorporating fully melted butter at the right stage. Use salted or unsalted according to taste preference, but adjust if using salted.
- 1 (5-ounce) can evaporated milk Contribute concentrated dairy solids and creaminess while extending cooking temperature range with evaporated milk, aiding in a smooth, stable fudge consistency. Provide slight caramel notes from the milk’s heating process and help dissolve sugar evenly. Use the canned product undiluted for accurate moisture and fat content.
- 2 cups semi-sweet chocolate chips Provide intense chocolate flavor and body while melting into a silky matrix that binds the fudge components together. Contain cocoa butter that helps set the fudge when cooled and offers a rich, bittersweet counterpoint to the sweet elements. Add gradually off-heat to ensure even melting and a lump-free mixture.
- 1 (7-ounce) jar marshmallow creme Introduce light, sticky sweetness and a cloud-like texture that disperses throughout the fudge, creating traditional rocky road chewiness. Impart a unique sweet, vanilla-forward flavor and help suspend mix-ins for an even distribution. Fold in gently to avoid deflating its airy character.
- 1 teaspoon vanilla extract Enhance and brighten flavors with a concentrated vanilla note, balancing sweetness and rounding chocolate tones. Provide aromatic lift that makes the fudge taste more complex and bakery-like. Add near the end of cooking to preserve its volatile flavor compounds.
- 1 cup chopped almonds Contribute crunchy contrast and nutty depth, adding pleasant texture and savory balance to the sweet, creamy fudge. Provide toasted aromas and oils that complement chocolate while helping break up the richness for a more interesting bite. Chop uniformly so pieces distribute evenly throughout the final confection.
- 2 cups miniature marshmallows, frozen Create pillowy, chewy pockets and the classic rocky road appearance, contributing light sweetness and a soft contrast to the dense fudge. Freeze briefly to retain a firmer shape if desired, then fold in at the end to avoid melting. Use miniature size for even dispersal and bite-sized texture throughout.
Instructions
- Line a 9 X 13-inch pan with aluminum foil.: The aroma of warm chocolate and sugar will fill your kitchen later, but right now you want a prepared pan so you can move quickly. Lining the pan with foil helps you lift the fudge out cleanly when it is set, and it makes slicing much easier. A common misstep is not pressing the foil into the corners well, which can cause gaps where the fudge can seep underneath, making removal messy.
- In a medium pan, heat sugar, butter, and evaporated milk over medium-high heat. Bring to a boil and cook for 4 minutes, stirring continuously.: As these ingredients warm, you will see the butter melt and the sugar dissolve into the evaporated milk , forming a uniform liquid. Stir continuously with a wooden spoon to prevent scorching, and listen for the quiet bubbling that signals the mixture is approaching a boil. If you stop stirring, the sugar can stick to the pan and burn, leaving dark flecks in your fudge, so maintain steady, even strokes.
- Remove pan from heat and stir in chocolate chips and marshmallow creme until melted.: While the mixture comes to a full boil, the texture will shift from watery to syrupy, and the scent will become deeply sweet with caramel notes. Timing matters here because the boiling period concentrates the sugar and sets the foundation for the final fudge texture. Overcooking will lead to a harder, overly brittle fudge, while undercooking may result in a gooey set that does not hold shape.
- Stir in vanilla and almonds.: Once off the heat, the residual warmth will melt the chocolate chips and the marshmallow creme without scorching them, producing a glossy, homogeneous mixture. Stir gently until you see ribbon like streaks dissolve and the surface becomes smooth and shiny. If you try to force melting on too high a flame, the chocolate may seize and grainy bits will form, so let the heat of the syrup do the work.
- Quickly stir in 1 cup of frozen marshmallows and pour into prepared pan. Stir as little as possible so marshmallows do not melt.: Adding the vanilla now preserves its fragrance, and the chopped almonds distribute a crunchy contrast throughout the mixture. You will notice the batter thicken slightly and take on a nut speckled appearance. Mix until the pieces are evenly dispersed, and be mindful not to overwork the mixture, as excessive stirring can warm it too much and soften the frozen marshmallows prematurely.
- Sprinkle remaining marshmallows on top. Cool completely before cutting.: The first cup of frozen miniature marshmallows will create pockets of chewiness inside the fudge, and because they are frozen they hold their shape better. After adding them, work briskly to pour the mixture into the foil lined pan so the marshmallows do not fully melt. The sound will be a thick, gloppy pour, and visually you should see the frozen pieces suspended in the glossy chocolate. A frequent error is lingering too long while stirring, which lets the marshmallows dissolve into the batter and lose texture.
- Stir as little as possible so marshmallows do not melt: With the batter in the pan, resist the urge to swirl or level excessively, because movement can cause the frozen marshmallows to soften and disappear. Instead, gently tilt the pan to settle the mixture evenly. The surface should look slightly uneven with visible marshmallow and nut pieces. Over handling can lead to a uniform, denser fudge without the signature pockets of marshmallow that make this treat special.
- Sprinkle remaining marshmallows on top: The final scattering of miniature marshmallows creates an inviting, textured top layer that gives a playful appearance and additional chew in every square. Press them very lightly into the surface so they adhere without sinking. If you press too hard, they will become embedded and lose their visual appeal, so a gentle touch is best.
- Cool completely before cutting: Allow the pan to sit at room temperature until the fudge is fully set, which preserves the dense yet tender texture; refrigeration can speed this but may dull the flavor slightly. When you cut into it, the sound should be a clean glide through a firm, but not brittle, slab. Cutting too soon will result in misshapen pieces and sticky knife residue, so patience at this stage rewards you with neat, satisfying squares.
Notes
- Freeze the marshmallows, as noted in the original notes, to keep them distinct when folded into the warm chocolate. This preserves the chewiness and creates those fun pockets that make each bite interesting.
- Use high quality semi sweet chocolate for a cleaner chocolate flavor and smoother melt, which impacts the final mouthfeel and overall taste of the fudge.
- Toast the almonds lightly before chopping to boost their aroma and add a deeper, nutty contrast that pairs beautifully with the chocolate.
- Stir continuously while boiling to prevent the sugar from sticking to the pan and burning, which can introduce bitter notes into the fudge.
- Add vanilla off heat so its fragrance remains bright, enhancing the chocolate without being cooked away by residual heat.